Featured image of post 【合集】各种问题解决方案

【合集】各种问题解决方案

icons图标

https://tablericons.com/

https://fontawesome.com/

配色表

http://www.peiseka.cn/

配置Docker国内镜像源

解决“error pulling image configuration: download failed after attempts=6: dial tcp 59.188.250.54

步骤1:配置国内镜像源,控制台执行

 1
 2
 3
 4
 5
 6
 7
 8
 9
10
11
12
13
14
15
16
17
18
19
20
21
22
23
24
25
26
27
28
29
30
31
32
33
34
35
sudo mkdir -p /etc/docker
sudo tee /etc/docker/daemon.json <<-'EOF'
{
    "registry-mirrors": [
        "https://mirror.ccs.tencentyun.com",
        "https://docker.mirrors.ustc.edu.cn",
        "https://registry.docker-cn.com",
        "http://hub-mirror.c.163.com",
        "https://docker.m.daocloud.io",
        "https://dockerproxy.com",
        "https://cr.console.aliyun.com",
        "https://docker.nju.edu.cn",
        "https://ustc-edu-cn.mirror.aliyuncs.com/",
        "https://ccr.ccs.tencentyun.com/",
        "https://docker.registry.cyou",
        "https://docker-cf.registry.cyou",
        "https://docker.jsdelivr.fyi",
        "https://dockercf.jsdelivr.fyi",
        "https://dockertest.jsdelivr.fyi",
        "https://dockerpull.com",
        "https://dockerproxy.cn",
        "https://hub.uuuadc.top",
        "https://docker.1panel.live",
        "https://hub.rat.dev",
        "https://docker.anyhub.us.kg",
        "https://docker.chenby.cn",
        "https://dockerhub.jobcher.com",
        "https://dockerhub.icu",
        "https://docker.ckyl.me",
        "https://docker.awsl9527.cn",
        "https://docker.hpcloud.cloud",
        "https://atomhub.openatom.cn"
    ]
}
EOF

步骤2:重启docker服务

1
2
sudo systemctl daemon-reload
sudo systemctl restart docker

步骤3:查看docker重启后,容器是否没有自动重启

1
docker ps -a

步骤4:如果没有自动重启,启动,例如

1
docker start halo-halodb-1 

随机图片api

http://www.98qy.com/sjbz/api.php

https://imgapi.xl0408.top/index.php

Windows端口被占用

查询端口占用情况:

1
netstat -ano |findstr 8090

img_172.png

根据PID删除:

1
taskkill /F /PID 44460

img_173.png

MacOS/Linux端口被占用

查询端口占用情况:

1
2
3
4
5
sudo ss -tulnp | grep 8090


sudo lsof -i :8901

img_174.png

根据PID删除:

1
sudo kill 23558

谷歌浏览器禁用缓存

  1. 使用快捷键清除缓存

Ctrl+Shift+Delete:这个快捷键组合可以打开清除浏览数据的界面,用户可以选择清除缓存数据。但这种方法需要每次需要调试时都进行清理,可能较为繁琐。

  1. 强制刷新页面不使用缓存

Ctrl+Shift+R(Windows)/ Command+Shift+R(Mac):这个快捷键组合可以强制浏览器重新加载当前页面,而不使用缓存中的数据。这在需要实时查看更新后的页面时非常有用。

  1. 利用插件禁用缓存

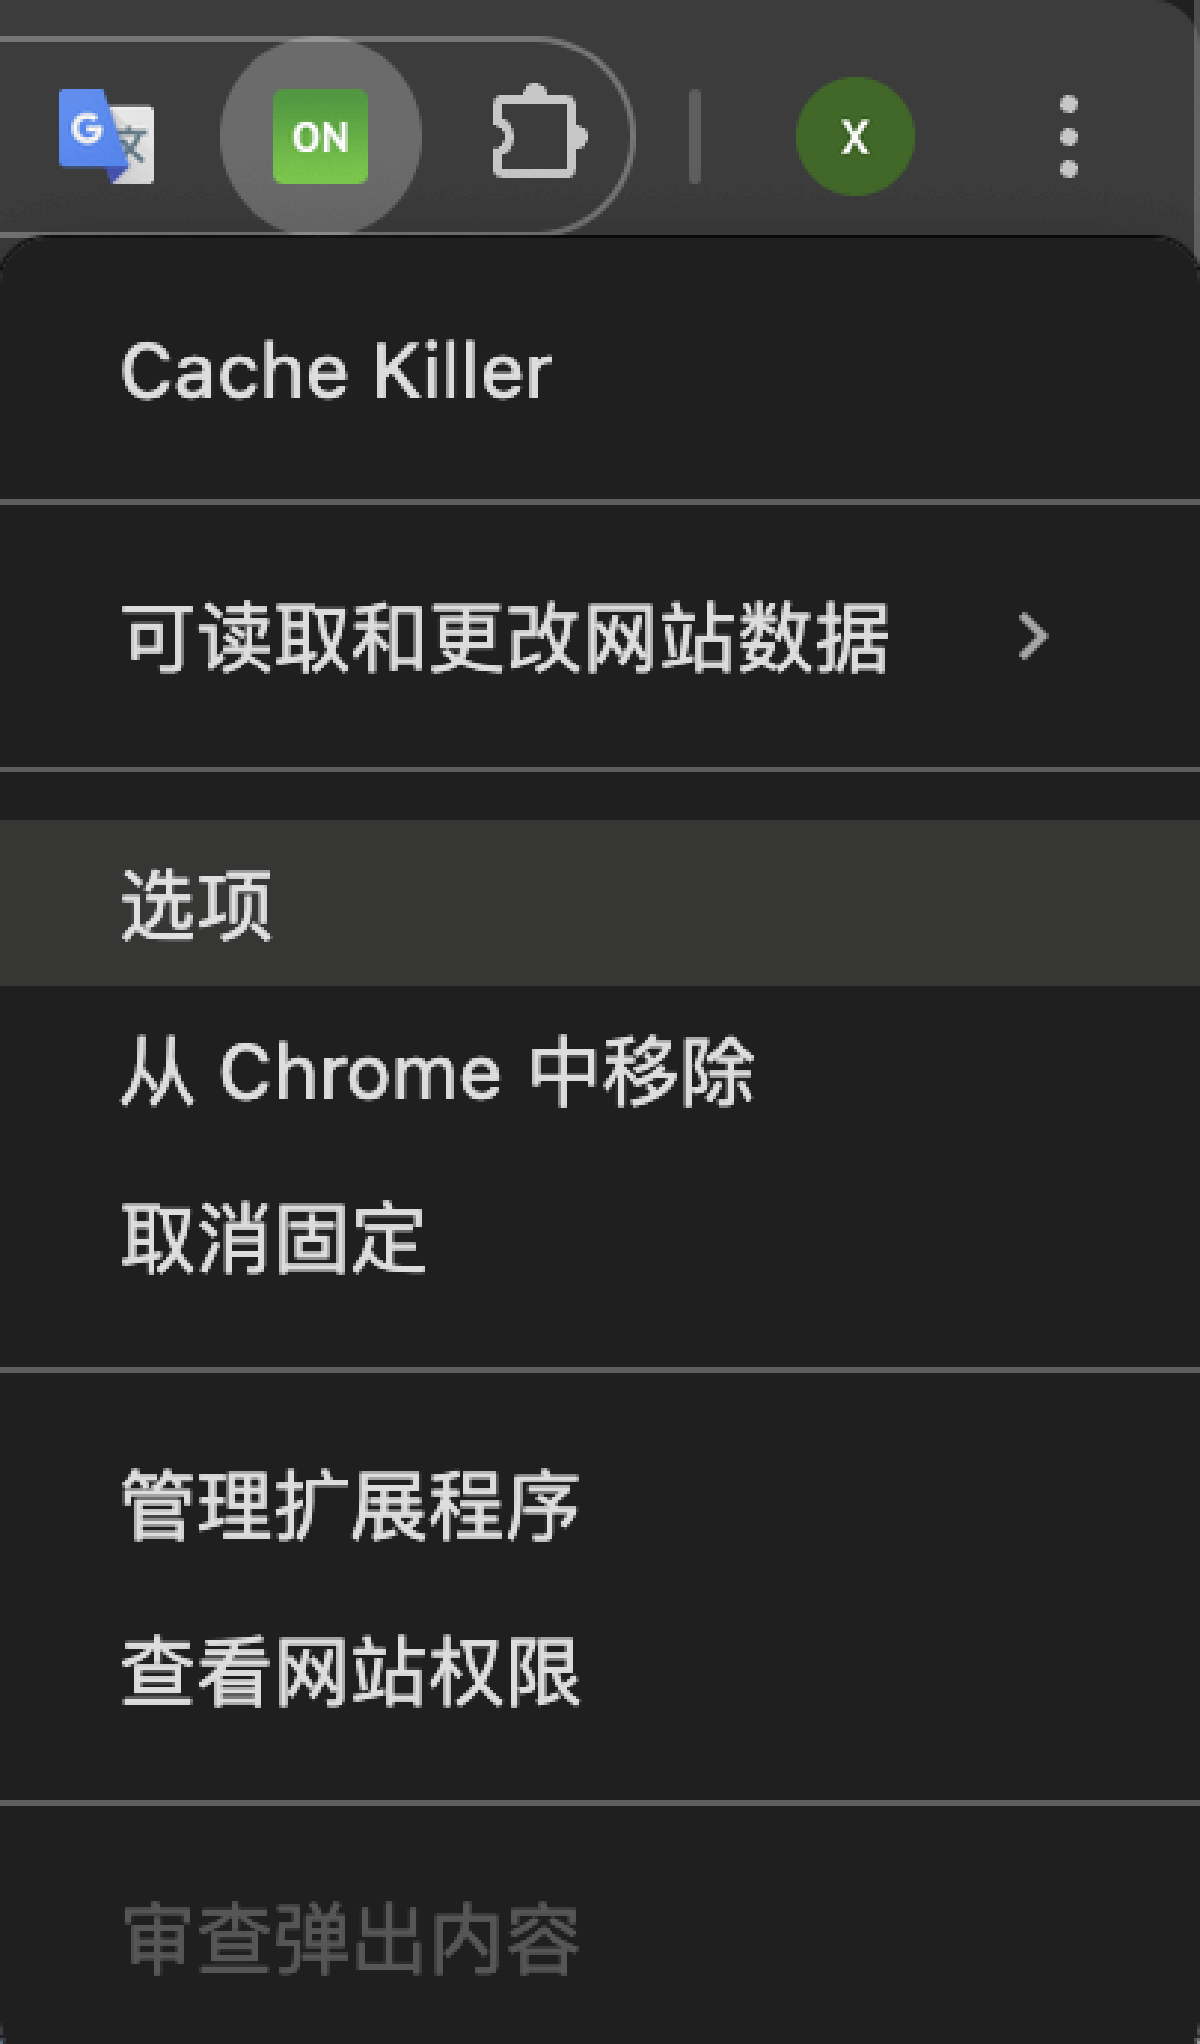
Classic Cache Killer:这是一个非常实用的插件,可以在每次加载页面时自动清除缓存。用户可以在Chrome应用商店中搜索并安装该插件。安装后,插件将在后台自动工作,无需用户手动操作。
img_171.png

  1. 通过开发者工具禁用缓存

这是较为推荐的方法,因为它可以在开发或调试过程中持续禁用缓存,而无需每次都进行手动操作。

  • 打开Chrome浏览器,在需要调试的页面右击,选择“检查”(Inspect)或按下F12键进入开发者模式。

  • 在开发者工具中,选择“Network”选项卡。

  • 在“Network”选项卡中,通常可以直接看到一个“Disable cache”(禁用缓存)的复选框,勾选它即可。但请注意,不同版本的Chrome浏览器界面可能略有不同,如果找不到这个复选框,可以尝试以下步骤:

    • 点击开发者工具右上角的齿轮图标(设置)。
    • 在设置中找到“Network”相关设置,通常会有一个“Disable cache”的选项,勾选它。
    • 关闭设置面板,但保持开发者工具打开状态,这样缓存就会被禁用。
  1. 通过浏览器设置禁用缓存(不推荐)

虽然Chrome浏览器没有直接通过常规设置来禁用缓存的选项,但上述通过开发者工具的方法已经足够灵活和强大,可以满足大多数开发者和调试者的需求。因此,不推荐通过修改浏览器核心设置来禁用缓存,因为这可能会影响到浏览器的正常功能和性能。

MacOS配置指令别名

检查电脑是bash还是shell

1
2
zhangxin@MacBook-Air ~ % echo $0
-zsh

如果是-bash 则 vim !/.bashrc

设置别名 我这里是shell,用:

vim ~/.zshrc

以下就是你的所有自定义指令集了,按格式(alias 别名=‘具体指令’)增加你自己的指令

 1
 2
 3
 4
 5
 6
 7
 8
 9
10
11
12
13
14
export M2_HOME=/Users/zxalive.com/apache-maven-3.8.6
export PATH=$PATH:$M2_HOME/bin

alias hs='hexo clean && hexo g && hexo s'
alias hd='hexo clean && hexo g && hexo d'
alias hds='hexo clean && hexo g && hexo d && hexo s'
alias hdd='hexo clean && hexo g && hexo d && git add . && git commit -m "update" && git push -f origin master'
alias hdds='hexo clean && hexo g && hexo d && git add . && git commit -m "update" && git push -f origin master && hexo s'
alias git-log='git log --all --pretty=oneline --abbrev-commit --graph'
alias gap='git add . && git commit -m "update" && git push -f origin master'
alias gapm='git add . && git commit -m "update" && git push -f'

fpath=(~/.zsh/completion $fpath)
autoload -Uz compinit && compinit -u

刷新即可

source ~/.zshrc

使用谷歌插件将网站前端源码(js+css+html)强行下载

插件下载地址:https://wws.lanzoub.com/i0Yso09kzhcj

halo-theme-earth主题删除页脚文字Powered by

/theme-earth/templates/modules/footer.html 中搜索Powered by

共有2处,删除我选中的代码

img_160.png

img_161.png

docker restart 容器名 重启halo,等待1分钟即可。

img_162.png

怎么清除MacBook-Safari浏览器的缓存和网站数据

方法一:通过Safari偏好设置

直接清除缓存:在偏好设置窗口中,点击“高级”选项卡,然后勾选“在菜单栏中显示‘开发’菜单”。之后,从菜单栏中选择“开发”>“清空缓存”来清除Safari浏览器的缓存。

通过隐私设置管理网站数据:同样在偏好设置窗口中,点击“隐私”选项卡,然后选择“管理网站数据…”。在这里,你可以看到所有存储了数据的网站列表,可以选择性地删除某些网站的数据,或者点击左下角的“全部移除”来清除所有网站的数据。

方法二:使用快捷键

Command + Option + E

解决nested exception is com.fasterxml.jackson.databind.exc.InvalidDefinitionException

报错信息1

1
2
3
4
5
Type definition error: [simple type, class com.gctl.brp.controller.MobileController$AddAppUserDTO]; 
nested exception is com.fasterxml.jackson.databind.exc.InvalidDefinitionException: 
Cannot construct instance of com.gctl.brp.controller.MobileController$AddAppUserDTO: 
non-static inner classes like this can only by instantiated using default, 
no-argument constructor\n at [Source: (org.springframework.util.StreamUtils$NonClosingInputStream); line: 1, column: 2]

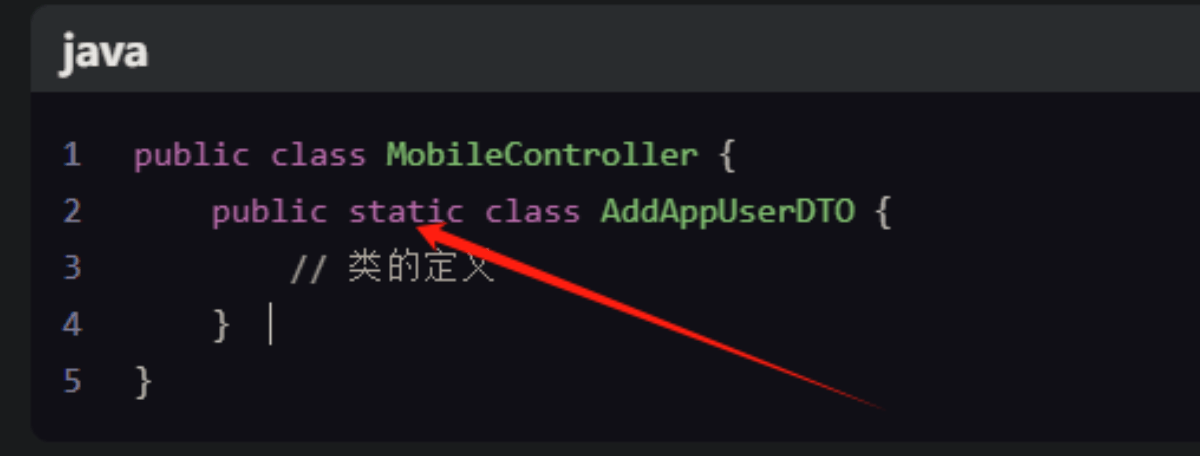
解决:内部类改为静态

img_158.png

报错信息2

1
2
3
4
Type definition error: [simple type, class com.gctl.brp.controller.MobileController$AddAppUserDTO]; 
nested exception is com.fasterxml.jackson.databind.exc.InvalidDefinitionException: 
Cannot construct instance of com.gctl.brp.controller.MobileController$AddAppUserDTO (no Creators, like default constructor, exist): 
cannot deserialize from Object value (no delegate- or property-based Creator)\n at [Source: (org.springframework.util.StreamUtils$NonClosingInputStream); line: 1, column: 2]

解决:加3个注解

img_159.png

Markdown(md)文件中插入HTML的链接

1
[Hexo博客-新手10分钟快速搭建](https://zxalive.com/archives/hexo-deploy)
1
<a href="https://www.baidu.com" target="_blank" title="百度搜索">访问百度</a>

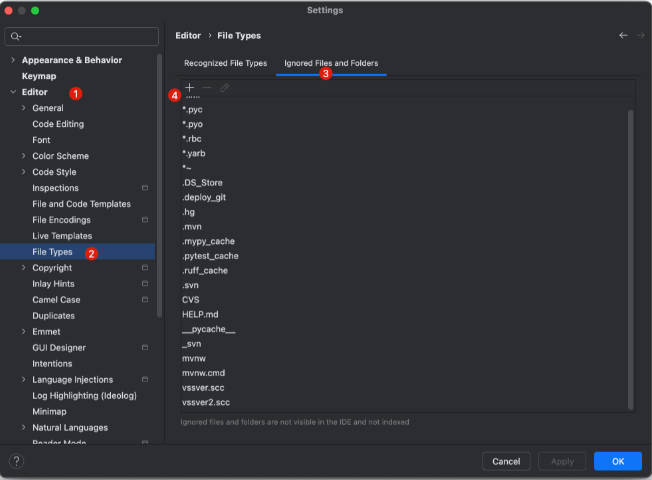
IntelliJ IDEA 项目中如何隐藏和显示.idea文件夹

windows快捷键:Ctrl + Alt + s

mac快捷键:command+,

+号添加忽视文件
img_149.png

IntelliJ IDEA中gradle怎么打包

  1. 在命令行中执行:

打开命令行工具,导航到你的项目根目录。

执行gradle jar命令(或你自定义的打包任务名称)。

Gradle会编译项目并生成JAR包,通常位于build/libs目录下。

  1. 在IDEA中直接执行:

在IDEA中,你可以直接点击build.gradle文件中的jar任务旁边的绿色三角按钮来启动打包任务。

或者在右侧的Gradle面板中,找到你的项目,展开Tasks -> build,然后双击jar任务来执行。

IntelliJ IDEA 终端配置环境变量

Path=C:\Users\xzhang10\IdeaProjects\blog-hugo\hugo_extended_0.134.0_windows-amd64

img_232.png

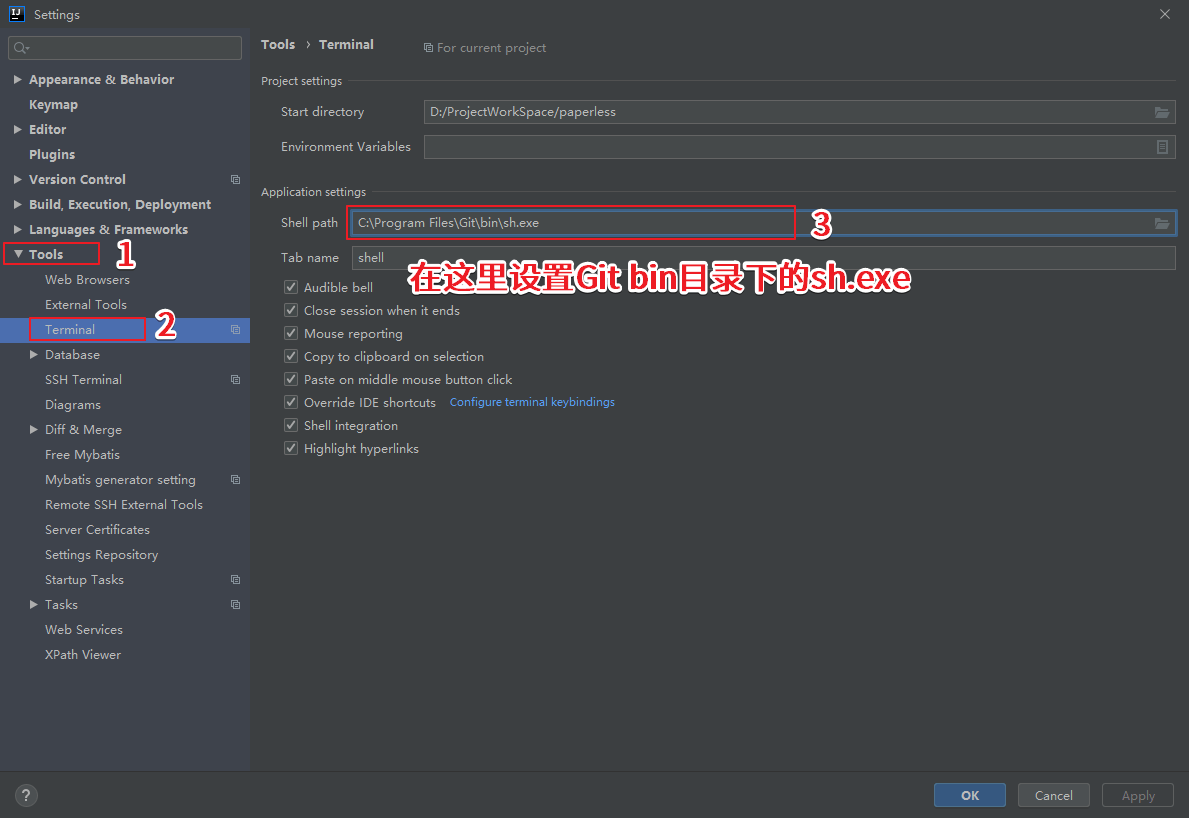
IntelliJ IDEA 终端选择Git Bash

img_27.png

C:\Users\xzhang10\AppData\Local\Programs\Git\git-bash.exe

通常如果不改变 Git 的安装目录,它会在 C:\Program Files 或者 C:\Program Files (x86) 目录,如果改变了就去自己安装 Git 的目录去找,最后把 Terminal 的 Shell path设置为其 bin 目录下的 sh.exe 就行了。

idea 终端 配置环境变量

img_28.png

皖ICP备2024056275号-1
发表了78篇文章 · 总计148.99k字
本站已稳定运行