欢迎加QQ群一起成长:291557205
Windows安装Hugo
下载解压Hugo扩展版
配置环境变量:C:\Users\xzhang10\IdeaProjects\blog-hugo\hugo_extended_0.135.0_windows-amd64
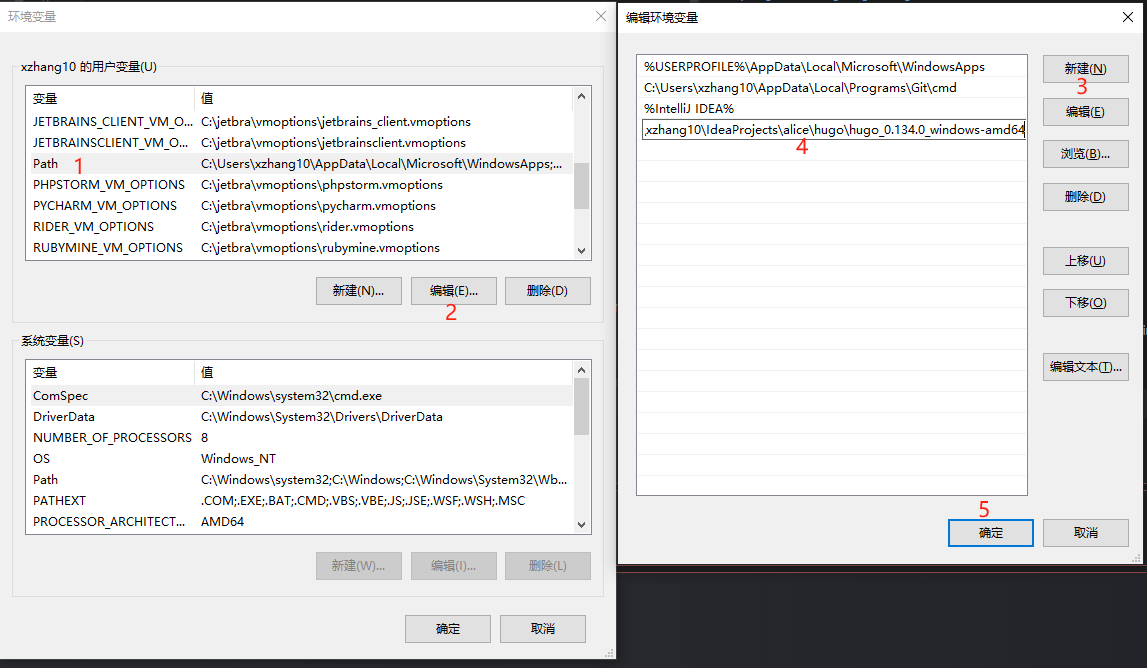
如果用idea,可以这么配置
Path=C:\Users\xzhang10\IdeaProjects\blog-hugo\hugo_extended_0.135.0_windows-amd64
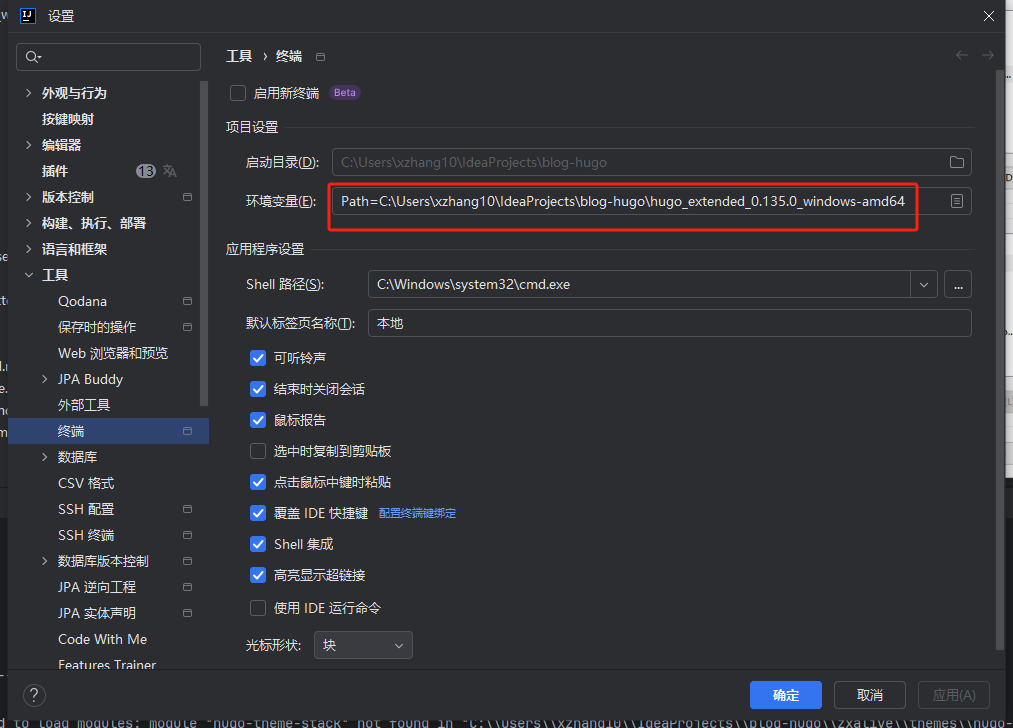
查看是否安装成功:hugo version
MacOS安装Hugo
安装:brew install hugo
查看是否安装成功:hugo version
常用命令
 1
 2
 3
 4
 5
 6
 7
 8
 9
10
11
12
13
14
15
16
17
18
19
20
21
22
23
24
25
26
27
28
29
30
31
32
33
34
|
# 指令查询
hugo help

# 启动服务 指令查询
hugo server --help

# 启动
hugo server

# 包含草稿内容启动
hugo server -D

# 构建静态文件
hugo
# 构建静态文件 包含草稿文章
hugo -D
# 构建静态文件 包含过期文章
hugo -E
# 构建静态文件 包含未来文章
hugo -F

# 构建并启动
hugo server
# 构建并启动 包含草稿文章
hugo server -D

# 编辑内容时,如果您希望浏览器自动重定向到您上次修改的页面,请运行:
hugo server --navigateToChanged

# 创建新文章
hugo new content content/post/my-first-post.md

# 清理mod
hugo mod clean
|
新建站点,并使用stack主题
1
2
3
4
5
6
7
8
9
|
# 新建站点
hugo new site zxalive

# 进入站点
cd zxalive

# 下载stack主题
# stack主题文档:https://stack.jimmycai.com/guide/getting-started
git submodule add https://github.com/CaiJimmy/hugo-theme-stack/ themes/hugo-theme-stack
|
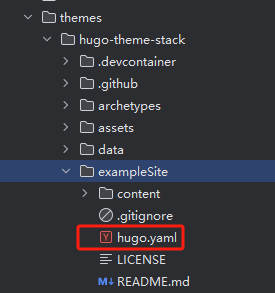
删除站点下原hugo.toml,然后将主题下示例站点的hugo.toml文件复制到博客主程序目录下
1
2
3
4
5
|
# 新建文章
hugo new content content/post/my-first-post.md

# 包含草稿内容启动
hugo server -D
|
访问:http://localhost:1313/
Stack主题配置及优化
文档地址
https://stack-docs.netlify.app/zh/getting-started
https://stack.jimmycai.com/guide/getting-started
简码
https://stack.jimmycai.com/writing/shortcodes#shortcodes
如 https://www.bilibili.com/video/BV1By411H7cb/?t=13&spm_id_from=333.1007.tianma.1-2-2.click&vd_source=c57311942d38847adc4597a126bba185
这样写:
1
|
{{< bilibili BV1By411H7cb >}}
|
效果:
ico获取
https://fontawesome.com/
https://tablericons.com/
Stroke调至0.5px, 单击图标复制,在assets/icons下新建"图标名.svg",内容粘贴到其中即可。
主页分类左颜色边框和右统计数字
复制 themes\hugo-theme-stack\layouts\partials\widget\categories.html 到 layouts\partials\widget\categories.html
然后修改见下面
 1
 2
 3
 4
 5
 6
 7
 8
 9
10
11
12
13
14
15
16
17
18
|
{{- $context := .Context -}}
{{- $limit := default 10 .Params.limit -}}
<section class="widget tagCloud">
    <div class="widget-icon">
        {{ partial "helper/icon" "categories" }}
    </div>
    <h2 class="widget-title section-title">{{ T "widget.categoriesCloud.title" }}</h2>

    <!-- 自定义修改:分类左颜色边框和右统计数字 -->
    <div class="tagCloud-tags">
        {{ range first $limit $context.Site.Taxonomies.categories.ByCount }}
            <a href="{{ .Page.RelPermalink }}" class="font_size_{{ .Count }}"
               style="border-left: 6px solid {{ .Page.Params.style.background }}; filter:saturate(1.7);">
                {{ .Page.Title }}<span class="category-count">{{ .Count }}</span>
            </a>
        {{ end }}
    </div>
</section>
|
assets\scss\custom.scss中添加(没有文件则自己新建一个)
1
2
3
4
|
/* 自定义新增:分类统计颜色 */
.category-count {
  color: var(--body-text-color);
}
|
主页标签右统计数字
复制 themes\hugo-theme-stack\layouts\partials\widget\tag-cloud.html 到 layouts\partials\widget\tag-cloud.html
然后修改见下面
 1
 2
 3
 4
 5
 6
 7
 8
 9
10
11
12
13
14
15
16
17
|
{{- $context := .Context -}}
{{- $limit := default 10 .Params.limit -}}
<section class="widget tagCloud">
    <div class="widget-icon">
        {{ partial "helper/icon" "tag" }}
    </div>
    <h2 class="widget-title section-title">{{ T "widget.tagCloud.title" }}</h2>

    <!-- 自定义修改:标签右统计数字 -->
    <div class="tagCloud-tags">
        {{ range first $limit $context.Site.Taxonomies.tags.ByCount }}
            <a href="{{ .Page.RelPermalink }}" class="font_size_{{ .Count }}">
                {{ .Page.Title }} <span class="tagCloud-count">{{ .Count }}</span>
            </a>
        {{ end }}
    </div>
</section>
|
assets\scss\custom.scss中添加(没有文件则自己新建一个)
1
2
3
4
|
/* 自定义新增:标签云统计颜色 */
.tagCloud-count {
  color: var(--body-text-color);
}
|
友链页:友链说明放下面
复制 themes\hugo-theme-stack\layouts\partials\article\components\links.html 到 layouts\partials\article\components\links.html
然后在</div>下面添加
 1
 2
 3
 4
 5
 6
 7
 8
 9
10
11
12
13
14
15
16
17
18
19
20
21
22
23
|
<!-- 自定义新增:友链说明放下面 -->
<article class="has-image main-article">
<section class="article-content">
    <p><strong>下方评论,即可申请友链,平均5分钟内添加~</strong></p>
    <p><strong>申请要求</strong></p>
    <ul>
        <li>有不少于5篇原创文章,且稳定维护更新;</li>
        <li>不含任何违法违规内容;</li>
        <li>已添加本网站到友情链接。</li>
    </ul>
    <p><strong>本站信息</strong></p>
    <ul>
        <li>站点名称:知行博客</li>
        <li>站点简介:Java开发代码实战,搜你所需,快速CV,早点下班~</li>
        <li>站点地址:https://zxalive.com/</li>
        <li>站点Logo:https://zxalive.com/avatar.webp</li>
        <li>我的站点友链接地址:https://zxalive.com/links/</li>
        <li>RSS地址:https://zxalive.com/rss.xml</li>
        <li>站点地图:https://zxalive.com/sitemap.xml</li>
    </ul>
</section>

</article>
|
友链3栏
assets\scss\custom.scss中添加(没有文件则自己新建一个)
 1
 2
 3
 4
 5
 6
 7
 8
 9
10
11
12
13
14
15
16
17
18
19
20
21
22
|
/* 自定义新增:友情链接3栏 */
@media (min-width: 1024px) {
  .article-list--compact.links {
    display: grid;
    grid-template-columns: 1fr 1fr 1fr; /* 修改为三栏 */
    gap: 8px; /* 使用gap属性来设置列与列之间的间距,这样就不需要单独设置margin-right了 */
    background: none;
    box-shadow: none;

    article {
      background: var(--card-background);
      border: none;
      box-shadow: var(--shadow-l2);
      margin-bottom: 8px; /* 如果需要底部间距,可以保留 */
      border-radius: 10px;
      /* 移除或注释掉原有的 :nth-child(odd) 选择器,因为它不再适用 */
      /* &:nth-child(odd) {
        margin-right: 8px;
      } */
    }
  }
}
|
归档页添加标签云
复制 themes\hugo-theme-stack\layouts_default\archives.html 到 layouts/_default/archives.html
然后在下面添加
 1
 2
 3
 4
 5
 6
 7
 8
 9
10
11
12
13
14
15
16
17
18
19
20
|
<!-- 自定义新增: 归档页添加标签云 -->
<section class="widget tagCloud">
    <h2 class="section-title">Tags</h2> <!-- 假设标签税收分类的标题就是 "Tags" -->

    <div class="tagCloud-tags">
        {{- $tags := $.Site.Taxonomies.tags -}}
        {{- if $tags -}}
            {{- range $name, $taxonomy := $tags -}}
                {{- $tagCount := len $taxonomy.Pages -}}
                <a href="{{ "/tags/" | relURL }}{{ $name | urlize }}" class="tag-cloud-item">
                    {{ $name }}<span class="tag-cloud-count">{{ $tagCount }}</span>
                </a>
            {{- end -}}
        {{- else -}}
            <p>No tags found.</p>
        {{- end -}}
    </div>
</section>

<!-- 这里是一个空行 -->
|
assets\scss\custom.scss中添加(没有文件则自己新建一个)
1
2
3
4
|
/* 自定义新增:标签云统计颜色 */
.tagCloud-count {
  color: var(--body-text-color);
}
|
页脚加:备案号
复制 themes\hugo-theme-stack\layouts\partials\footer\footer.html 到 layouts\partials\footer\footer.html
然后在</section>下面添加
1
2
3
4
|
<!-- 自定义新增:备案号 -->
<section class="powerby">
    <a href="Https://beian.miit.gov.cn" target="_blank" rel="noopener">皖ICP备2024056275号-1</a>
</section>
|
页脚加:全站统计
复制 themes\hugo-theme-stack\layouts\partials\footer\footer.html 到 layouts\partials\footer\footer.html
然后在</section>下面添加
1
2
3
4
5
6
7
8
9
|
<!-- 自定义新增:全站统计 -->
<section class="totalcount">
    {{$scratch := newScratch}}
    {{ range (where .Site.Pages "Kind" "page" )}}
    {{$scratch.Add "total" .WordCount}}
    {{ end }}
    发表了{{ len (where .Site.RegularPages "Section" "post") }}篇文章 ·
    总计{{ div ($scratch.Get "total") 1000.0 | lang.FormatNumber 2 }}k字
</section>
|
assets\scss\custom.scss中添加(没有文件则自己新建一个)
1
2
3
4
5
6
|
/* 自定义新增:全站统计 */
.totalcount {
  color: var(--card-text-color-secondary);
  font-weight: normal;
  margin-bottom: 5px;
}
|
页脚加:博客动态运行时间
复制 themes\hugo-theme-stack\layouts\partials\footer\footer.html 到 layouts\partials\footer\footer.html
然后在</section>下面添加
 1
 2
 3
 4
 5
 6
 7
 8
 9
10
11
12
13
14
15
16
17
18
19
20
21
22
23
24
25
|
<!-- 自定义新增:博客动态运行时间 -->
<section class="run">
    本站已稳定运行
    <span id="run-time" class="run-time"></span>
</section>
<script>
    function updateRunningTime() {
        let s1 = '2018-10-26'; // 站点创建时间
        s1 = new Date(s1.replace(/-/g, "/"));
        let s2 = new Date();
        let timeDifference = s2.getTime() - s1.getTime();

        let days = Math.floor(timeDifference / (1000 * 60 * 60 * 24));
        let hours = Math.floor((timeDifference % (1000 * 60 * 60 * 24)) / (1000 * 60 * 60));
        let minutes = Math.floor((timeDifference % (1000 * 60 * 60)) / (1000 * 60));
        let seconds = Math.floor((timeDifference % (1000 * 60)) / 1000);

        let result = days + "天" + hours + "小时" + minutes + "分钟" + seconds + "秒";
        document.getElementById('run-time').innerHTML = result;
    }

    // 页面加载完成后立即调用一次,然后每1000毫秒(1秒)更新一次
    updateRunningTime();
    setInterval(updateRunningTime, 1000);
</script>
|
assets\scss\custom.scss中添加(没有文件则自己新建一个)
 1
 2
 3
 4
 5
 6
 7
 8
 9
10
11
12
13
14
15
16
|
/* 自定义新增:博客动态运行时间 */
.run {
  color: var(--card-text-color-secondary);
  font-weight: normal;

  .run-time {
    font-weight: bold;
    color: var(--run-time-color);
  }
}
:root {
 --run-time-color: #9e8f9f;
  &[data-scheme="dark"] {
   --run-time-color: #d5cfc4;
  }
}
|
一键返回顶部按钮
复制 themes\hugo-theme-stack\layouts_default\single.html 到 layouts_default\single.html
在{{ define "main" }}下面添加
1
2
|
    <!-- 自定义新增:一键返回顶部按钮 -->
    <a href="#top" class="backtop">{{ partial "arrow.html" . }}</a>
|
layouts\partials\head\custom.html中添加(没有文件则自己新建一个)
1
2
|
<!-- 自定义新增:一键返回顶部按钮 -->
<span id="top"></span>
|
新建 layouts\partials\arrow.html,填入 https://fontawesome.com/
或者 https://tablericons.com/
获取到的图标svg代码,也可直接用下面的代码
1
2
3
4
|
<svg aria-hidden="true" focusable="false" data-prefix="fas" data-icon="chevron-circle-up" class="svg-inline--fa fa-chevron-circle-up fa-w-16" role="img" xmlns="http://www.w3.org/2000/svg" viewBox="0 0 512 512">
    <path fill="currentColor" d="M8 256C8 119 119 8 256 8s248 111 248 248-111 248-248 248S8 393 8 256zm231-113.9L103.5 277.6c-9.4 9.4-9.4 24.6 0 33.9l17 17c9.4 9.4 24.6 9.4 33.9 0L256 226.9l101.6 101.6c9.4 9.4 24.6 9.4 33.9 0l17-17c9.4-9.4 9.4-24.6 0-33.9L273 142.1c-9.4-9.4-24.6-9.4-34 0z">
    </path>
</svg>
|
assets\scss\custom.scss中添加(没有文件则自己新建一个)
 1
 2
 3
 4
 5
 6
 7
 8
 9
10
|
/* 自定义新增:一键返回顶部按钮 */
.backtop {
     color: #b3b1b1;
     position: fixed;
     right: 16px;
     bottom: 16px;
     width: 32px;
     height: 32px;
     z-index: 999998;
}
|
外链后面加图标
复制 themes\hugo-theme-stack\layouts_default_markup\render-link.html 到 layouts_default_markup\render-link.html
然后{{ .Text | safeHTML }}后面添加:
1
2
3
4
5
6
7
8
9
|
<!-- 自定义新增:外链后面加图标 -->
{{ if strings.HasPrefix .Destination "http" }}
<span style="white-space: nowrap;">
    <svg width=".7em" height=".7em" viewBox="0 0 21 21" xmlns="http://www.w3.org/2000/svg">
        <path d="m13 3l3.293 3.293l-7 7l1.414 1.414l7-7L21 11V3z" fill="currentColor" />
        <path d="M19 19H5V5h7l-2-2H5c-1.103 0-2 .897-2 2v14c0 1.103.897 2 2 2h14c1.103 0 2-.897 2-2v-5l-2-2v7z" fill="currentColor">
    </svg>
</span>
{{ end }}
|
缩小归档页分类卡片尺寸
assets\scss\custom.scss中添加(没有文件则自己新建一个)
 1
 2
 3
 4
 5
 6
 7
 8
 9
10
11
12
13
|
/* 自定义新增:缩小归档页分类卡片尺寸 */
.subsection-list {

  .article-list--tile {
    padding-bottom: 0px;

    article {
      width: 200px;
      height: 90px;
      margin-right: 5px;
    }
  }
}
|
参考文档
- stack官方主题文档
- Hugo-Stack主题页
- 仓库最新版本
- HUGO+Stack下的美化修改
- Hugo Stack主题装修笔记
- Hugo Stack主题装修笔记Part 2
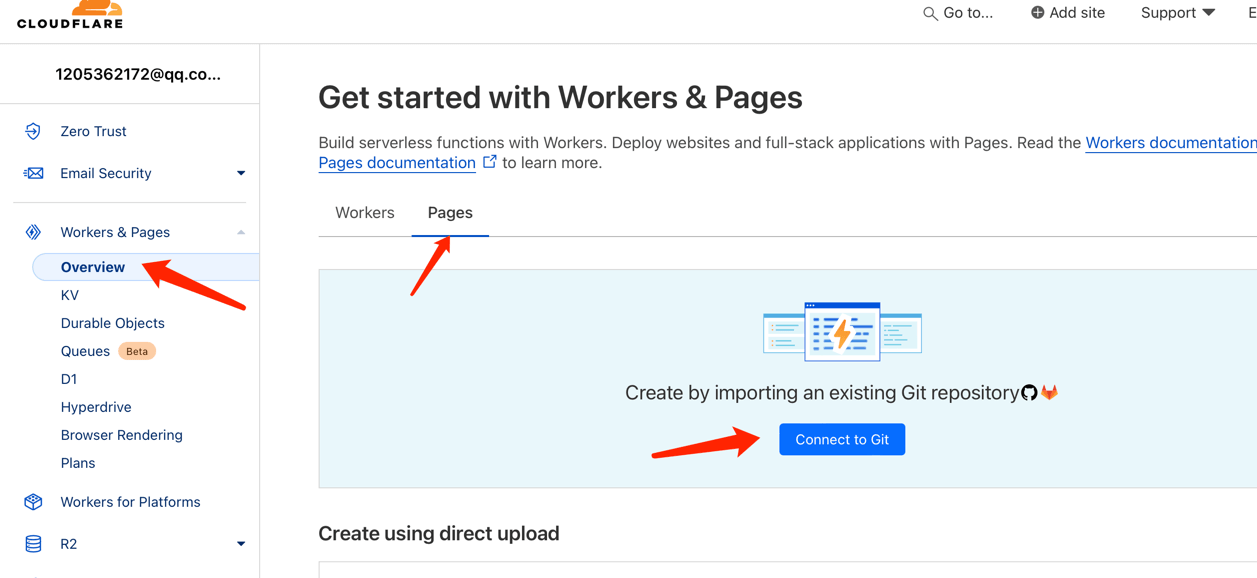
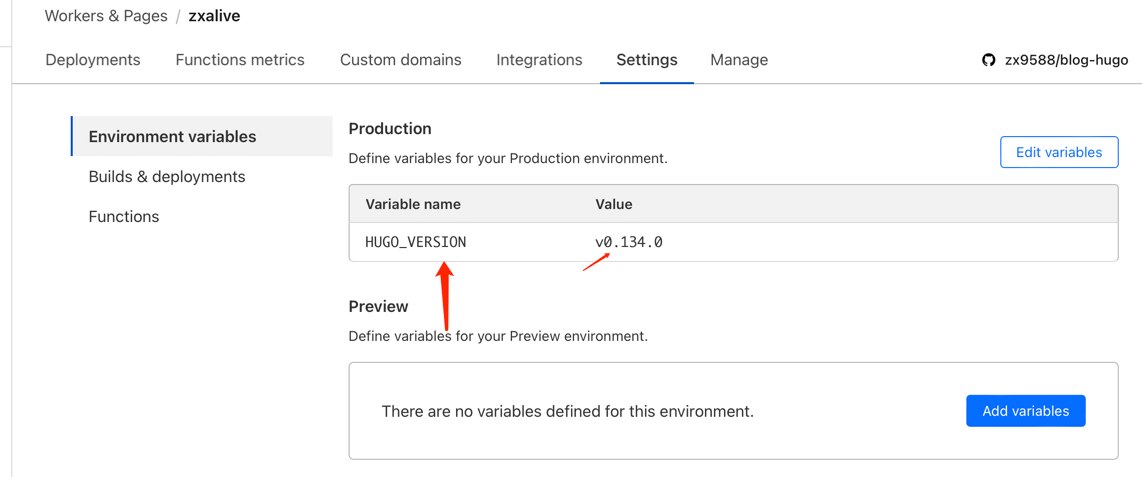
Cloudflare托管
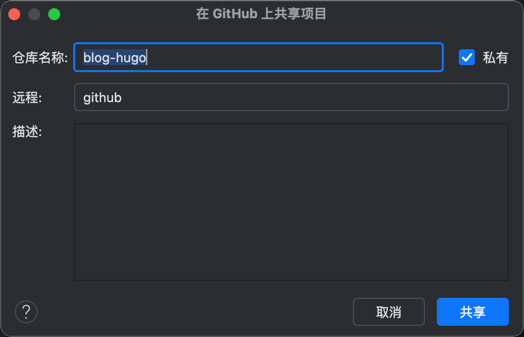
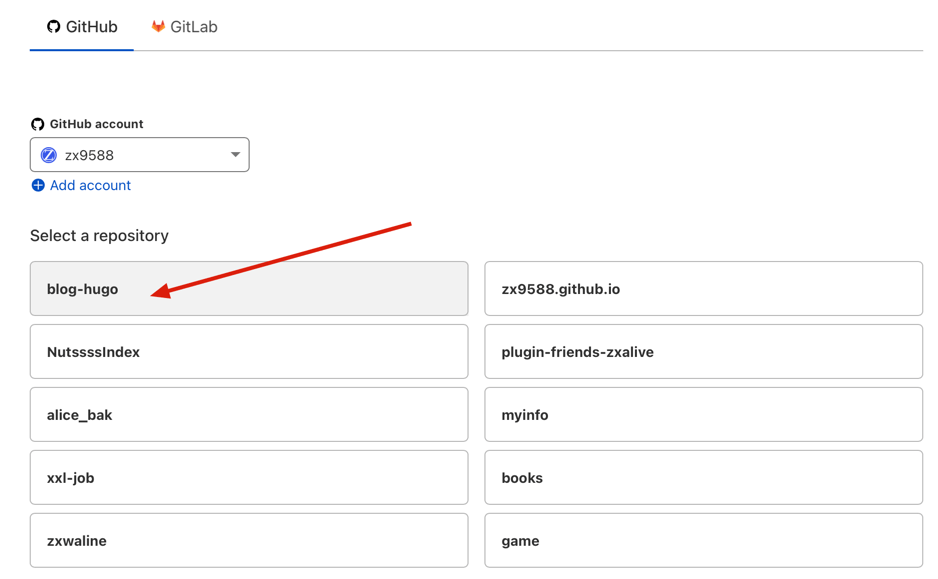
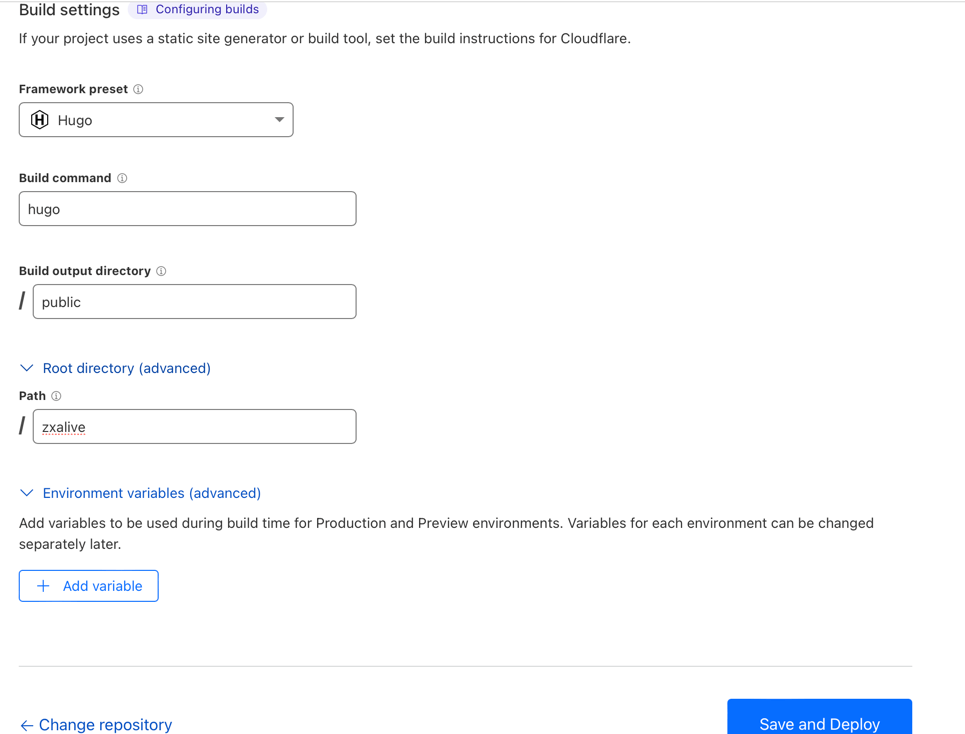
先将你的站点zxalive推到github仓库,然后打开cloudflare
(我这里外面套了一层文件夹blog-hugo,主要是存其他文件的)
接入谷歌广告
参考Halo博客接入谷歌广告

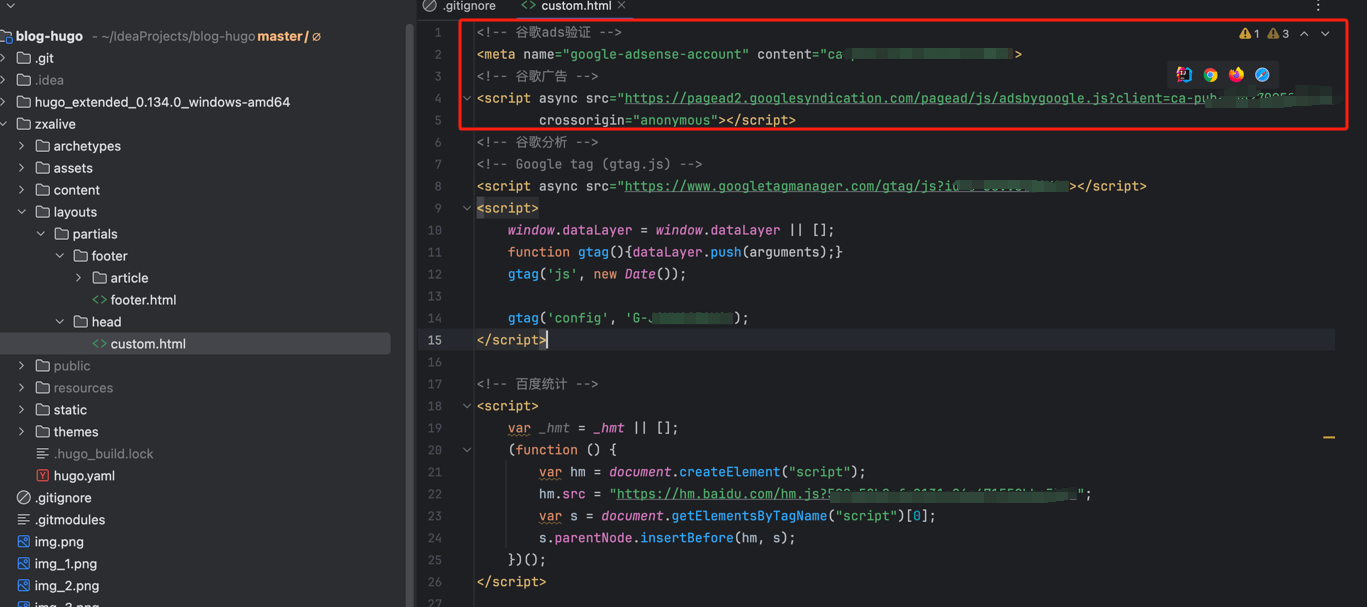
使用Github Actions自动构建发布到阿里云服务器
参考:https://spaceforfox.cn/post/how-to-build-a-site/
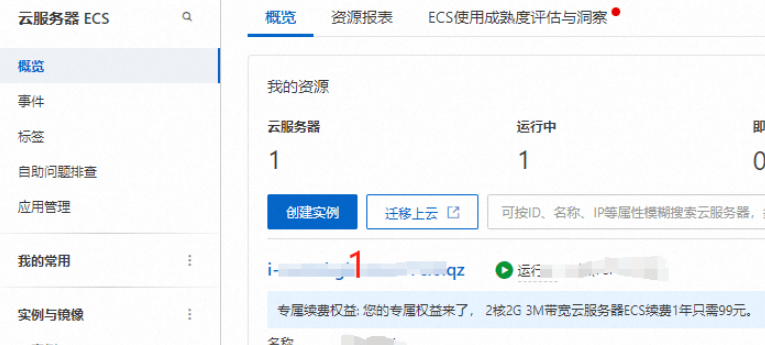
打开阿里云ecs控制台
点击1,进入服务器内
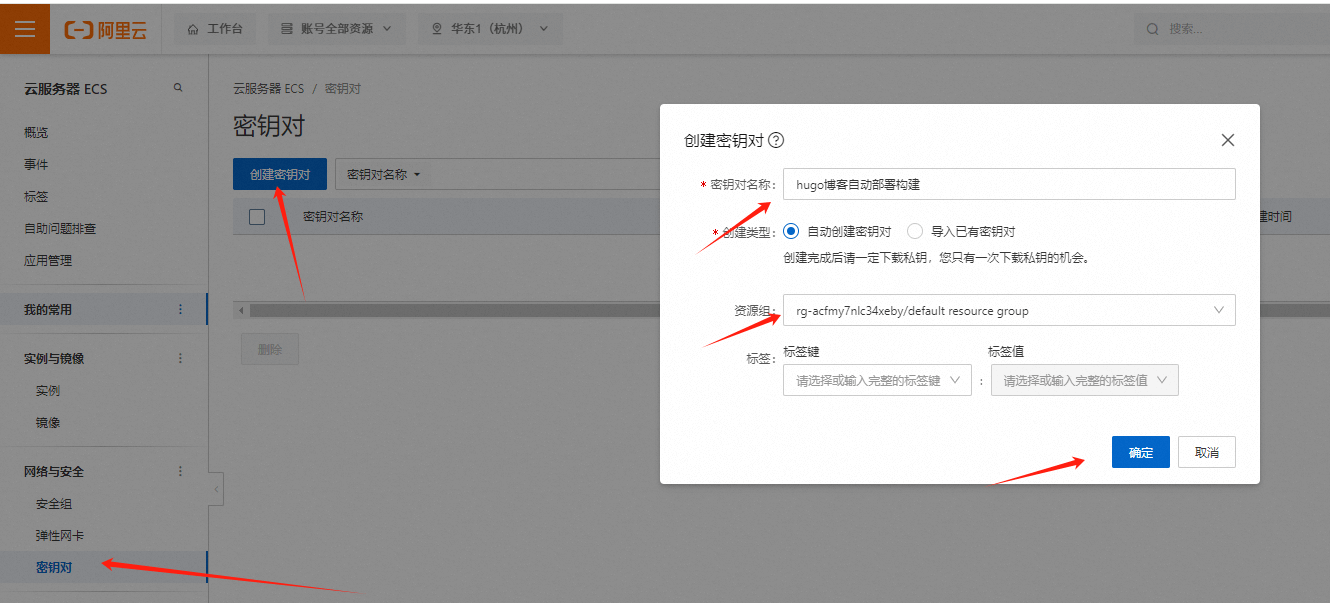
创建密钥对,创建完会自动下载。然后点击绑定密钥对,并重启服务器。
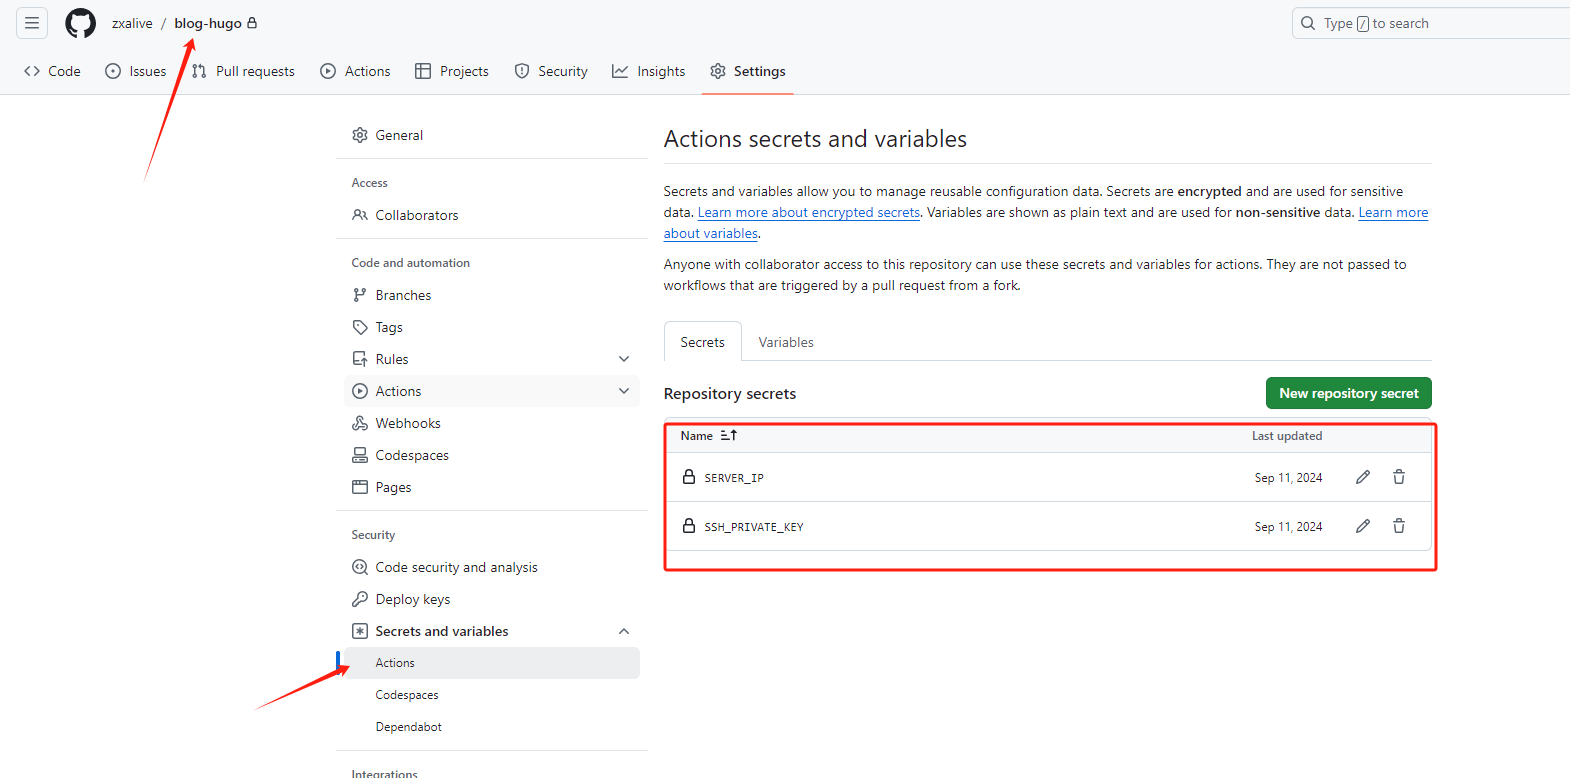
进入你的github仓库,新建两个secret,对应 服务器公网IP 和 上面下载的密钥内容
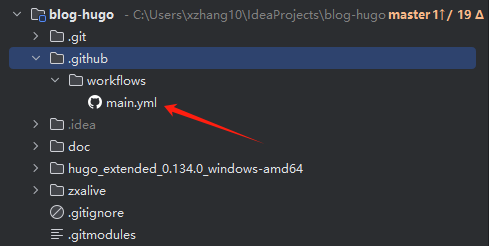
创建文件:.github/workflows/main.yml,然后每次push,就会自动构建并发布到云服务器
 1
 2
 3
 4
 5
 6
 7
 8
 9
10
11
12
13
14
15
16
17
18
19
20
21
22
23
24
25
26
27
28
29
30
31
32
33
34
35
36
37
38
|
name: deploy

on:
 push:
 workflow_dispatch:
 schedule:
  # Runs everyday at 8:00 AM
  - cron: "0 0 * * *"

jobs:
 build:
  runs-on: ubuntu-latest
  steps:
   - name: Checkout
     uses: actions/checkout@v2
     with:
      submodules: true
      fetch-depth: 0

   - name: Setup Hugo
     uses: peaceiris/actions-hugo@v2
     with:
      hugo-version: "latest"
      extended: true

   - name: Build Web
     run: |
      cd zxalive           # 切换到你的网站源代码目录
      hugo --minify --gc   # 执行 Hugo 构建 minify:压缩html、css、js gc:先删除旧的文件再重新生成

   - name: Deploy
     uses: wlixcc/SFTP-Deploy-Action@v1.0
     with:
      username: 'root' #你在服务器设定的登录名
      server: '${{ secrets.SERVER_IP }}'
      ssh_private_key: ${{ secrets.SSH_PRIVATE_KEY }}
      local_path: './zxalive/public'
      remote_path: 'nginx/html' #你在服务器设置的放置网站静态文件的文件夹
|
actions可以看构建记录

Vercel部署Waline评论系统
注册leadcloud
参考:https://waline.js.org/guide/get-started/
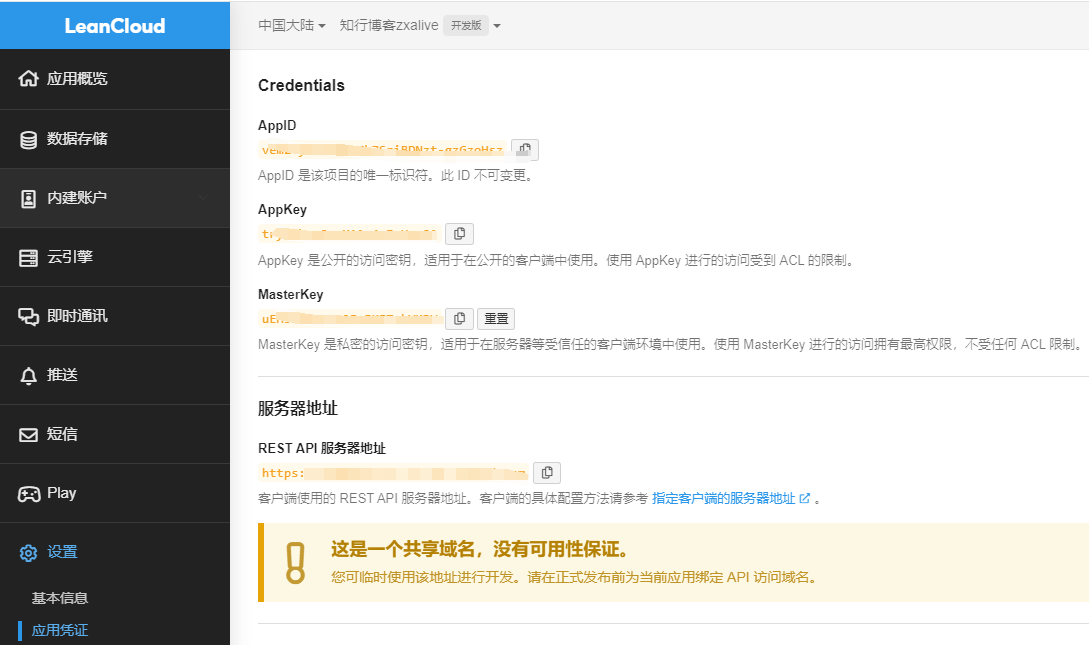
注册并登录leadcloud,然后创建一个应用(开发版),打开应用查看应用凭证。
https://console.leancloud.cn/apps
Vercel部署waline
vercle部署waline
如果你未登录的话,Vercel 会让你注册或登录,请使用 GitHub 账户进行快捷登录。

输入waline,并创建,等待完成后,点击 Go to Dashboard
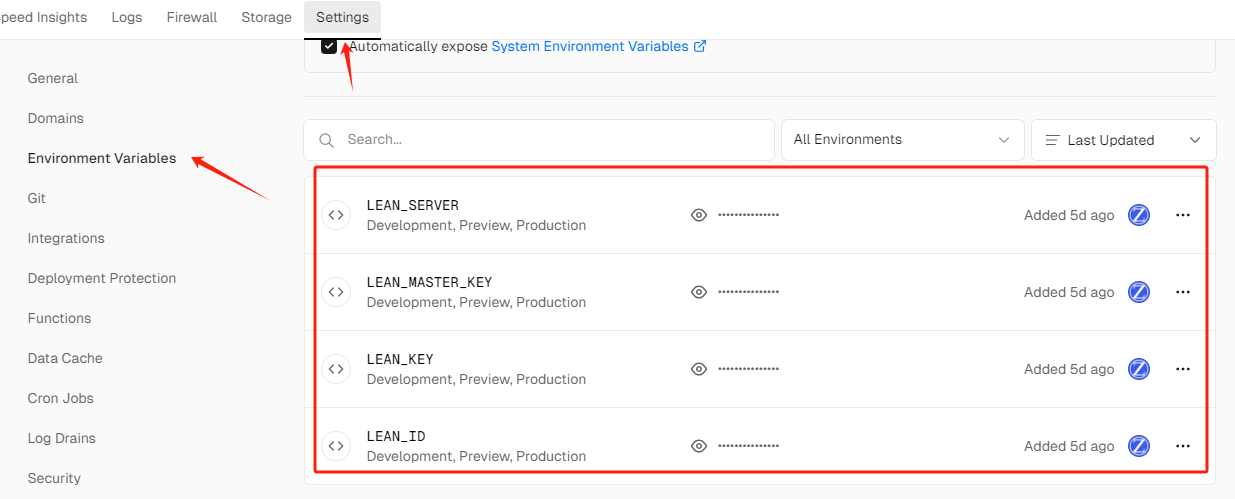
配置三个环境变量LEAN_ID、LEAN_KEY、LEAN_MASTER_KEY,它们的值分别对应上一步在 LeanCloud 中获得的APP ID、APP KEY、Master Key。
国内版需要增加配置LEAN_SERVER,对应leancloud的REST API服务器地址
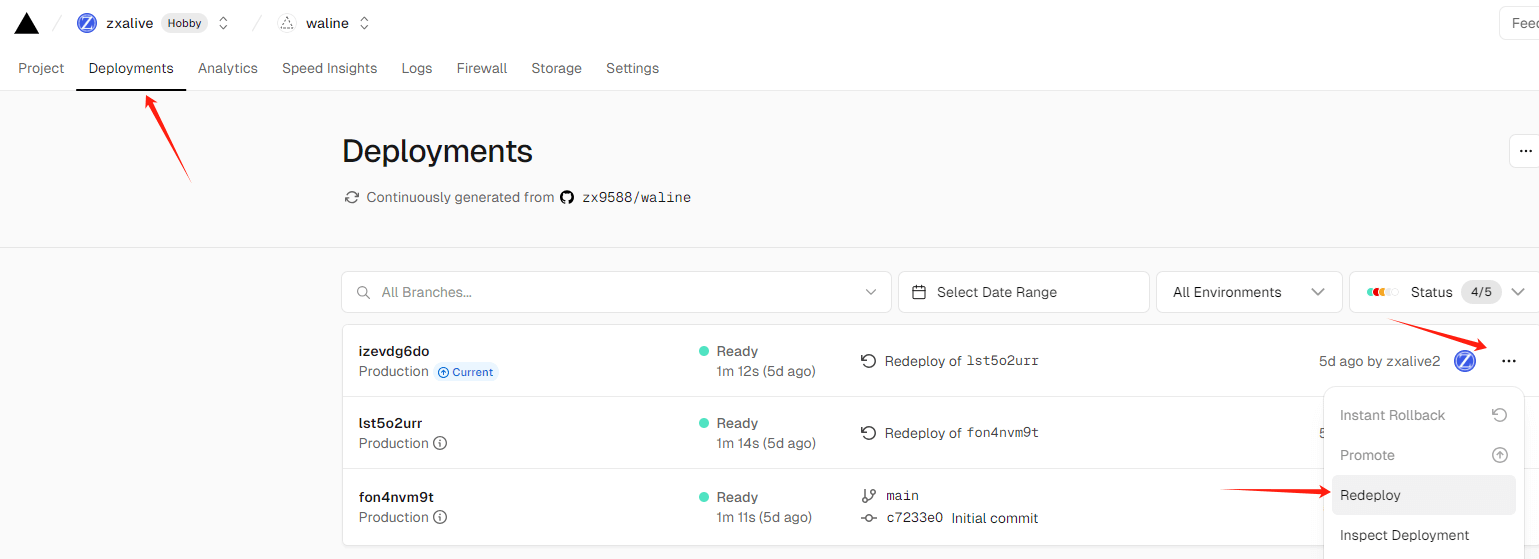
点击replay,等待部署好
点击主域名查看并注册用户

首次注册的为管理员
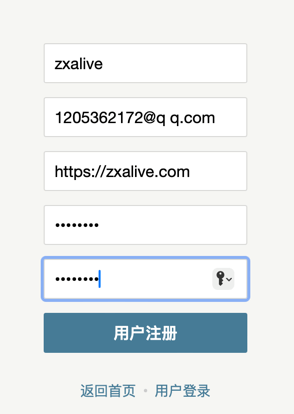
hugo配置waline地址:https://waline-zxalive.vercel.app

云服务器上部署Waline评论系统
添加二级域名+https证书
阿里云添加二级域名:阿里云-域名控制台

给二级域名安装https证书,参考:Nginx配置Https免费证书
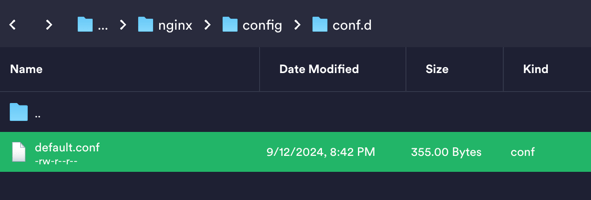
nginx配置中增加server,然后重启nginx:docker restart nginx
 1
 2
 3
 4
 5
 6
 7
 8
 9
10
11
12
13
14
15
16
17
18
19
20
21
22
23
24
25
26
27
28
29
30
31
32
33
34
35
36
37
|
server {
    listen 80;
    listen 443 ssl http2;
    server_name  waline.zxalive.com;
    root /www/wwwroot/waline.zxalive.com;
    if ($server_port !~ 443){
        rewrite ^(/.*)$ https://$host$1 permanent;
    }

    # SSL 设置
    ssl_certificate /usr/share/nginx/html/cert/waline.zxalive.com.pem;
    ssl_certificate_key /usr/share/nginx/html/cert/waline.zxalive.com.key;
    ssl_protocols TLSv1.1 TLSv1.2 TLSv1.3;
    ssl_ciphers EECDH+CHACHA20:EECDH+CHACHA20-draft:EECDH+AES128:RSA+AES128:EECDH+AES256:RSA+AES256:EECDH+3DES:RSA+3DES:!MD5;
    ssl_prefer_server_ciphers on;
    ssl_session_cache shared:SSL:10m;
    ssl_session_timeout 10m;
    add_header Strict-Transport-Security "max-age=31536000";

    # 代理到8360端口
    location / {
        proxy_pass http://服务器ip:8360;
        proxy_set_header Host $host;
        proxy_set_header X-Real-IP $remote_addr;
        proxy_set_header X-Forwarded-For $proxy_add_x_forwarded_for;
        proxy_set_header X-Forwarded-Proto $scheme;
        proxy_set_header REMOTE-HOST $remote_addr;
        add_header X-Cache $upstream_cache_status;
        add_header Cache-Control no-cache;
        expires 12h;
    }

    error_page 500 502 503 504  /50x.html;
    location = /50x.html {
        root   /usr/share/nginx/html/zxalive/public;
    }
}
|
创建mysql数据库容器
如果没有mysql,先部署一个mysql
进入mysql容器:docker exec -it mysql mysql -u root -p,然后输出密码
创建一个数据库:CREATE DATABASE waline;
使用数据库:USE waline;
waline.sql
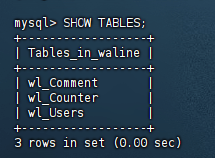
复制并执行,会创建表,查看是否创建成功:SHOW TABLES;
创建waline容器
如果在mysql容器内,先退出mysql:exit,然后执行:
服务端环境变量说明: https://waline.js.org/reference/server/env.html
 1
 2
 3
 4
 5
 6
 7
 8
 9
10
11
12
13
|
docker rm -f waline
docker run --name waline \
        -p 8360:8360 \
        -e MYSQL_HOST=服务器ip \
        -e MYSQL_PORT=3306 \
        -e MYSQL_DB=waline \
        -e MYSQL_USER=root \
        -e MYSQL_PASSWORD=数据库密码 \
        -e SITE_URL="https://zxalive.com" \
        -e SITE_NAME="知行博客" \
        -e SERVER_URL="https://waline.zxalive.com" \
        --restart always \
        -d lizheming/waline
|
开启服务器安全组:8360端口

注册,首次注册的为管理员: https://waline.zxalive.com/ui/register
hugo配置waline地址:https://waline.zxalive.com

评论邮件通知
参考: https://waline.js.org/guide/features/notification.html#%E9%82%AE%E4%BB%B6%E9%80%9A%E7%9F%A5
https://mail.qq.com/
登录qq邮箱,右上角账号与安全->安全设置->生成授权码
服务端环境变量说明: https://waline.js.org/reference/server/env.html
 1
 2
 3
 4
 5
 6
 7
 8
 9
10
11
12
13
14
15
16
17
18
19
20
21
22
|
docker rm -f waline
docker run --name waline \
        -p 8360:8360 \
        -e TZ=Asia/Shanghai \
        -e MYSQL_HOST=服务器ip \
        -e MYSQL_PORT=3306 \
        -e MYSQL_DB=waline \
        -e MYSQL_USER=root \
        -e MYSQL_PASSWORD=数据库密码 \
        -e SITE_URL=https://zxalive.com \
        -e SITE_NAME=知行博客 \
        -e SERVER_URL=https://waline.zxalive.com \
        -e SMTP_HOST=smtp.qq.com \
        -e SMTP_PORT=465 \
        -e SMTP_USER=1205362172@qq.com \
        -e SMTP_PASS=QQ邮箱获取的授权码 \
        -e SMTP_SECURE=true \
        -e SITE_NAME=知行博客 \
        -e SITE_URL=https://zxalive.com \
        -e AUTHOR_EMAIL=1205362172@qq.com \
        --restart always \
        -d lizheming/waline
|
默认自带 https://zxalive.com/index.xml
//
: # “copyright: “zhangxin All Rights Reserved””
//
: # “”
//
: # “”
相册画廊功能
新建 layouts\shortcodes\gallery.html
1
|
<a href="{{ .Get "src" }}" data-ngThumb="{{ .Get "src" }}">{{ .Get "title" }}</a>
|
新建 layouts\shortcodes\galleries.html
data-nanogallery2里面的配置参考nanogallery2用法指导
 1
 2
 3
 4
 5
 6
 7
 8
 9
10
11
12
13
14
15
16
17
18
19
20
21
22
23
24
25
26
27
28
29
30
31
32
33
34
35
36
37
38
39
40
41
42
43
44
45
46
47
48
49
50
51
52
53
54
55
56
57
58
59
60
61
62
63
64
65
66
67
68
69
70
71
72
73
74
75
76
77
78
79
80
81
82
83
84
85
86
87
88
89
90
91
92
93
94
95
96
|
<!DOCTYPE html>
<html lang="en">
<head>
    <meta name="viewport" content="user-scalable=no, width=device-width, initial-scale=1, maximum-scale=1">
    <script src="https://cdn.jsdelivr.net/npm/jquery@3.3.1/dist/jquery.min.js"></script>
    <link rel="stylesheet" href="https://cdn.jsdelivr.net/npm/nanogallery2@3.0.5/dist/css/nanogallery2.min.css">
    <script src="https://cdn.jsdelivr.net/npm/nanogallery2@3.0.5/dist/jquery.nanogallery2.min.js"></script>
</head>
<body>

<div data-nanogallery2='{
{{/* 这是一个模板注释 */}}

    {{/* 是否使用灯箱 */}}
    "thumbnailOpenInLightox": true,

    "galleryTheme": {
        "thumbnail": {
            {{/* 圆角 */}}
            "borderRadius": "8px"
        }
    },

    "thumbnailToolbarImage": {
       "topLeft": "",
       "topRight": "",
       "bottomLeft": "",
       "bottomRight": ""
    },
    {{/* 工具栏 */}}
    "viewerToolbar":   {
        "display": true,
        "standard": "label"
     },
    "viewerTools": {
        "topLeft": "pageCounter, playPauseButton",
        "topRight": "downloadButton, rotateLeft, rotateRight, closeButton"
    },

    {{/* 描述 */}}
    "thumbnailLabel": {
        {{/* 标签位置 */}}
        "position": "overImage",
        {{/* 标签字体大小 */}}
        "titleFontSize": "0.8em"
    },
    {{/* 缩略图鼠标悬停效果缩放/透明度 */}}
     "thumbnailHoverEffect2": "image_scale_1.00_1.10|label_backgroundColor_rgba(0,0,0,0)_rgba(255,255,255,0)",

    {{/* 显示延迟 */}}
    "eventsDebounceDelay": 10,
    {{/* 缩略图是否超出屏幕时隐藏 */}}
    "thumbnailDisplayOutsideScreen": true,

    {{/* 缩略图边框 */}}
    "thumbnailL1BorderHorizontal": 0,
    "thumbnailL1BorderVertical": 0,

    {{/* 缩略图显示动画 */}}
    "thumbnailDisplayTransition":          "scaleUp",
    "thumbnailDisplayTransitionDuration":  500,
    "thumbnailDisplayInterval":            30,

    {{/* 图库显示动画 */}}
    {{/* 切换效果 */}}
    "galleryDisplayTransition":            "none",
    {{/* 切换效果持续时间 */}}
    "galleryDisplayTransitionDuration":    500,

    {{/* 宽度 */}}
    "thumbnailWidth": {{ .Get "w" }},
    {{/* 高度 */}}
    {{ $h := .Get "h" }}
    {{ if eq $h "auto" }}
        "thumbnailHeight": "auto",
    {{ else }}
        "thumbnailHeight": {{ $h }},
    {{ end }}

    {{/* 左右边距 */}}
    "thumbnailGutterHeight": 4,
    {{/* 上下边距 */}}
    "thumbnailGutterWidth": 4,

    {{/* 图片库宽度 */}}
    "viewerGalleryTWidth": 4,
    {{/* 图片库高度 */}}
    "viewerGalleryTHeight": 4,

    "galleryDisplayMode": "rows"

}'>
    {{ .Inner }}
</div>
</body>
</html>
|
md文章里面使用
1
2
3
4
5
6
7
8
|
{使用时去掉我{< galleries w=300 h=auto >}}
{使用时去掉我{< gallery src="/photo/猫/小区里的流浪猫3.jpg" >}}
{使用时去掉我{< gallery src="/photo/猫/小区里的流浪猫1.jpg" >}}
{使用时去掉我{< gallery src="/photo/猫/小区里的流浪猫6.jpg" >}}
{使用时去掉我{< gallery src="/photo/猫/小区里的流浪猫2.jpg" >}}
{使用时去掉我{< gallery src="/photo/猫/小区里的流浪猫5.jpg" >}}
{使用时去掉我{< gallery src="/photo/猫/小区里的流浪猫4.jpg" >}}
{使用时去掉我{< /galleries >}}
|
参考及其他画廊插件
- nanogallery2参考:https://www.sulvblog.cn/posts/blog/hugo_gallery/
新建 layouts\shortcodes\gallery.html
1
|
<a href="{{ .Get "src" }}" data-ngThumb="{{ .Get "src" }}">{{ .Get "title" }}</a>
|
新建 layouts\shortcodes\galleries.html
data-nanogallery2里面的配置参考nanogallery2用法指导
 1
 2
 3
 4
 5
 6
 7
 8
 9
10
11
12
13
14
15
16
17
18
19
20
21
22
23
24
25
26
27
28
29
30
31
32
33
34
35
36
37
38
39
40
41
42
43
44
45
46
47
48
49
50
51
52
53
|
<!DOCTYPE html>
<html lang="en">

<head>
    <meta name="viewport" content="user-scalable=no, width=device-width, initial-scale=1, maximum-scale=1">
    <script src="https://fastly.jsdelivr.net/npm/jquery@3.3.1/dist/jquery.min.js"></script>
    <link rel="stylesheet" href="https://fastly.jsdelivr.net/npm/nanogallery2@3.0.5/dist/css/nanogallery2.min.css">
    <script src="https://fastly.jsdelivr.net/npm/nanogallery2@3.0.5/dist/jquery.nanogallery2.min.js"></script>
</head>

<body>
<div data-nanogallery2='{
	 "thumbnailDisplayTransition":          "none",
     "thumbnailDisplayTransitionDuration":  500,
     "thumbnailDisplayInterval":            30,
     "galleryDisplayTransition":            "none",
     "galleryDisplayTransitionDuration":    500,
     "galleryDisplayMode": "rows",
     "thumbnailDisplayOutsideScreen": "false",
     "eventsDebounceDelay": 10,
     "thumbnailL1BorderHorizontal": 0,
     "thumbnailL1BorderVertical": 0,
     "thumbnailLabel": {
        "titleFontSize": "0.6em"
     },
     "thumbnailHoverEffect2": "image_scale_1.00_1.10|label_backgroundColor_rgba(0,0,0,0)_rgba(255,255,255,0)",
     "galleryTheme": {
        "thumbnail": {
            "borderRadius": "8px"
        }
     },
     "thumbnailToolbarImage": {
        "topLeft": "",
        "topRight": "",
        "bottomLeft": "",
        "bottomRight": ""
     },
     "viewerToolbar":   {
        "display": true,
        "standard": "label"
     },
     "viewerTools":     {
        "topLeft":    "pageCounter, playPauseButton",
        "topRight":   "downloadButton, rotateLeft, zoomButton, fullscreenButton, closeButton"
     },
     "viewerGalleryTWidth": 40,
     "viewerGalleryTHeight": 40
}'>
    {{ .Inner }}
</div>
</body>

</html>
|
md文章里面使用
 1
 2
 3
 4
 5
 6
 7
 8
 9
10
11
|
{使用时去掉我{< galleries >}}
{使用时去掉我{< gallery src="https://www.sulvblog.cn/image/16_IMG_20220430_202353.png" title="香克斯">}}
{使用时去掉我{< gallery src="https://www.sulvblog.cn/image/17_IMG_20220430_202228.png" >}}
{使用时去掉我{< gallery src="https://www.sulvblog.cn/image/19_IMG_20220430_200901.png" >}}
{使用时去掉我{< gallery src="https://www.sulvblog.cn/image/16_IMG_20220430_202353.png" title="香克斯" >}}
{使用时去掉我{< gallery src="https://www.sulvblog.cn/image/17_IMG_20220430_202228.png" >}}
{使用时去掉我{< gallery src="https://www.sulvblog.cn/image/19_IMG_20220430_200901.png" >}}
{使用时去掉我{< gallery src="https://www.sulvblog.cn/image/16_IMG_20220430_202353.png" title="香克斯" >}}
{使用时去掉我{< gallery src="https://www.sulvblog.cn/image/17_IMG_20220430_202228.png" >}}
{使用时去掉我{< gallery src="https://www.sulvblog.cn/image/19_IMG_20220430_200901.png" >}}
{使用时去掉我{< /galleries >}}
|
-
nanogallery2参考:https://page.tuclink.com/zh/post/hugo/hugo-picture-2/
-
nanogallery2参考:https://mertbakir.gitlab.io/hugo/nanogallery2-with-hugo/
-
justifiedGallery 参考:https://www.ftls.xyz/posts/2023-09-08-hugo-shortcodes-simple-gallery/
-
photo swipe 参考:https://page.tuclink.com/zh/post/hugo/hugo-picture-3/
阿里云CDN加速
购买
域名管理
- 添加域名
- 域名解析修改(将原来的A解析改成CNAME,并且记录值改成CNAME列的值,如live.zxalive.com.w.kunlunaq.com)
- 操作栏点击管理=》https配置=》修改配置=》添加单域名的免费证书 阿里云SSL证书管理


