Halo搭建部署
需要准备
Centos版本Linux服务器1台
安装Docker
- 卸载旧版本
1
2
3
4
5
6
7
8
|
sudo yum remove docker \
                  docker-client \
                  docker-client-latest \
                  docker-common \
                  docker-latest \
                  docker-latest-logrotate \
                  docker-logrotate \
                  docker-engine
|
- 安装yum工具包
1
2
|
sudo yum install -y yum-utils
sudo yum-config-manager --add-repo https://mirrors.aliyun.com/docker-ce/linux/centos/docker-ce.repo
|
- 安装docker引擎
1
|
sudo yum install docker-ce docker-ce-cli containerd.io docker-buildx-plugin docker-compose-plugin
|
- 启动docker
1
|
sudo systemctl start docker
|
- 配置国内镜像源
 1
 2
 3
 4
 5
 6
 7
 8
 9
10
11
12
13
14
15
16
17
18
19
20
21
22
23
24
25
26
27
28
29
30
31
32
33
34
35
|
sudo mkdir -p /etc/docker
sudo tee /etc/docker/daemon.json <<-'EOF'
{
    "registry-mirrors": [
        "https://mirror.ccs.tencentyun.com",
        "https://docker.mirrors.ustc.edu.cn",
        "https://registry.docker-cn.com",
        "http://hub-mirror.c.163.com",
        "https://docker.m.daocloud.io",
        "https://dockerproxy.com",
        "https://cr.console.aliyun.com",
        "https://docker.nju.edu.cn",
        "https://ustc-edu-cn.mirror.aliyuncs.com/",
        "https://ccr.ccs.tencentyun.com/",
        "https://docker.registry.cyou",
        "https://docker-cf.registry.cyou",
        "https://docker.jsdelivr.fyi",
        "https://dockercf.jsdelivr.fyi",
        "https://dockertest.jsdelivr.fyi",
        "https://dockerpull.com",
        "https://dockerproxy.cn",
        "https://hub.uuuadc.top",
        "https://docker.1panel.live",
        "https://hub.rat.dev",
        "https://docker.anyhub.us.kg",
        "https://docker.chenby.cn",
        "https://dockerhub.jobcher.com",
        "https://dockerhub.icu",
        "https://docker.ckyl.me",
        "https://docker.awsl9527.cn",
        "https://docker.hpcloud.cloud",
        "https://atomhub.openatom.cn"
    ]
}
EOF
|
- 重启docker服务
1
2
|
sudo systemctl daemon-reload
sudo systemctl restart docker
|
安装Docker Compose
1
2
|
sudo yum update
sudo yum install docker-compose-plugin
|
部署Halo
在服务器上创建一个目录
1
|
mkdir ~/halo && cd ~/halo
|
下面内容中“外部访问地址”localhost替换为自己服务器的公网ip,然后执行下面命令
 1
 2
 3
 4
 5
 6
 7
 8
 9
10
11
12
13
14
15
16
17
18
19
20
21
22
23
24
25
26
27
28
29
30
31
32
33
34
35
36
37
38
39
40
41
42
43
44
45
46
47
48
49
50
51
52
53
54
55
|
sudo tee ~/halo/docker-compose.yaml <<-'EOF'
services:
  halo:
    image: registry.fit2cloud.com/halo/halo:2.17
    restart: on-failure:3
    depends_on:
      halodb:
        condition: service_healthy
    networks:
      halo_network:
    volumes:
      - ./halo2:/root/.halo2
    ports:
      - "8090:8090"
    healthcheck:
      test: ["CMD", "curl", "-f", "http://localhost:8090/actuator/health/readiness"]
      interval: 30s
      timeout: 5s
      retries: 5
      start_period: 30s
    command:
      - --spring.r2dbc.url=r2dbc:pool:mysql://halodb:3306/halo
      - --spring.r2dbc.username=root
      # MySQL 的密码,请保证与下方 MYSQL_ROOT_PASSWORD 的变量值一致。
      - --spring.r2dbc.password=o#DwN&JSa56
      - --spring.sql.init.platform=mysql
      # 外部访问地址,请根据实际需要修改
      - --halo.external-url=http://localhost:8090/

  halodb:
    image: mysql:8.1.0
    restart: on-failure:3
    networks:
      halo_network:
    command:
      - --default-authentication-plugin=caching_sha2_password
      - --character-set-server=utf8mb4
      - --collation-server=utf8mb4_general_ci
      - --explicit_defaults_for_timestamp=true
    volumes:
      - ./mysql:/var/lib/mysql
      - ./mysqlBackup:/data/mysqlBackup
    healthcheck:
      test: ["CMD", "mysqladmin", "ping", "-h", "127.0.0.1", "--silent"]
      interval: 3s
      retries: 5
      start_period: 30s
    environment:
      # 请修改此密码,并对应修改上方 Halo 服务的 SPRING_R2DBC_PASSWORD 变量值
      - MYSQL_ROOT_PASSWORD=o#DwN&JSa56
      - MYSQL_DATABASE=halo

networks:
  halo_network:
EOF
|
启动halo
基于docker-compose编排了halo mysql 容器,并后台启动
访问halo控制台
http://你的服务器公网ip:8090/console/
安装Nginx Proxy Manager 反向代理你的博客(通过域名访问你的博客)
创建一个 npm 的文件夹
1
|
mkdir -p ~/data/docker_data/nginxproxymanager
|
进入该文件夹
1
|
cd ~/data/docker_data/nginxproxymanager
|
创建compose脚本文件
 1
 2
 3
 4
 5
 6
 7
 8
 9
10
11
12
13
|
sudo tee ~/data/docker_data/nginxproxymanager/docker-compose.yml <<-'EOF'
services:
  app:
    image: 'jc21/nginx-proxy-manager:2.9.18'
    restart: unless-stopped
    ports:
      - '80:80'              # 不建议修改端口
      - '81:81'              # 可以把冒号左边的 81 端口修改成你服务器上没有被占用的端口
      - '443:443'            # 不建议修改端口
    volumes:
      - ./data:/data         # 点号表示当前文件夹,冒号左边的意思是在当前文件夹下创建一个 data 目录,用于存放数据,如果不存在的话,会自动创建
      - ./letsencrypt:/etc/letsencrypt  # 点号表示当前文件夹,冒号左边的意思是在当前文件夹下创建一个 letsencrypt 目录,用于存放证书,如果不存在的话,会自动创建
EOF
|
启动
进入后台
访问http://你的服务器公网ip:81 就可以访问 NPM 的网页端了。(记得服务器安全组打开81端口)
默认登录的用户名:admin@example.com 密码:changeme,登陆后提示修改密码
配置 Halo 的反向代理
进入Nginx Proxy Manager http://你的服务器公网ip:81
点击按钮 Hosts,点击按钮Proxy Hosts,点击按钮Add Proxy Hosts,弹出弹窗
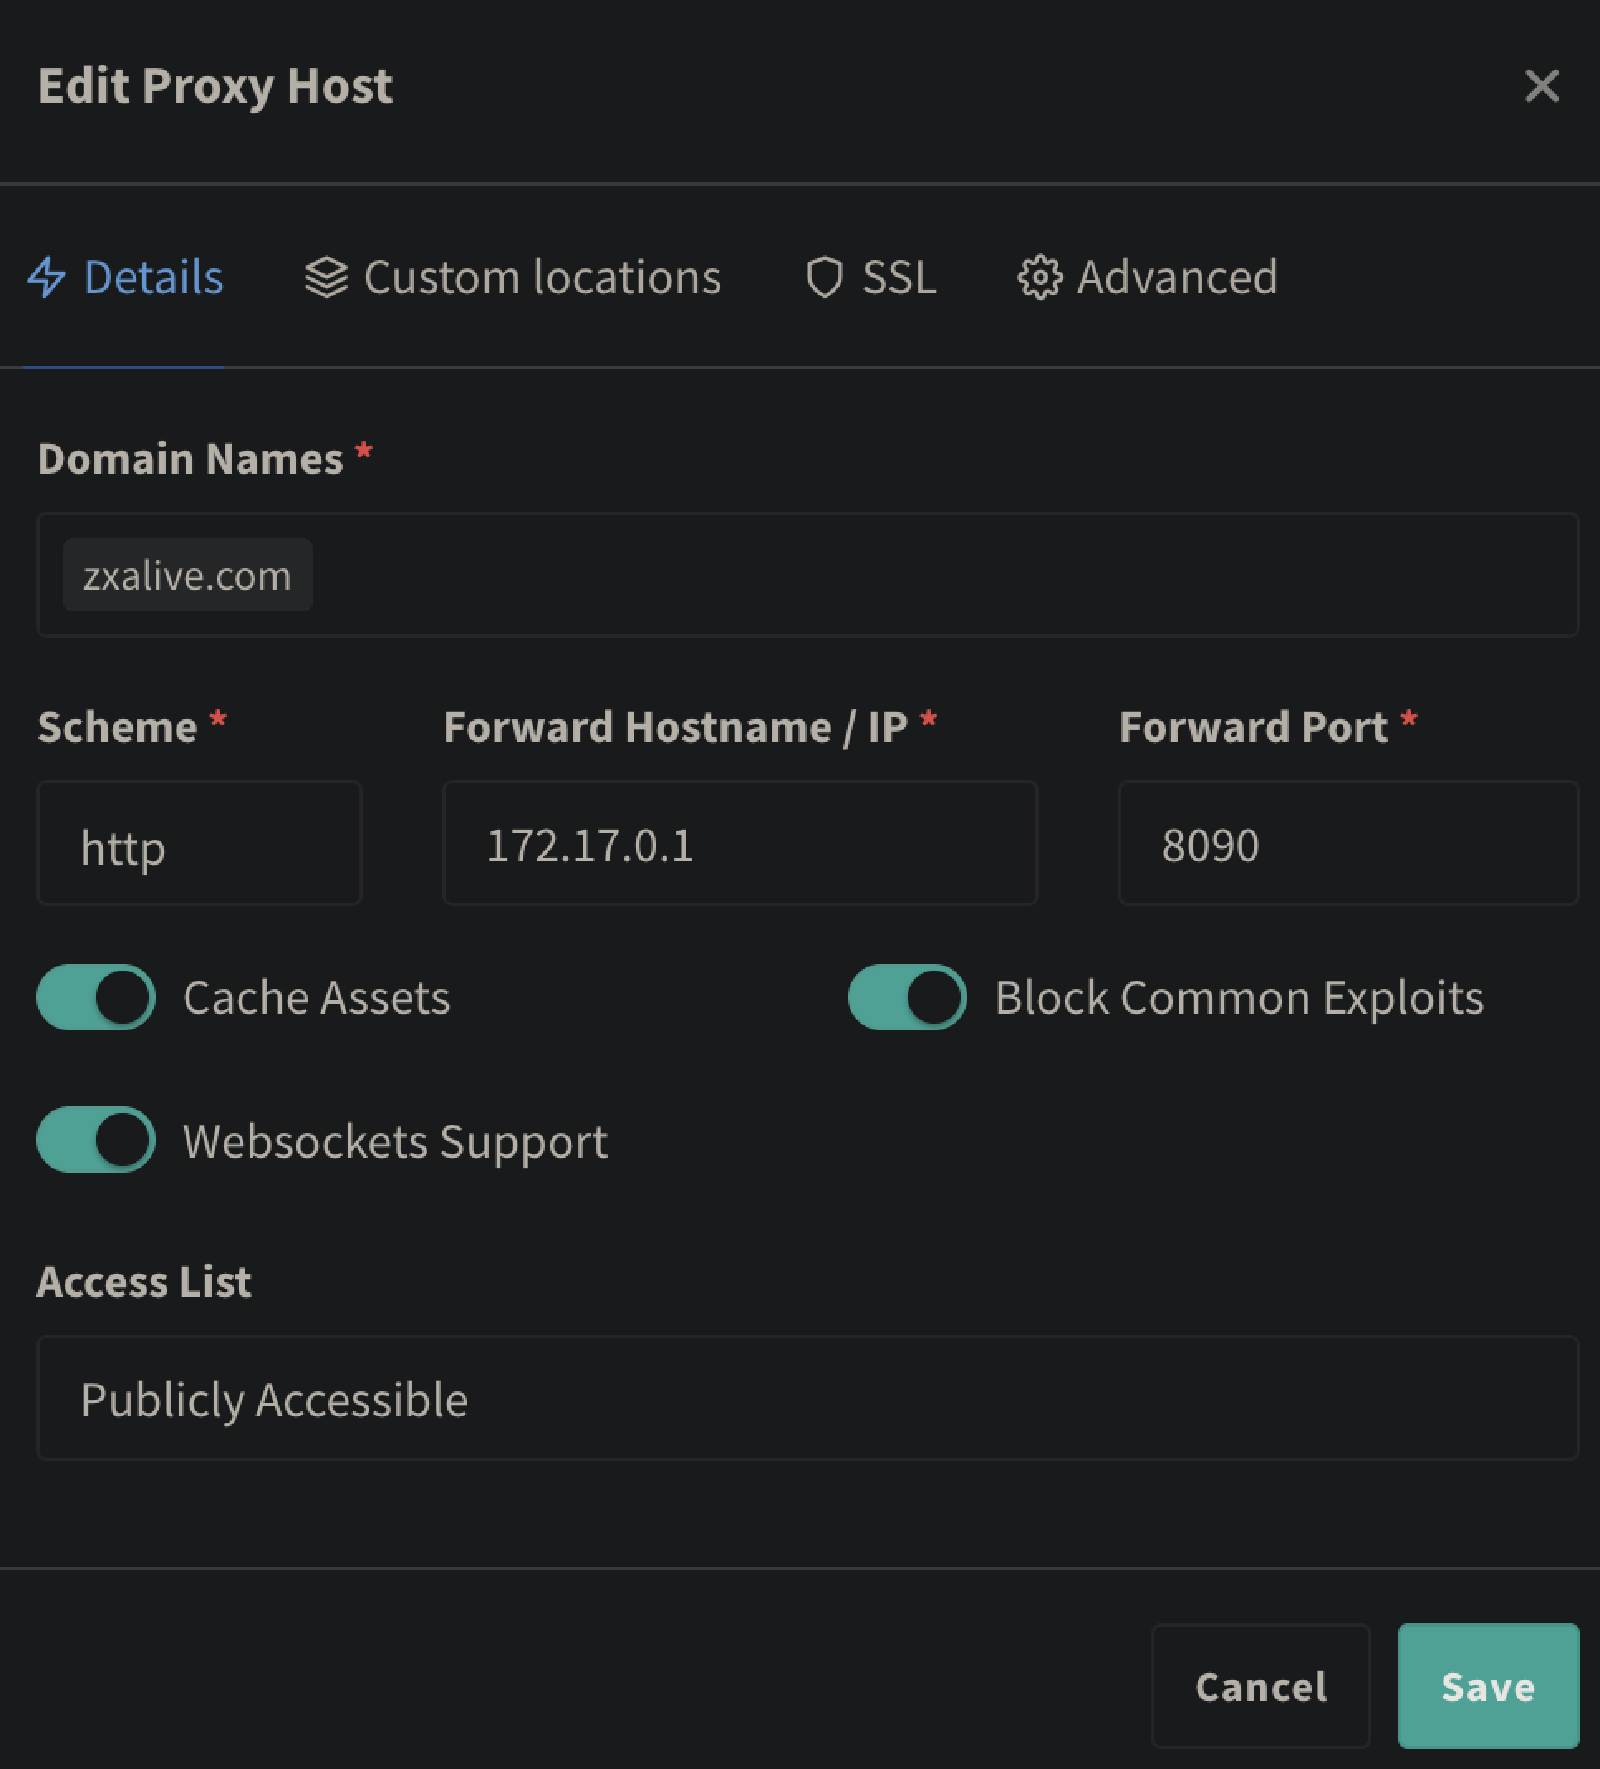
Domain Names :填我们 Halo 网站的域名,首先记得做好 DNS 解析,把域名绑定到我们的服务器的 IP 上
Scheme :默认 http 即可,除非你有自签名证书
Forward Hostname/IP :填入服务器的 IP,或者 Docker 容器内部的 IP(如果 NPM 和 Halo 搭建在同一台服务器上的话)
Forward Port:填入 Halo 映射出的端口,这边默认是 8090
Cache Assets :缓存,可以选择打开
Block Common Exploits: 阻止常见的漏洞,可以选择打开
Websockets Support :WS 支持,可以选择打开
Access List: 这个是 NPM 自带的一个限制访问功能,这边我们不管,后续可以自行研究。
一键申请 SSL 证书
编辑刚才添加的proxy host
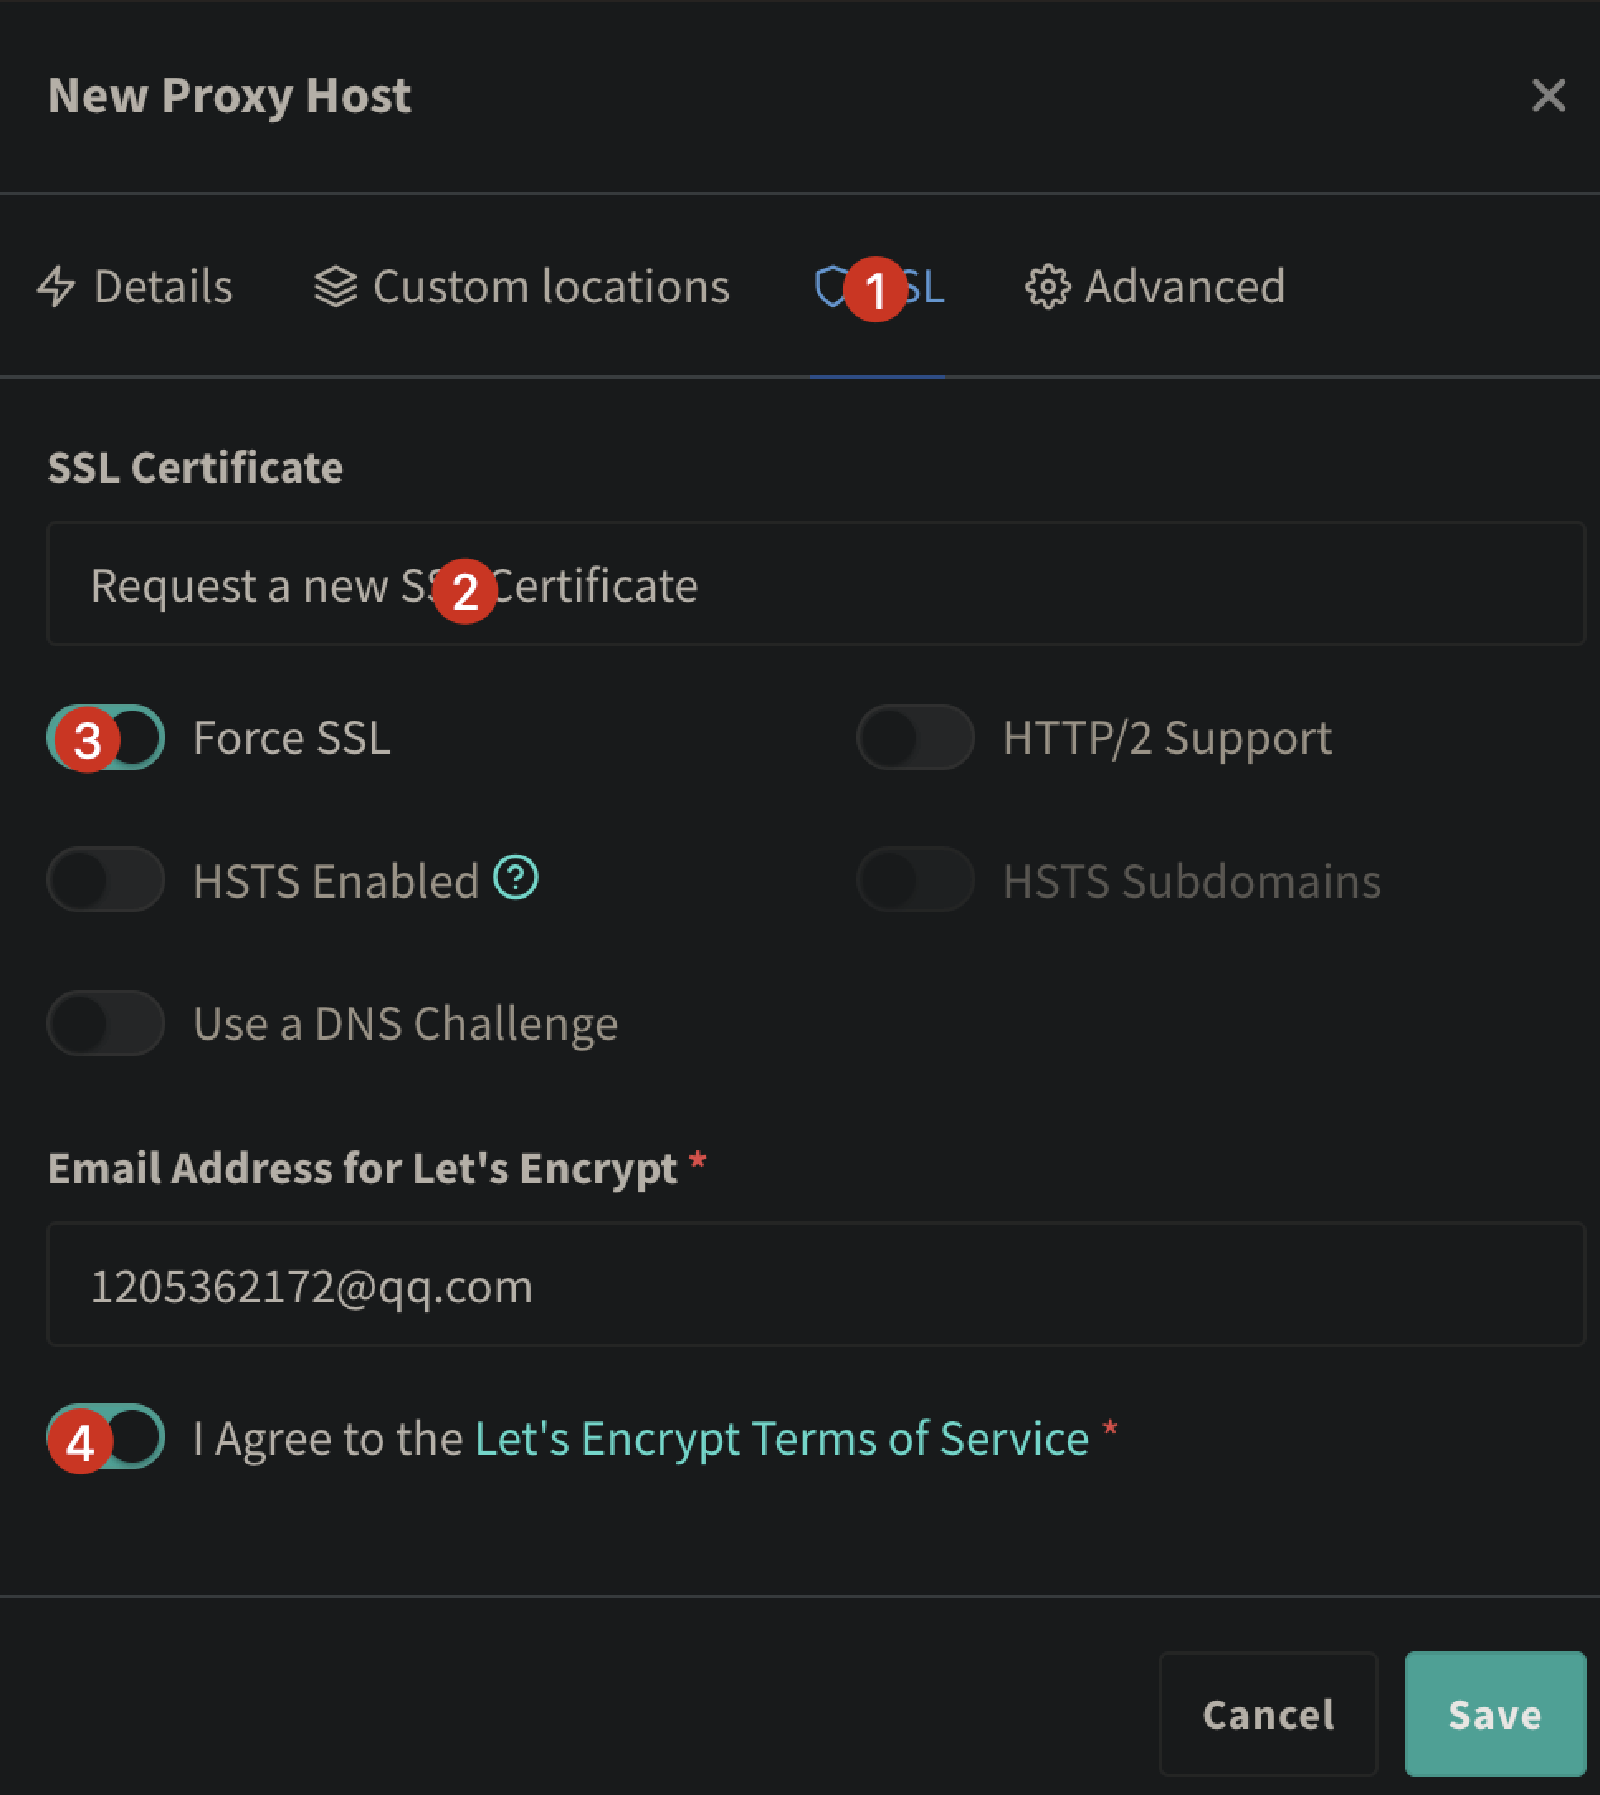
申请证书需要你提前将域名解析到 NPM 所在的服务器的 IP 上;
如果你使用的是国内的服务器,默认 80 和 443 端口是关闭的,你需要备案之后才能使用;
如果你使用了 CloudFlare 的 DNS 服务,记得把小黄云关闭(即不开启 CDN)。
不出意外,你将成功申请到 SSL 证书,证书会三个月自动续期。
再次点开配置,查看一下,将强制 SSL 打开
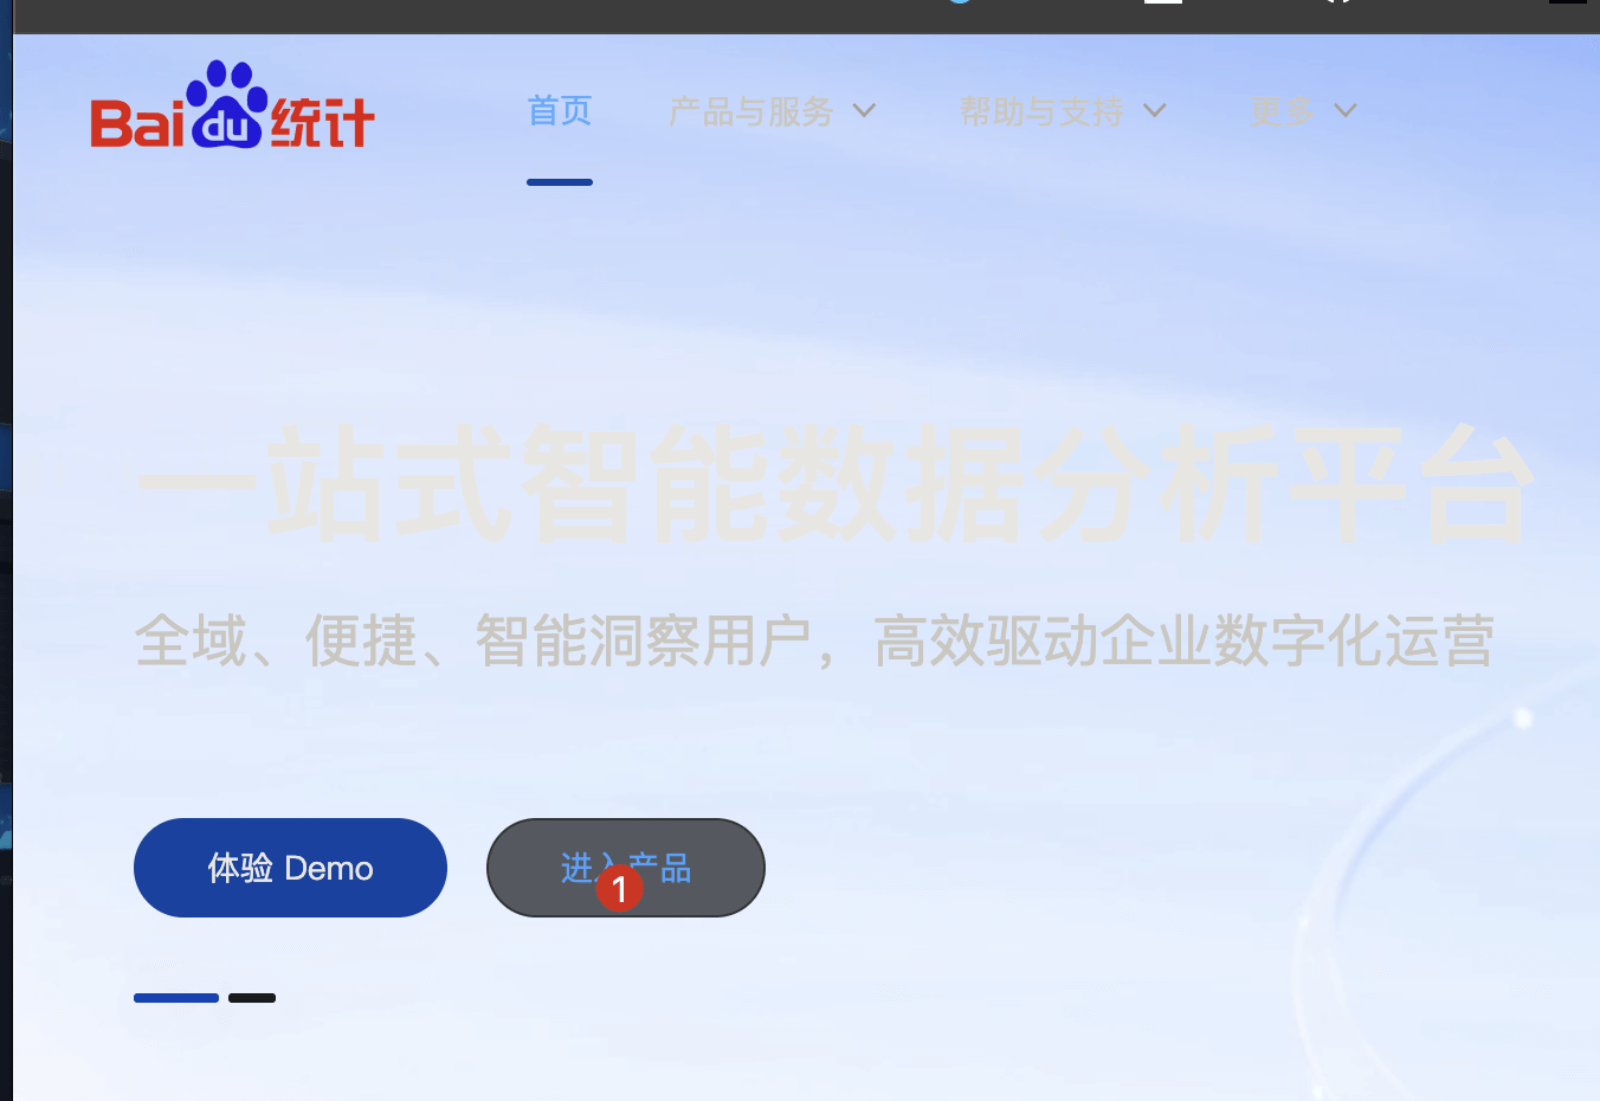
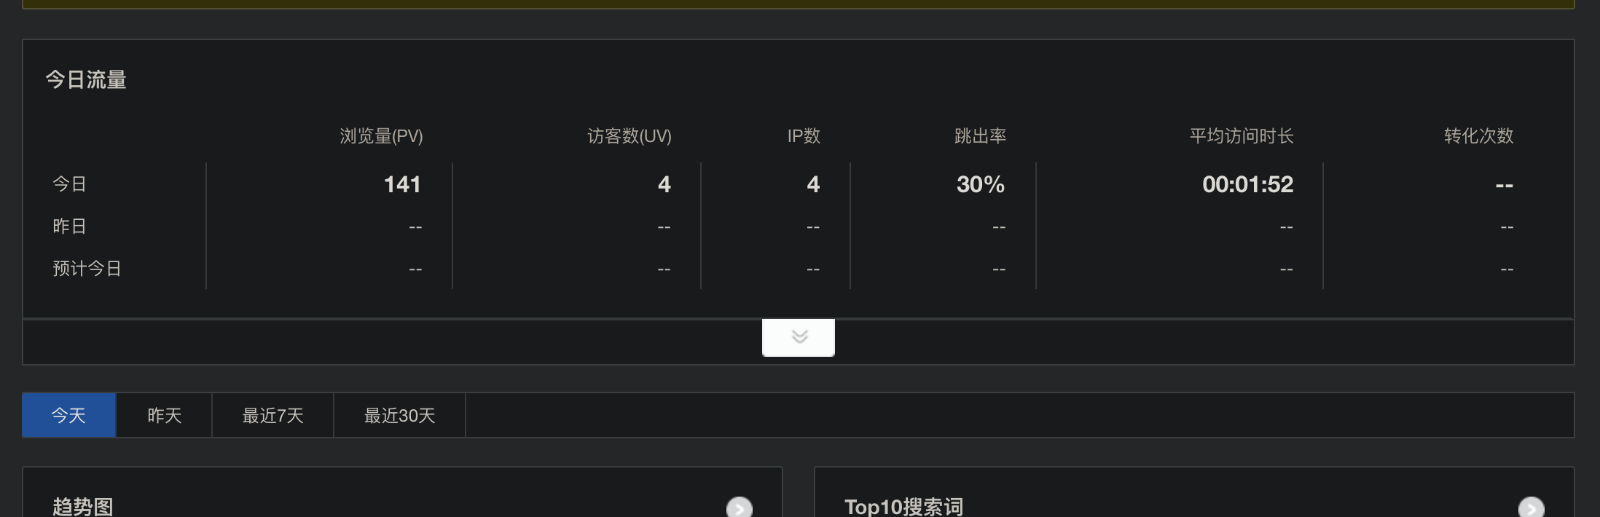
Halo博客使用百度统计网站统计,监控访问量pv uv
百度统计网址:https://tongji.baidu.com/web5/welcome/login
- 注册
- 选择 站长版
- 填写账户信息
- 登录账户
- 进入产品
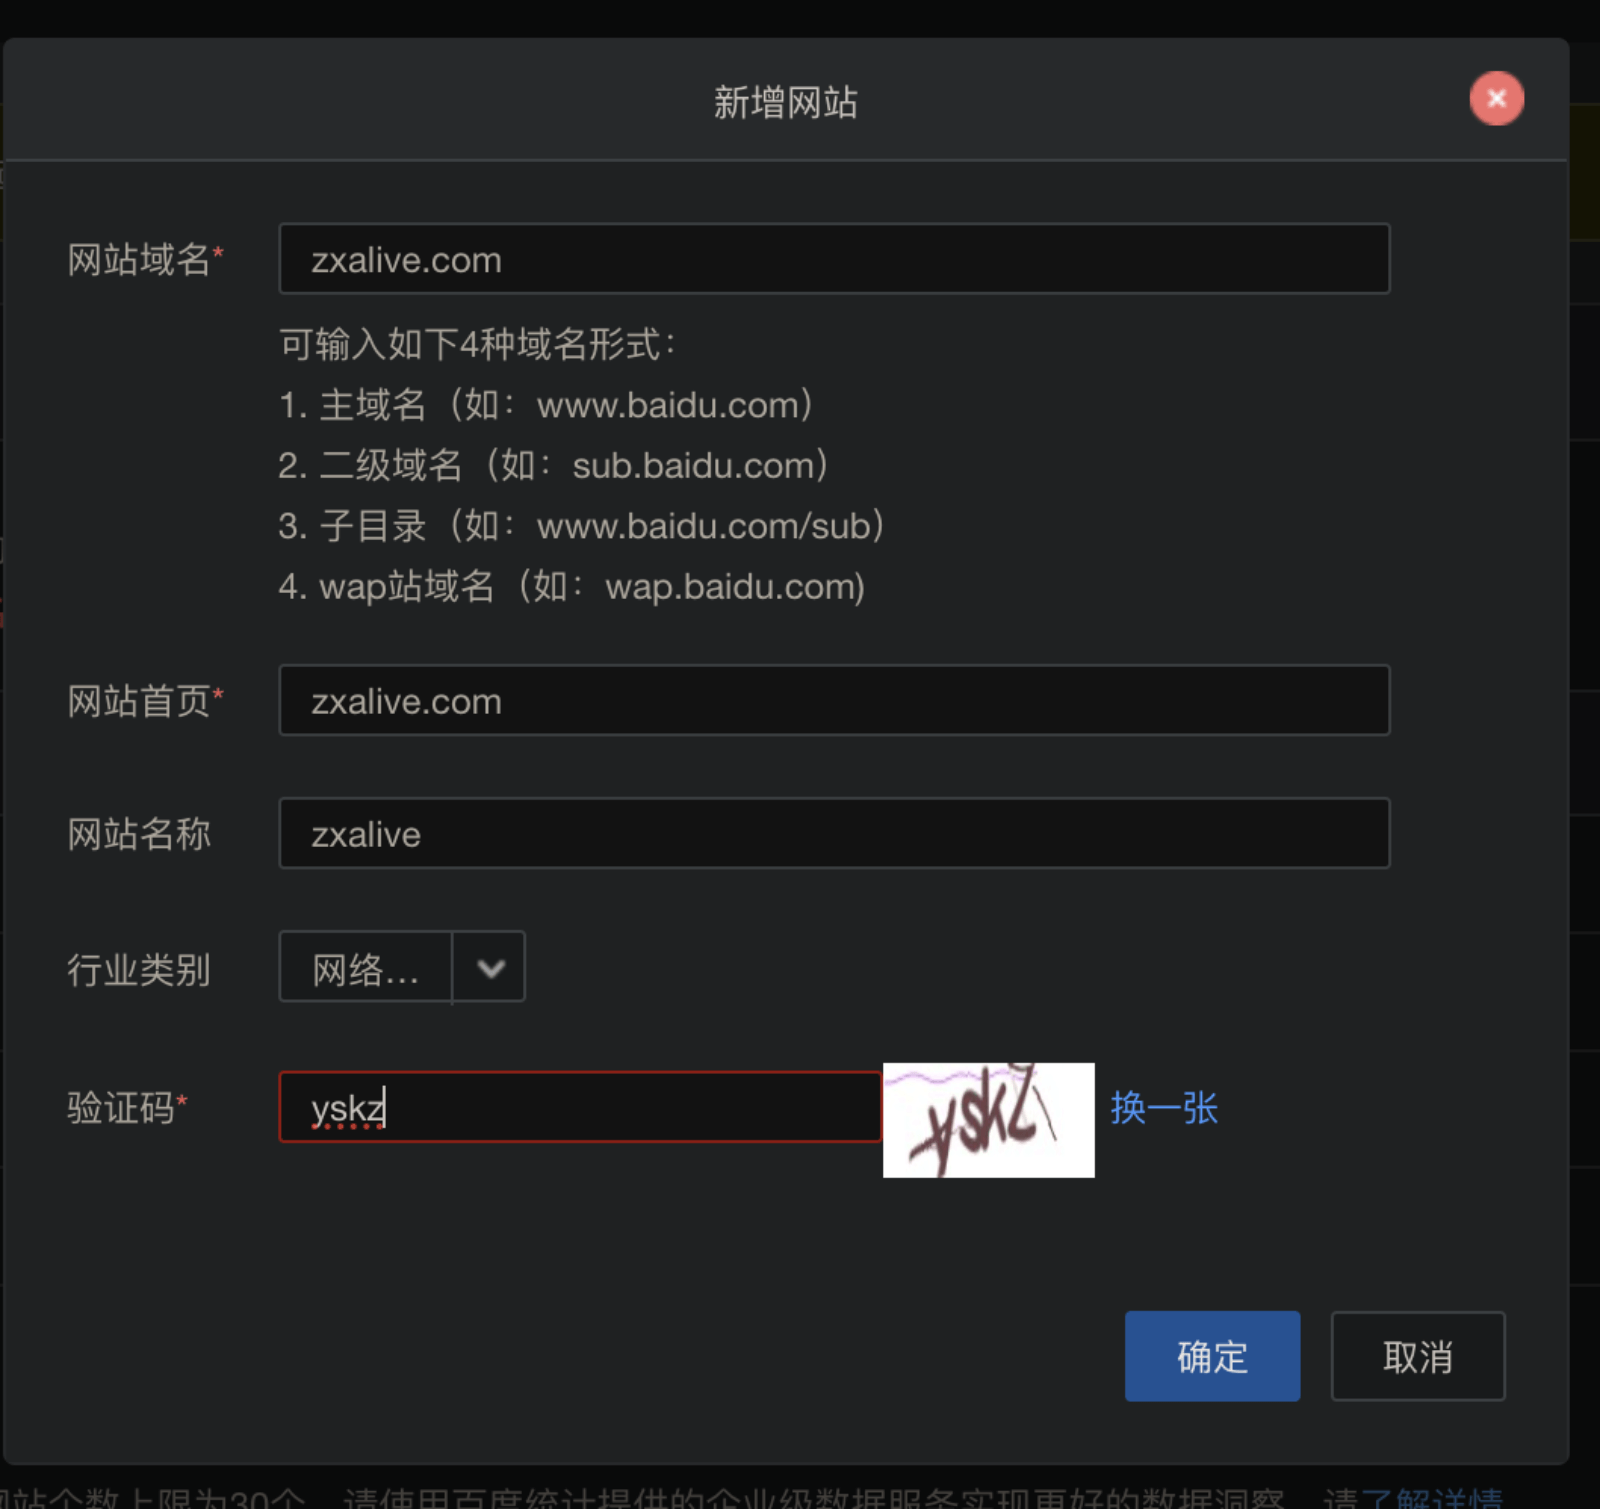
点击使用设置,新建站点
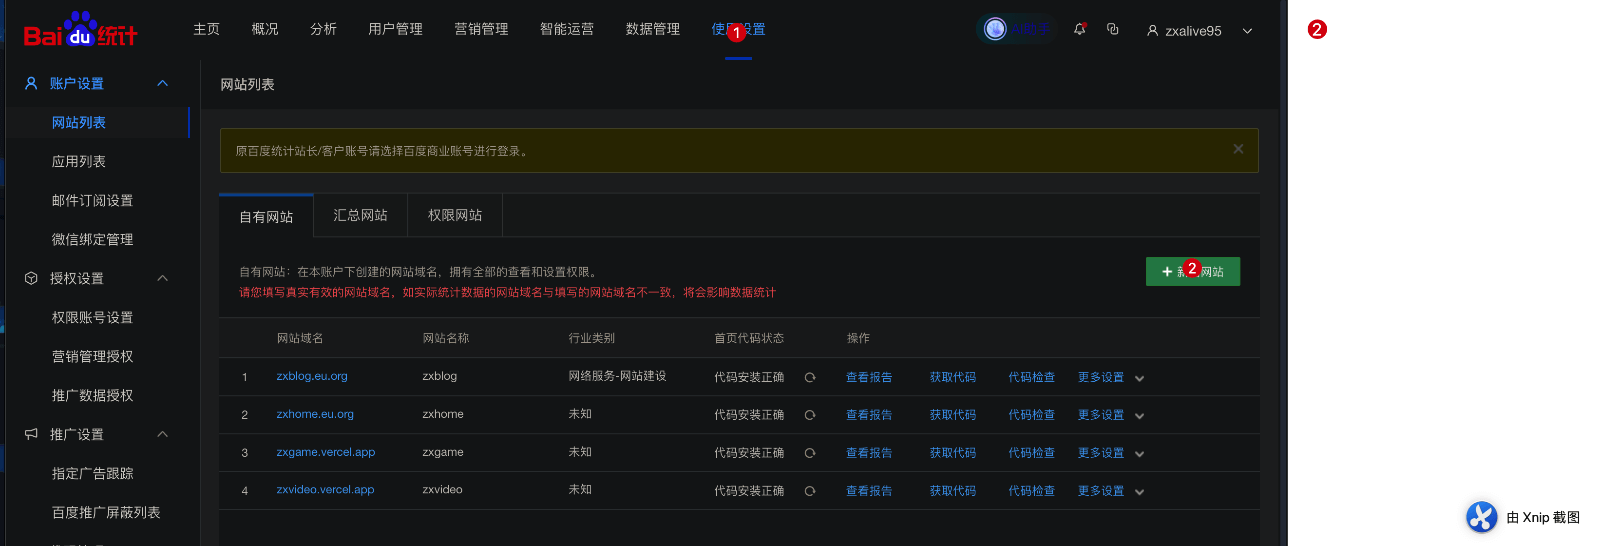
填写信息
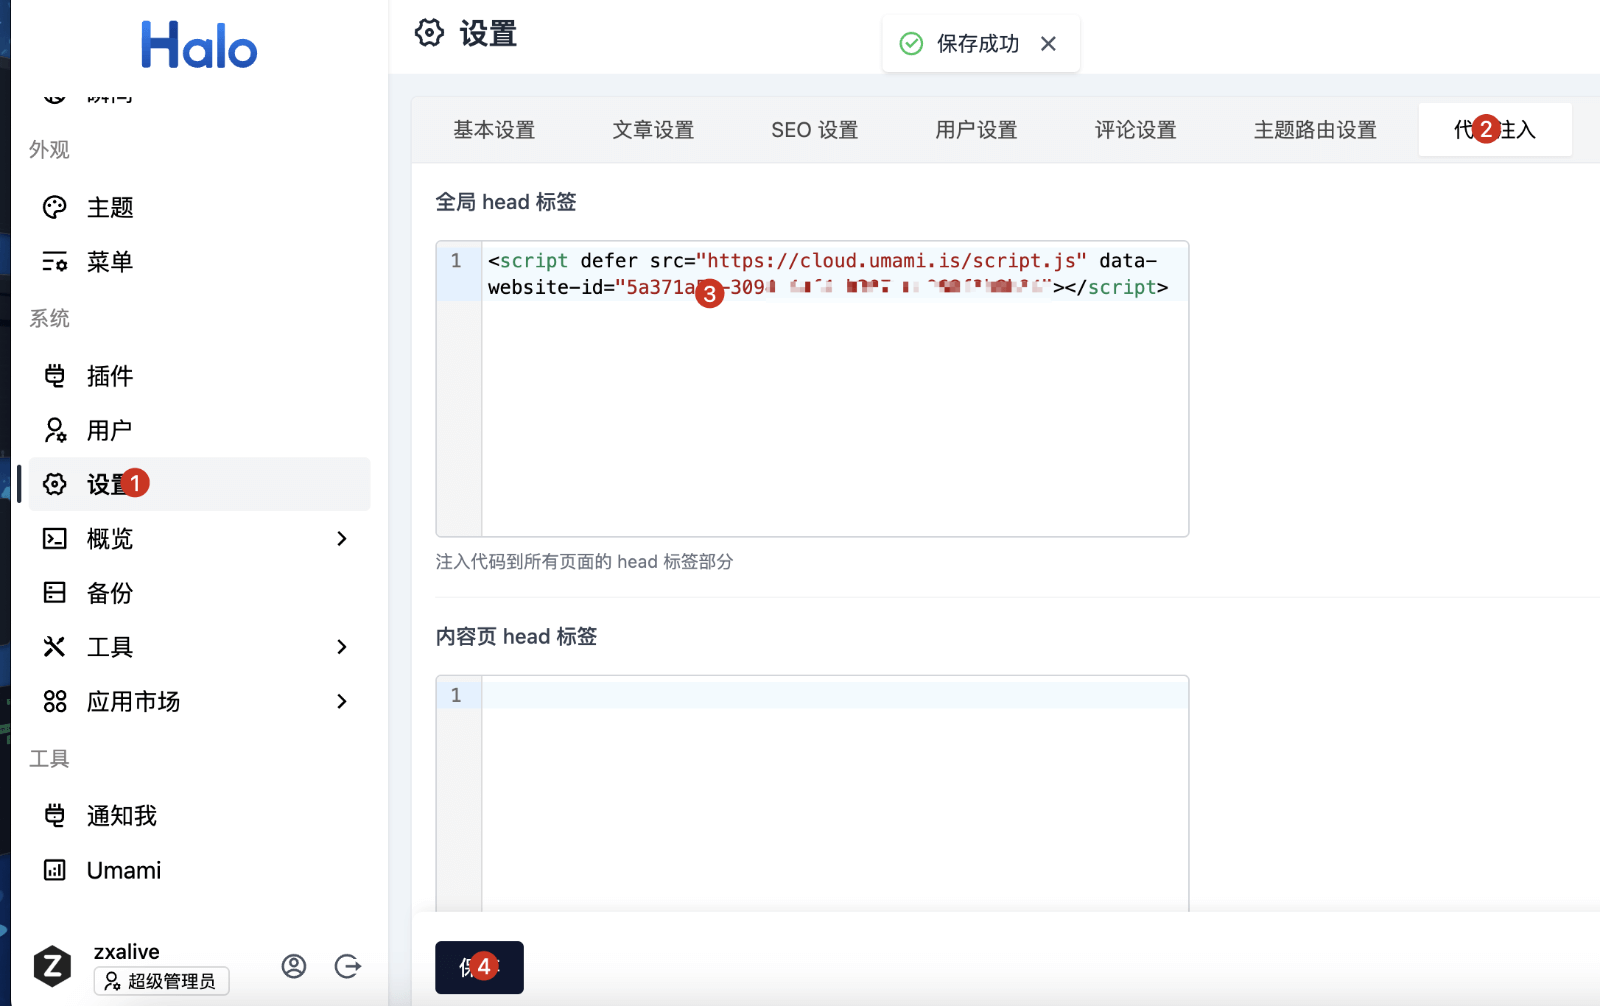
复制js代码
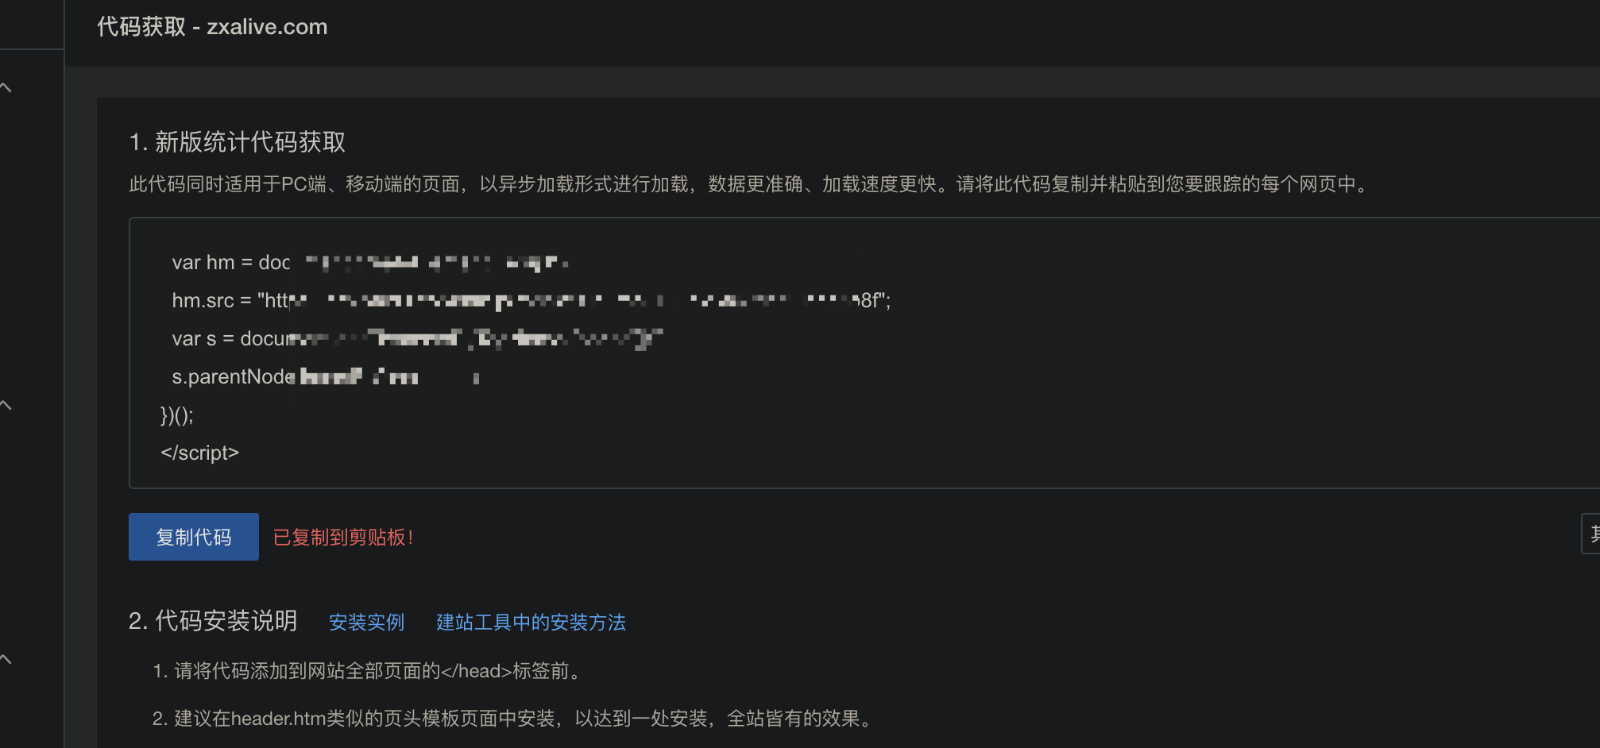
到halo博客的全局head标签
检测
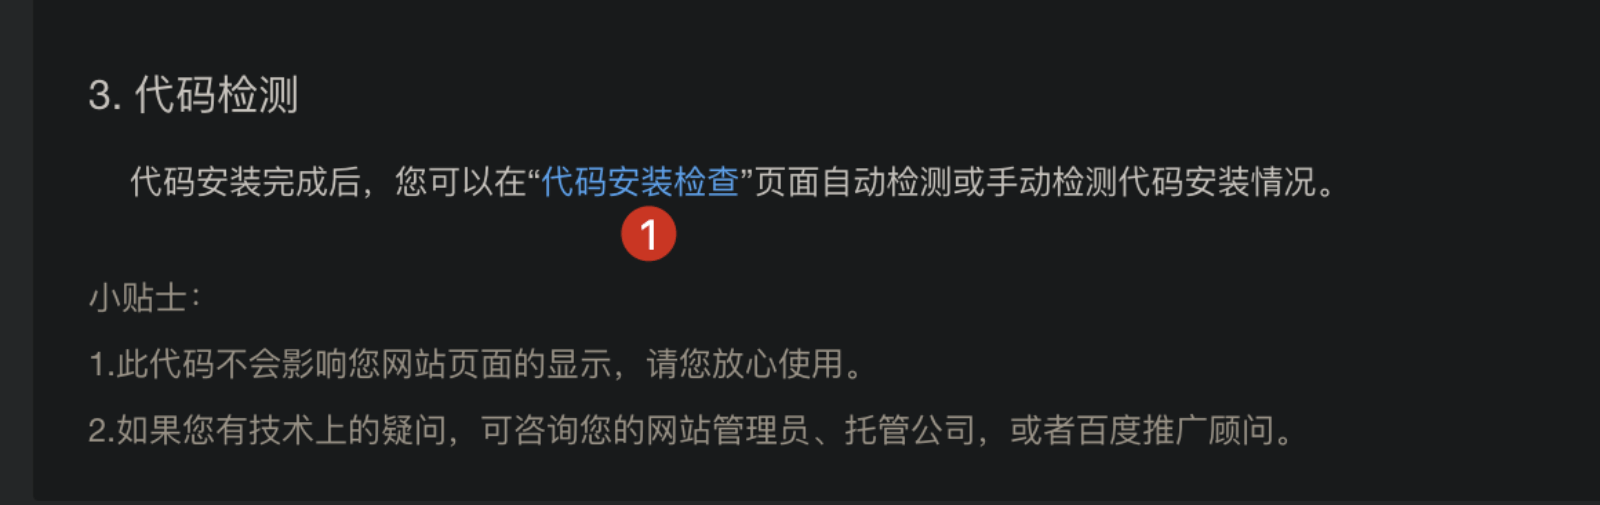
自动检查有点问题,可以手动检查
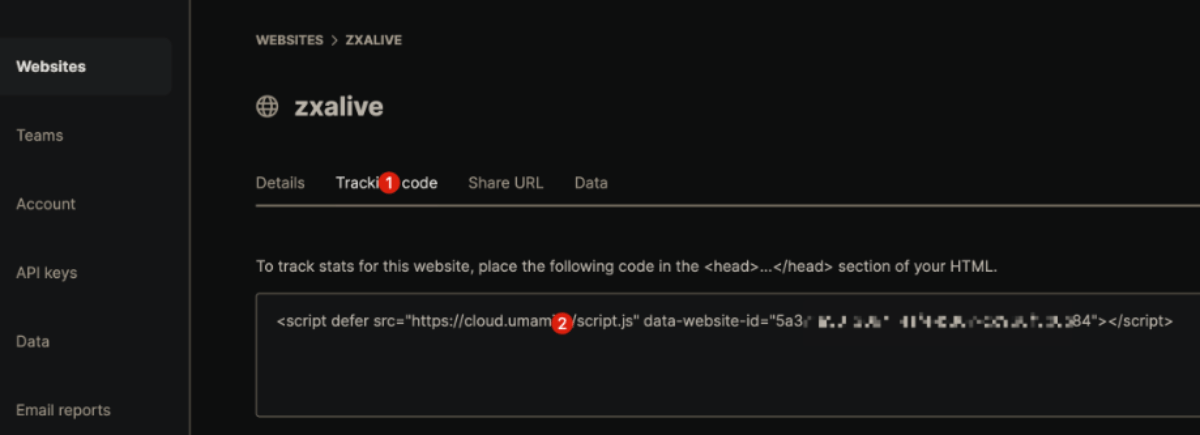
Halo博客使用umami网站统计,监控访问量pv uv
注册umami
cloud.umami.is 按照它的提示一步一步走完
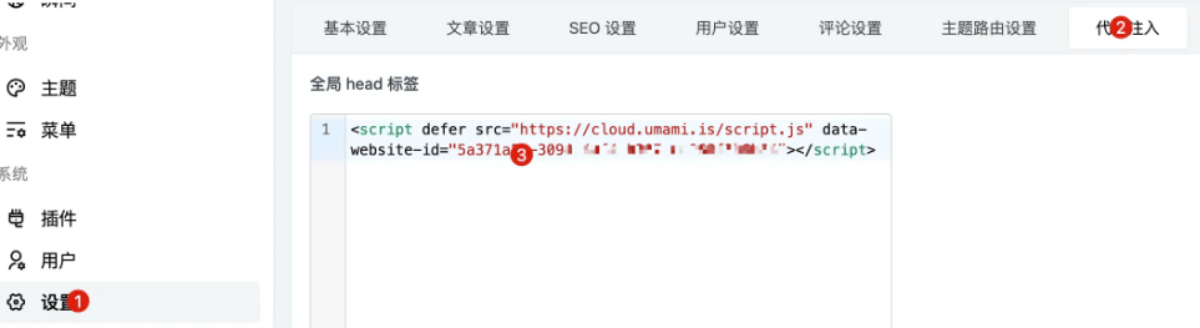
注入js统计代码
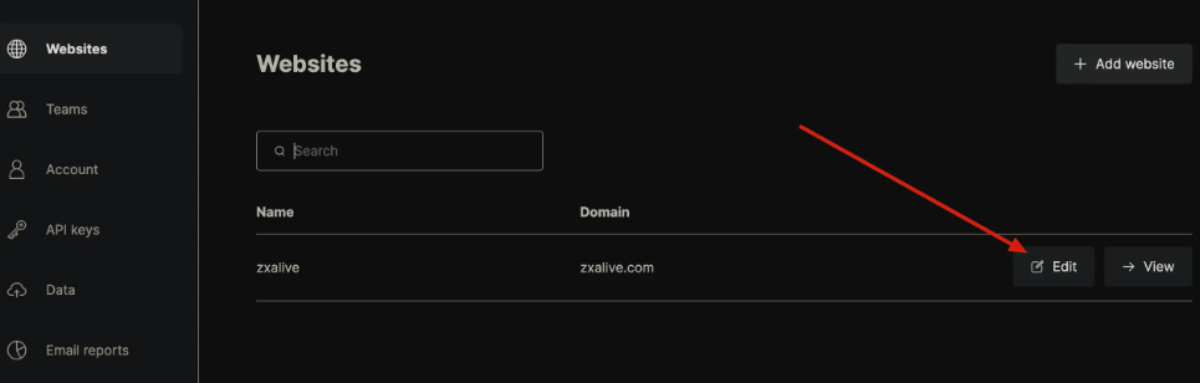
点击edit
然后复制js脚本,到halo博客的全局head标签,保存。
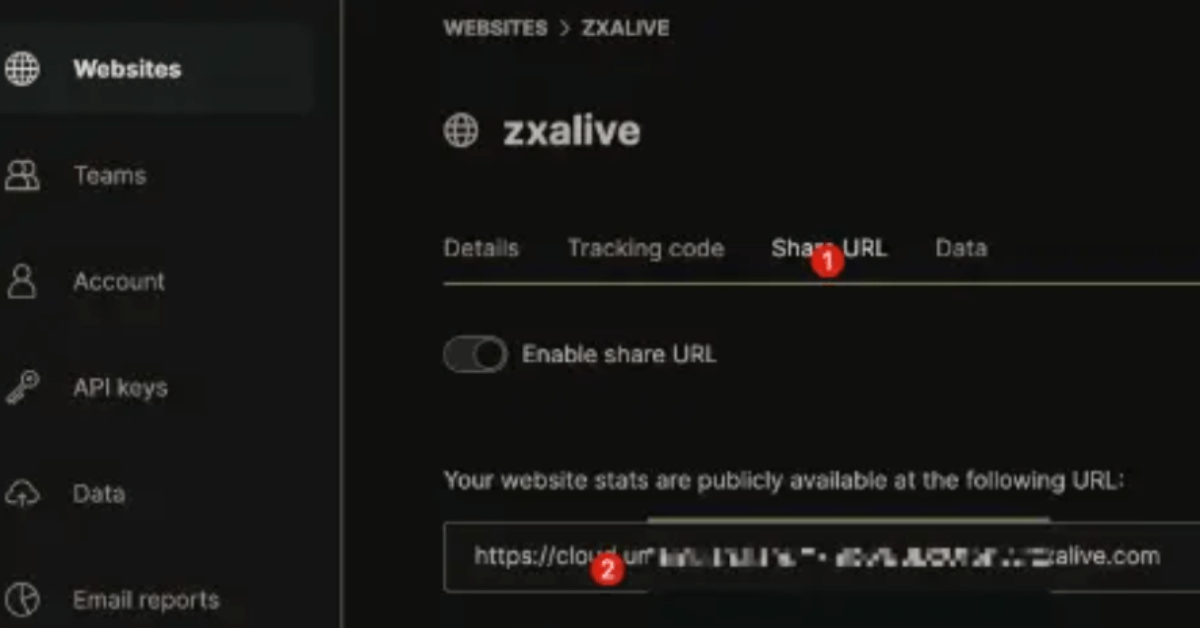
shareurl设置
复制2处的链接
Halo安装Umami插件,补充以下信息,保存
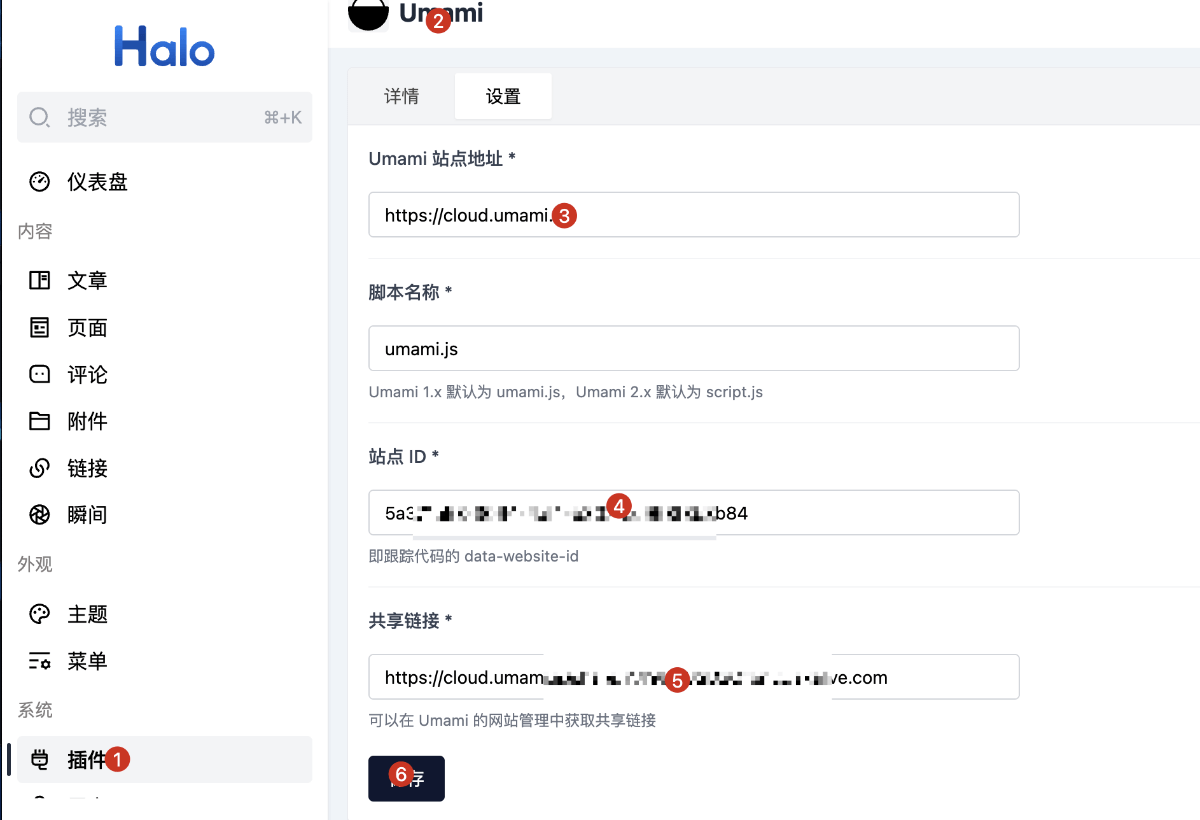
完成
然后最下角就有了

Halo免费使用又拍云CDN加速网站
加速前:

加速后:

准备
国内已经备案超过2天的域名
注册又拍云账号
https://console.upyun.com/register/
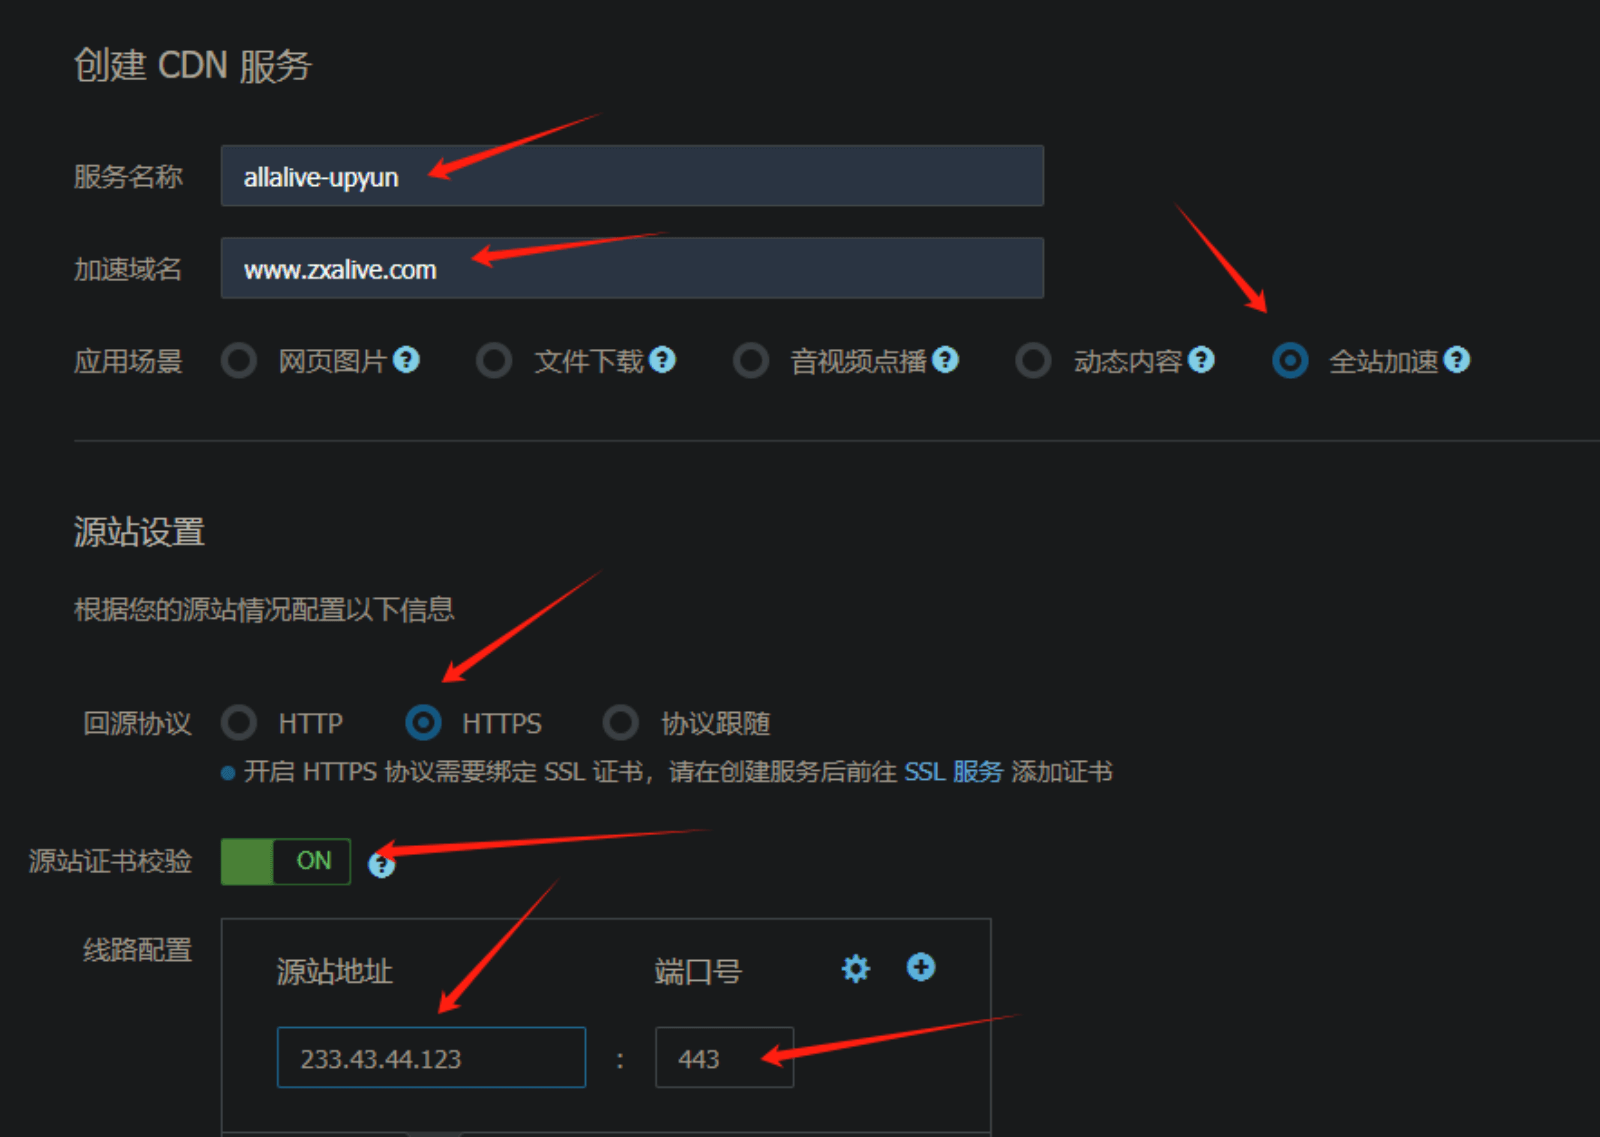
创建服务
登陆到控制台:https://console.upyun.com/dashboard/
菜单栏:云产品->CDN
然后点击创建服务按钮
加速域名示例:www.zxalive.com 或者 zxalive.com 或者blog.zxalive.com
域名绑定
https://console.upyun.com/services/
替换成你上面填写的服务名称/domainsCdn/
点击域名绑定按钮,绑定之后大概1小时通过审核。
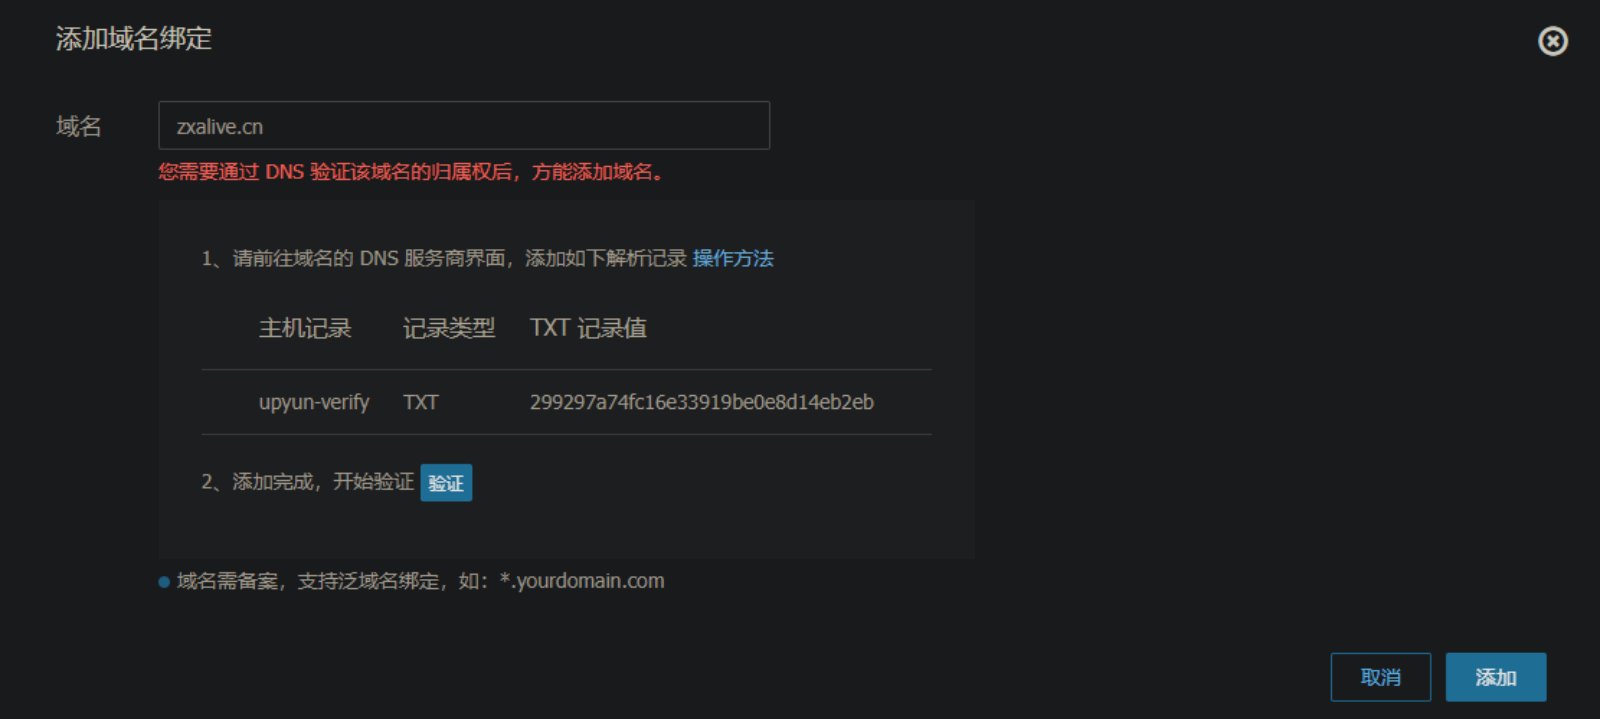
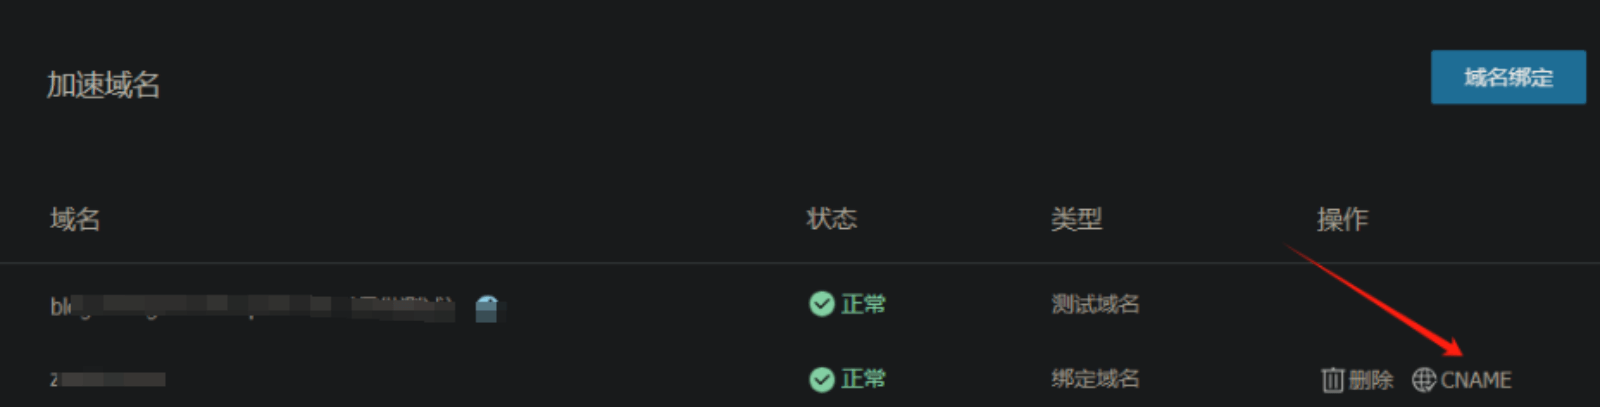
审核后CNAME解析
配置参数全程跟随
https://console.upyun.com/services/
替换成你上面填写的服务名称/cacheCdn/
参数跟随,选择全程跟随
Https证书免费申请和配置
申请 https://console.upyun.com/toolbox/ssl/
大概1日内通过

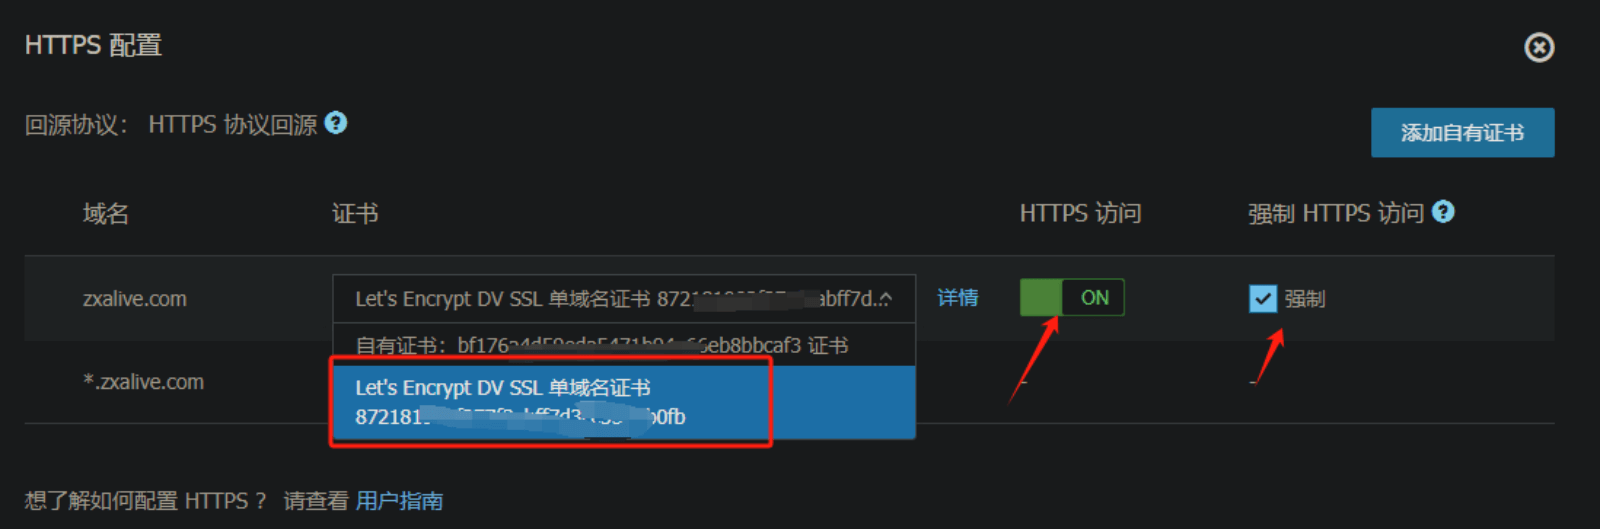
配置
https://console.upyun.com/services/
替换成你上面填写的服务名称/httpsCdn/
选择刚刚申请通过的证书
领取优惠券(或充值)
加入又拍云联盟,免费使用cdn服务:https://www.upyun.com/league
到账后状态使用中就可以了。https://console.upyun.com/billing/vouchers/
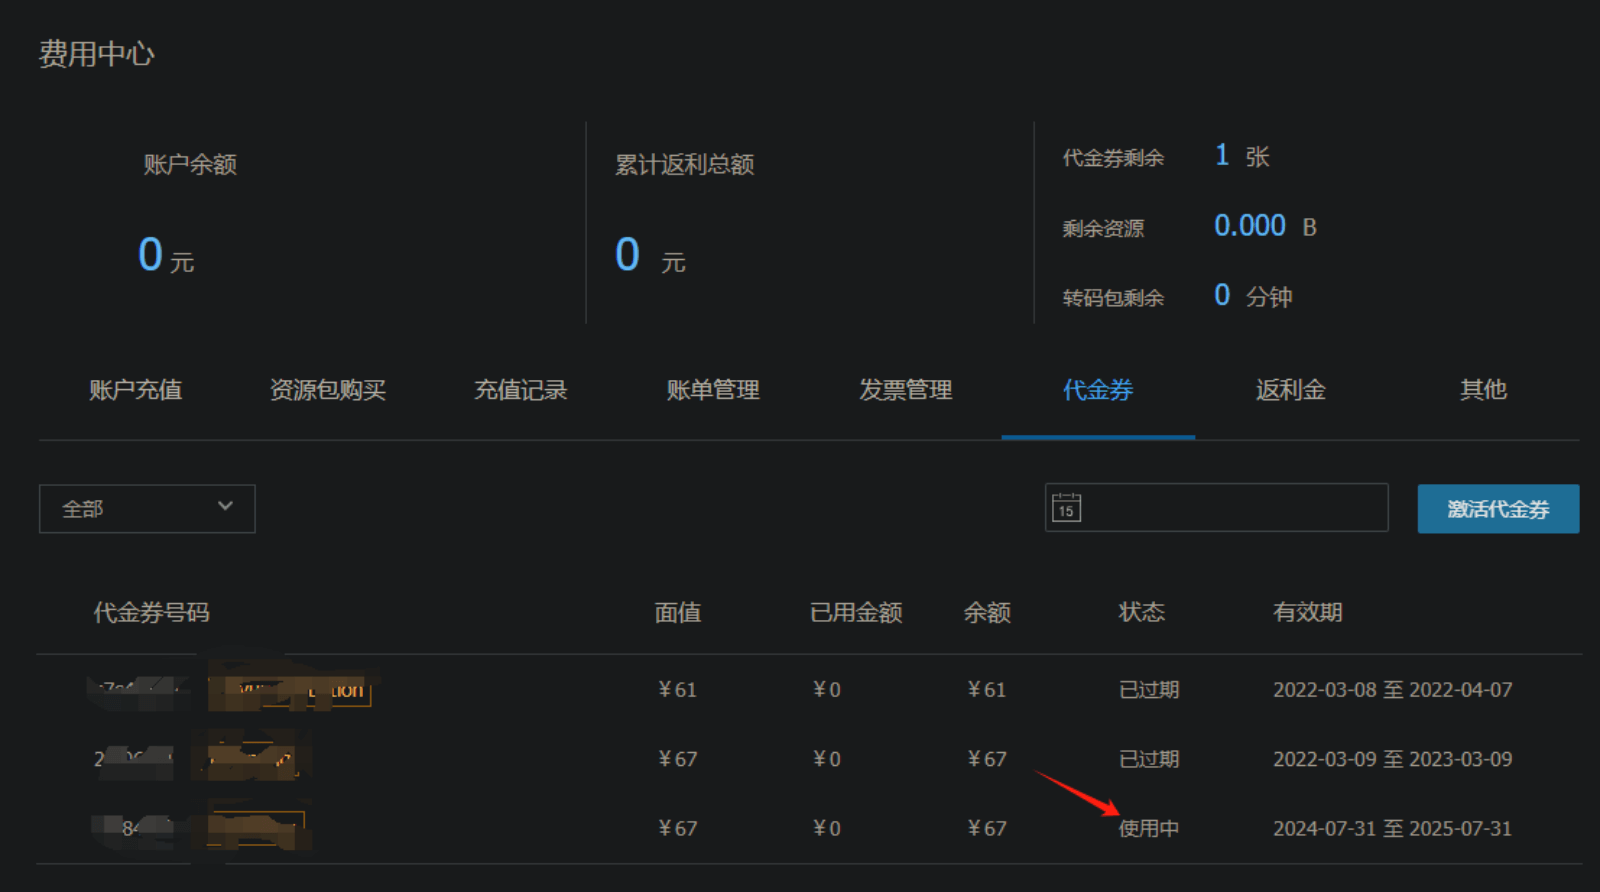
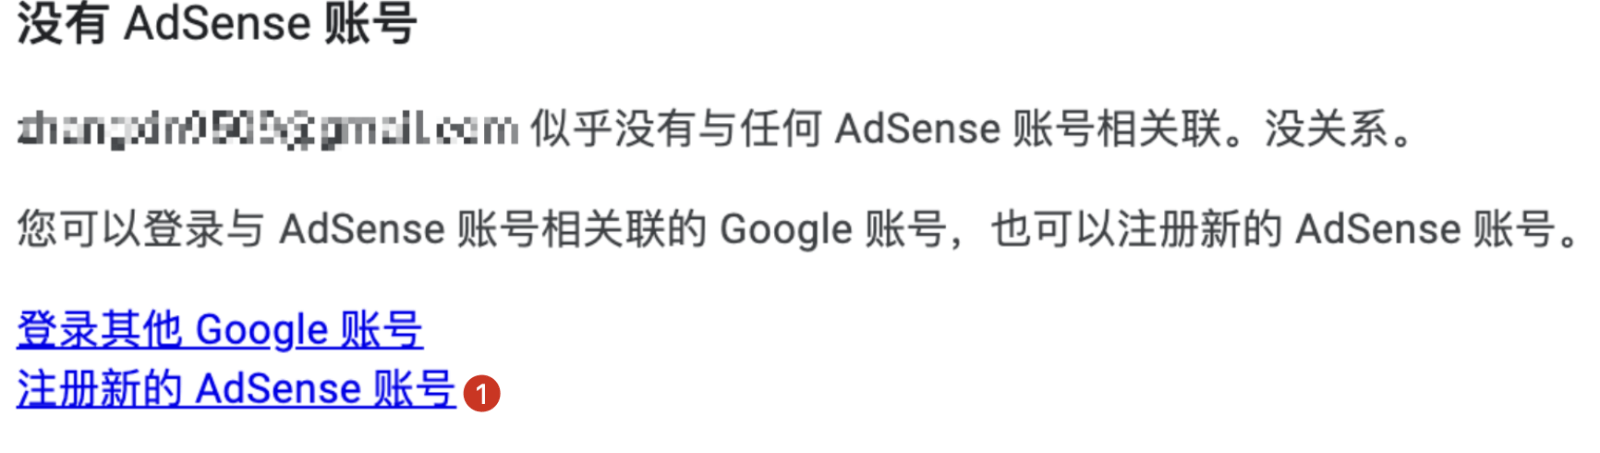
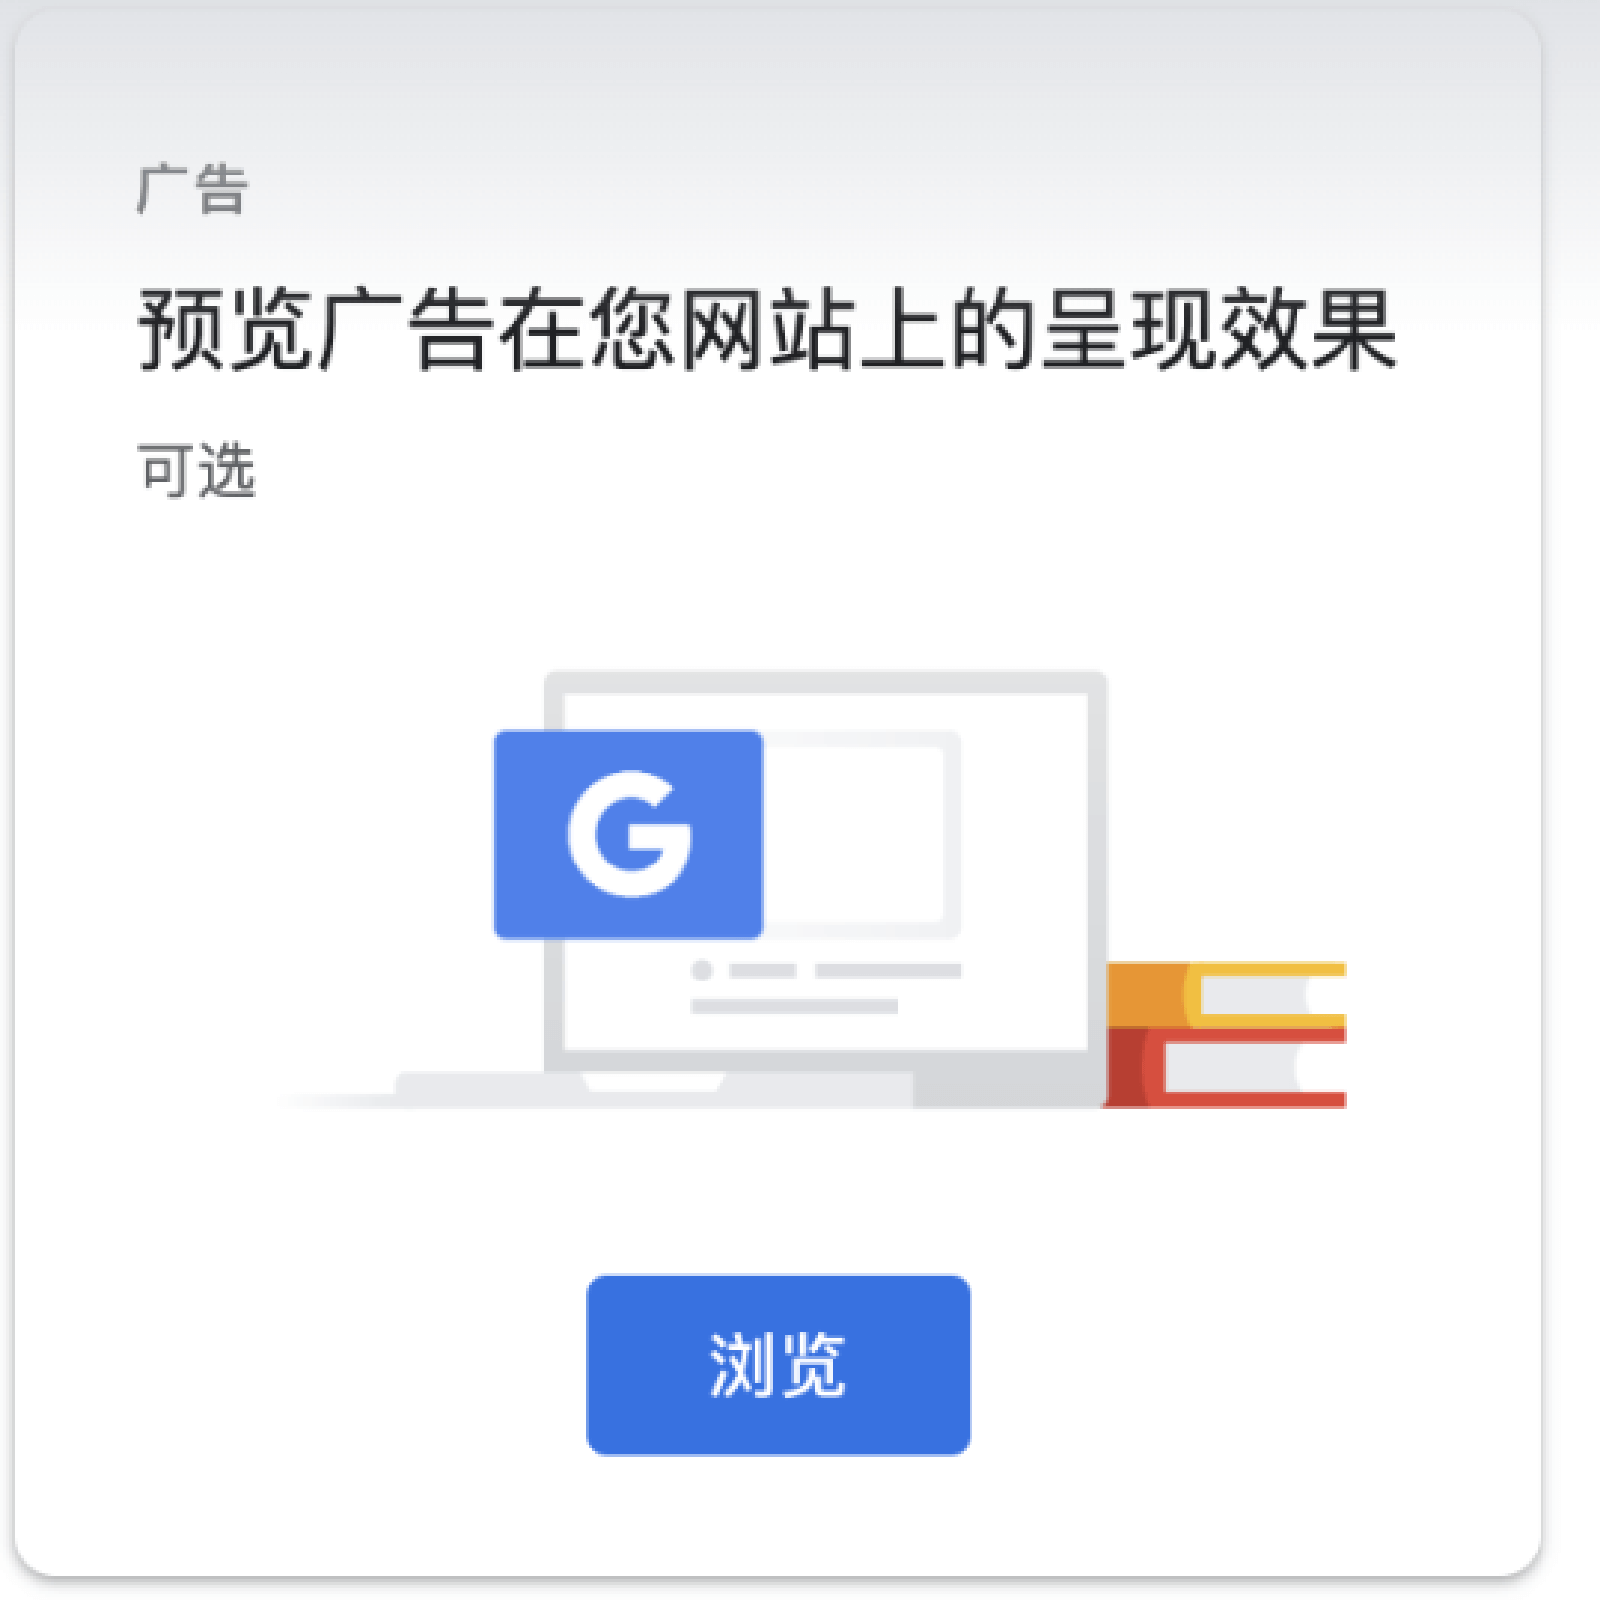
3分钟将你的网站接入Google Asd广告赚美元~
注册ads账号
https://adsense.google.com/start/
外网,可能需要依法访问。
用谷歌账号在右上角 sign up 按钮点击登陆。如何注册新的ads账号,如下截图:
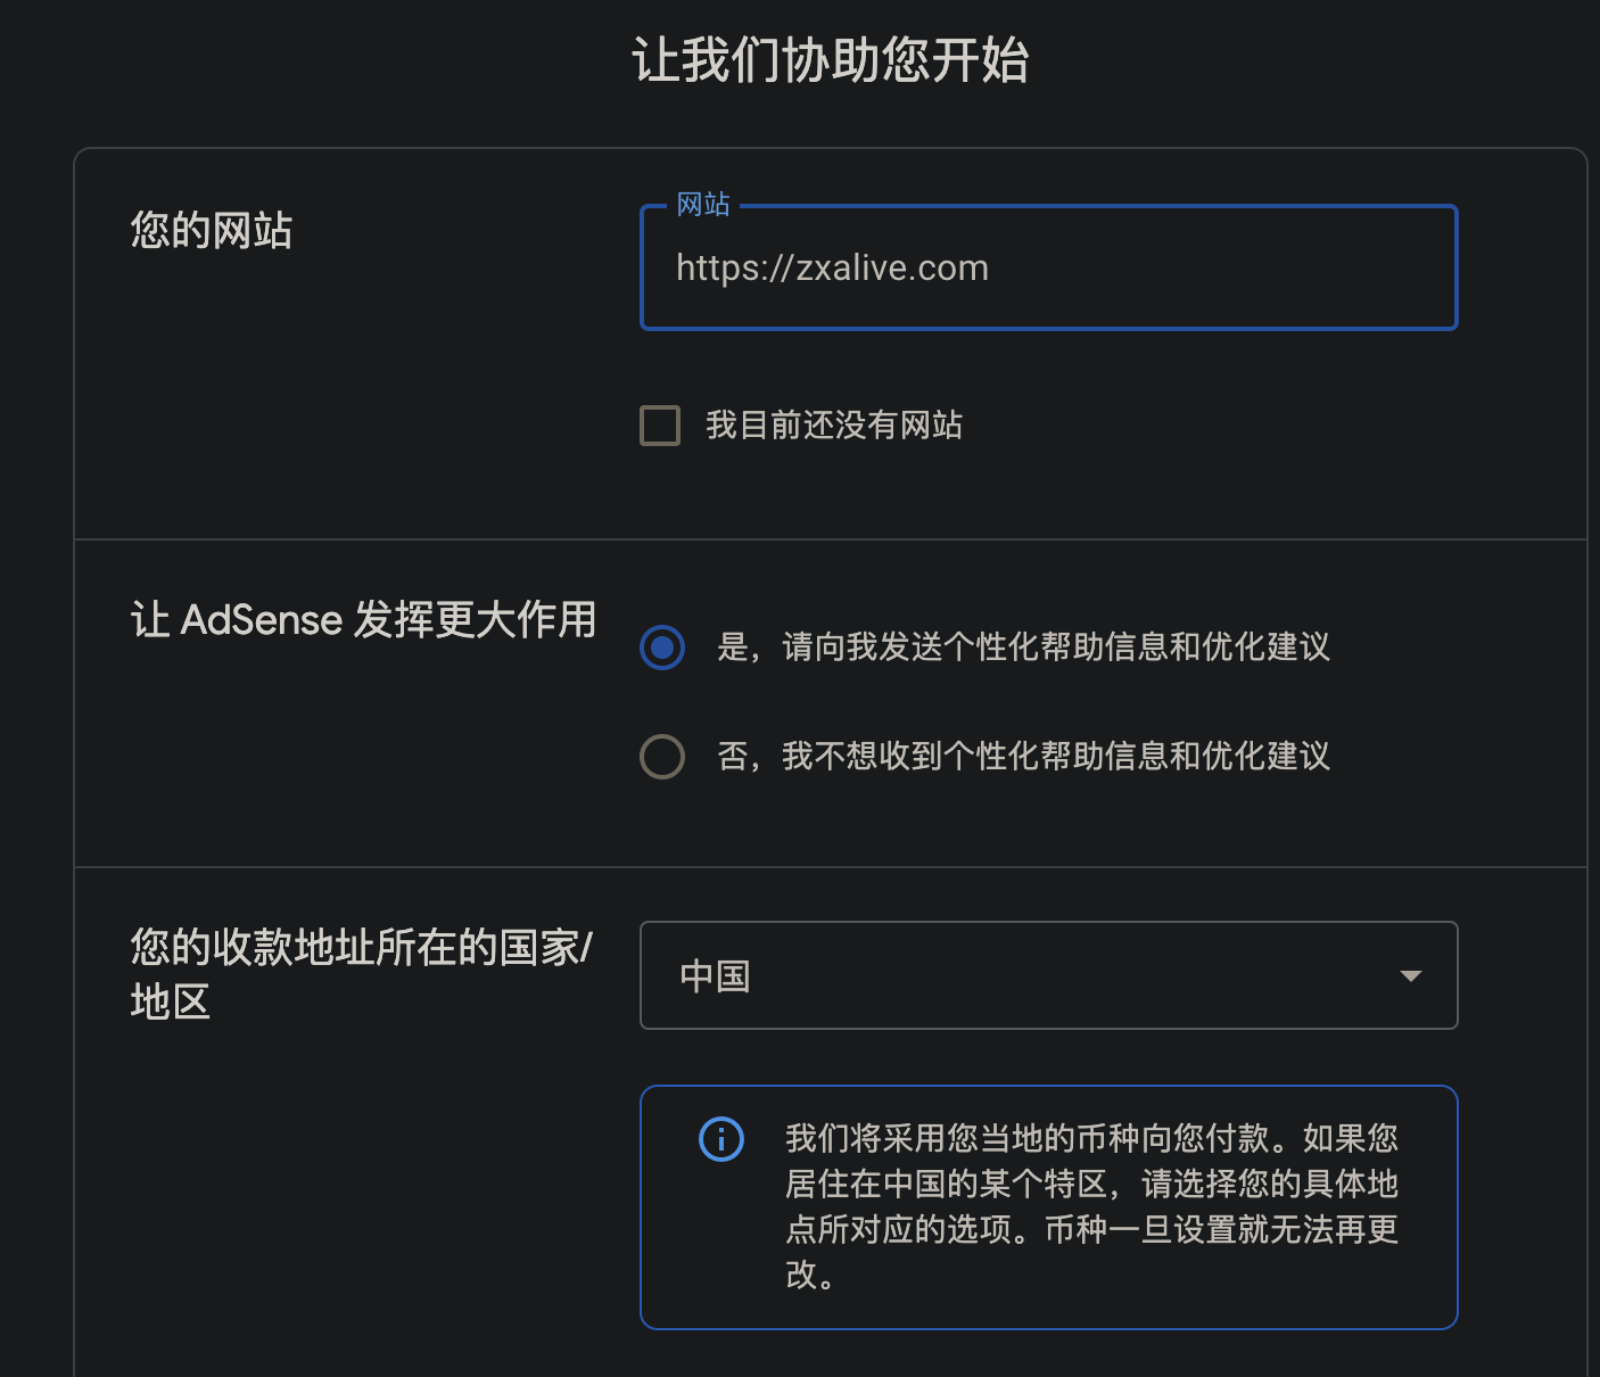
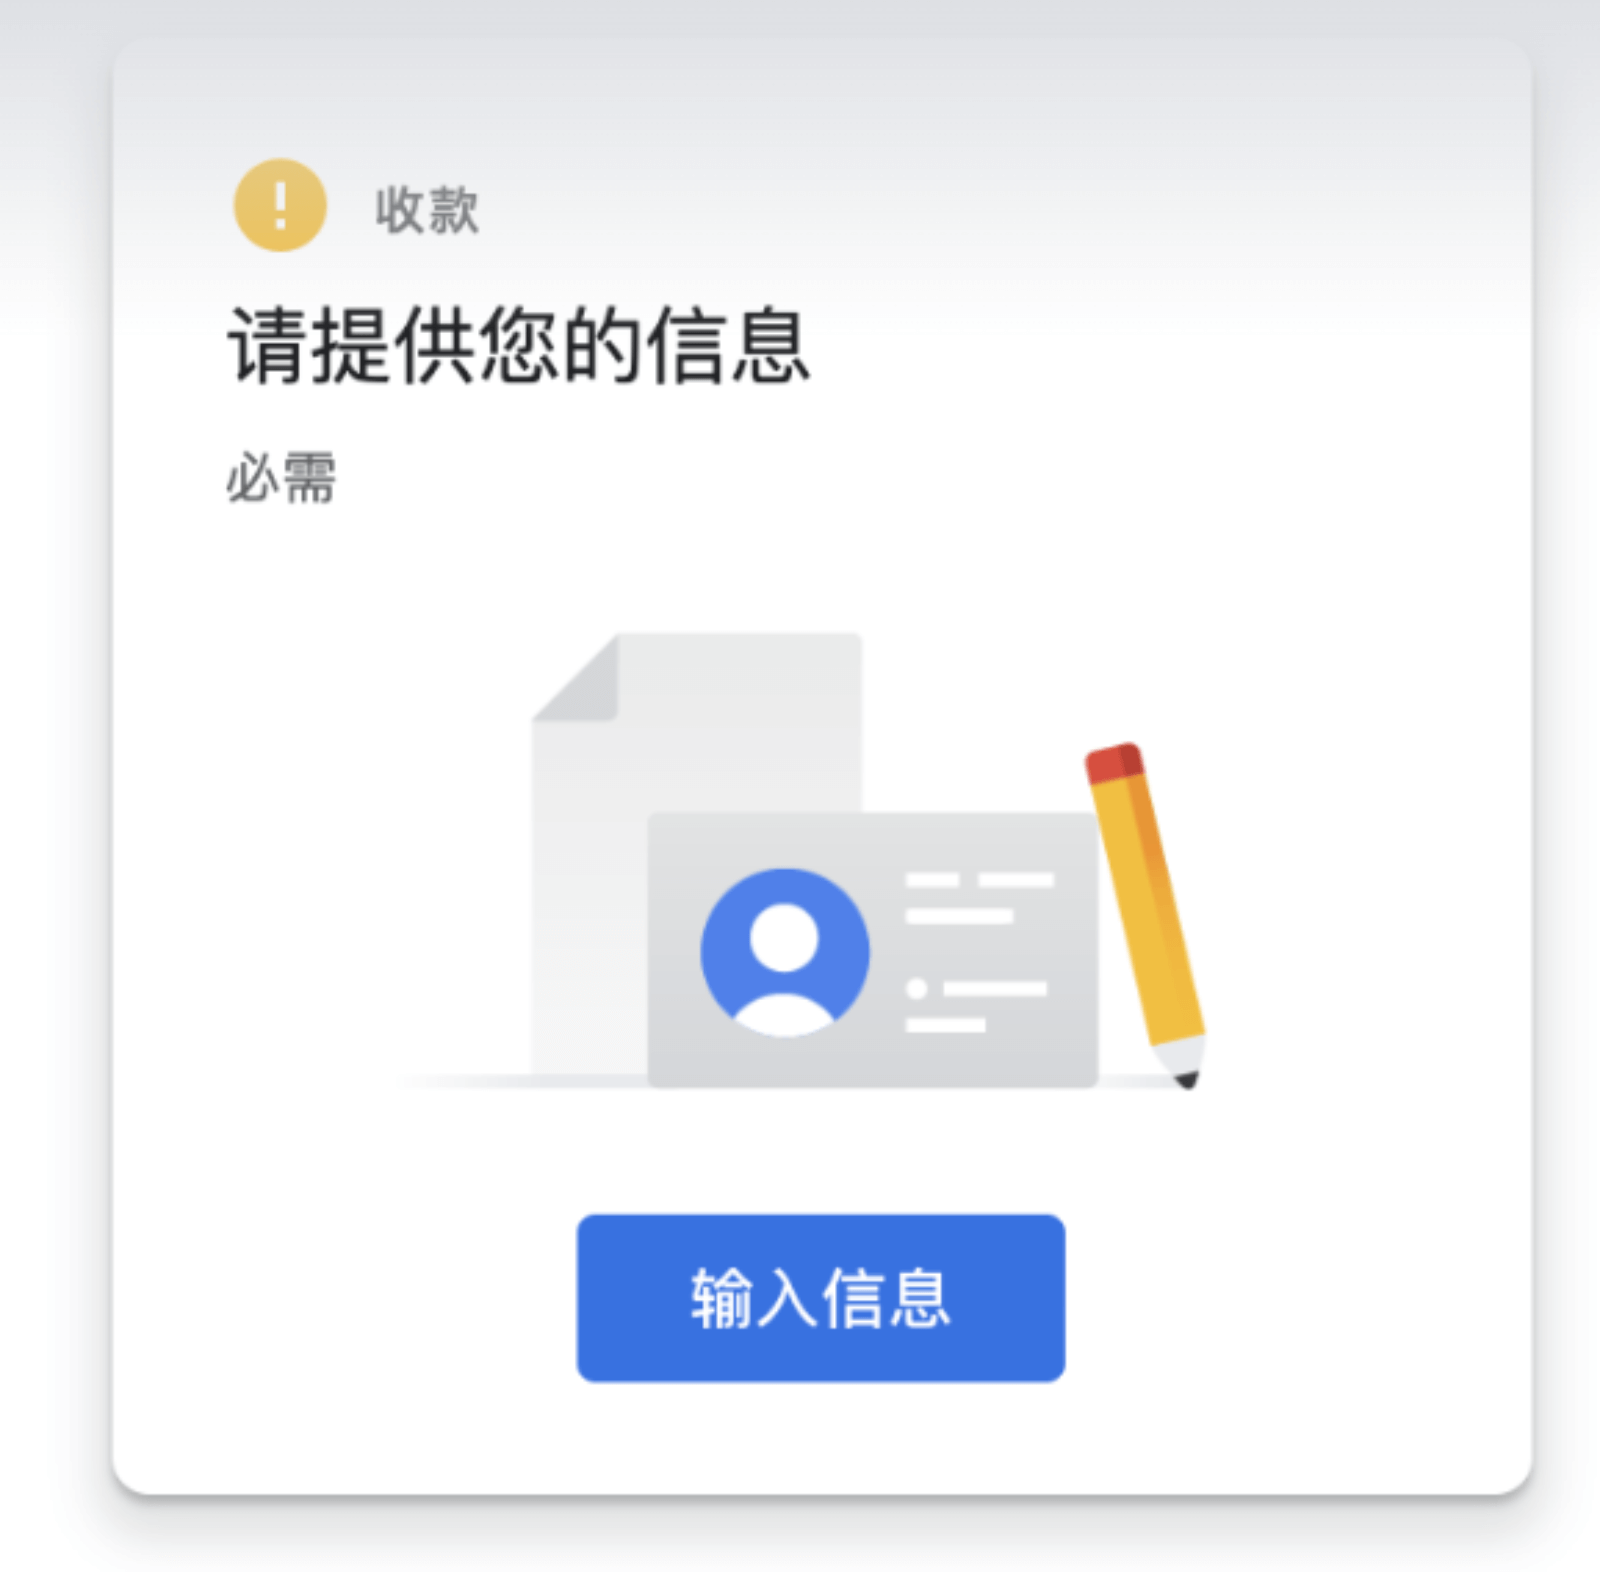
填写个人住址,银行卡信息
点击输入信息按钮,一步一步填写
设置广告位置
审核
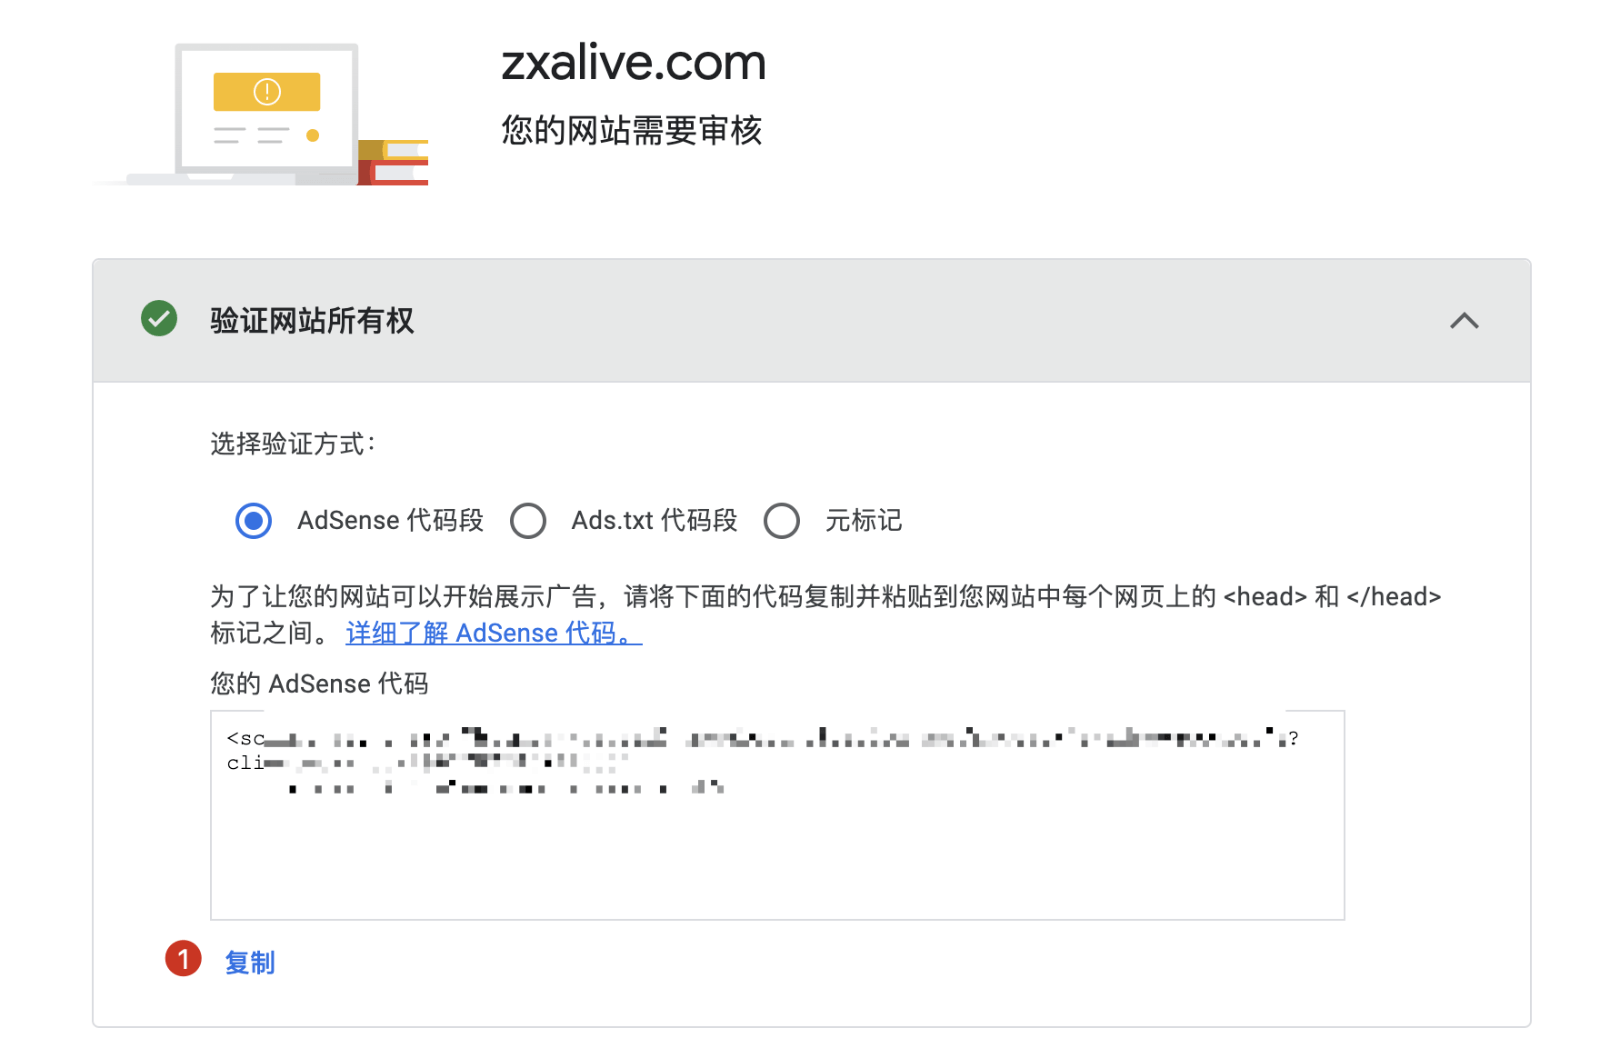
js脚本复制到网站中每个网页上的
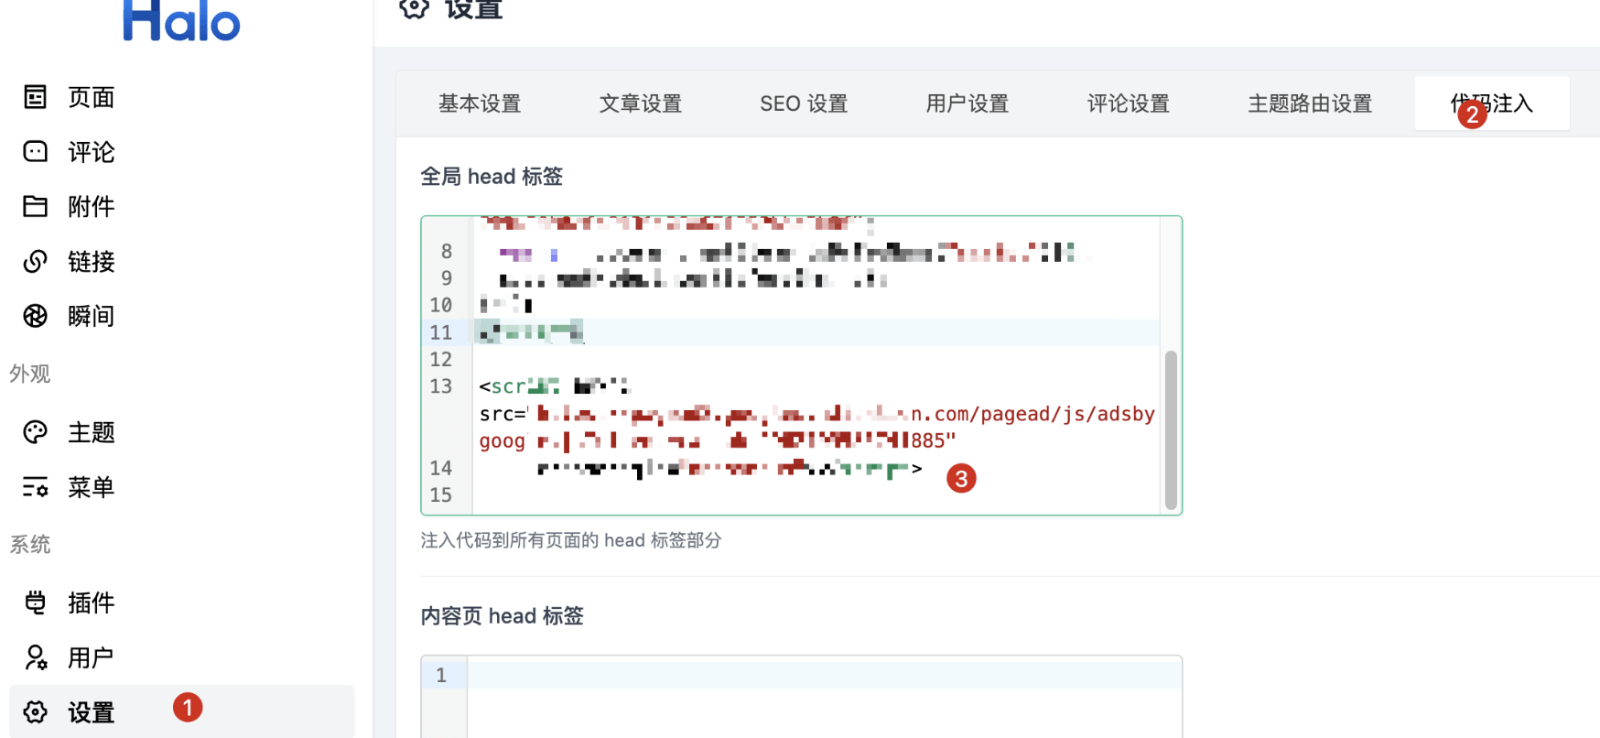
和 标记之间。halo博客可以看下面第二张图全局设置,记得保存:
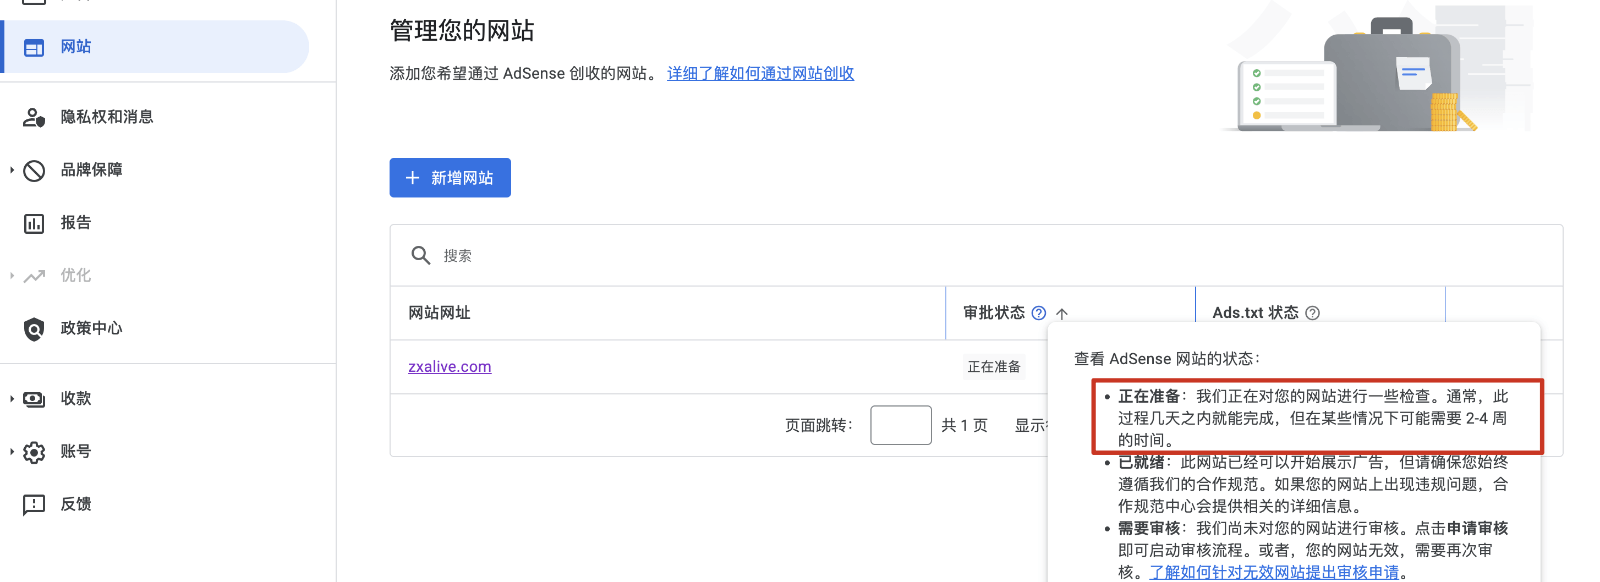
设置完后点击:申请审核按钮
需要2-4周时间:
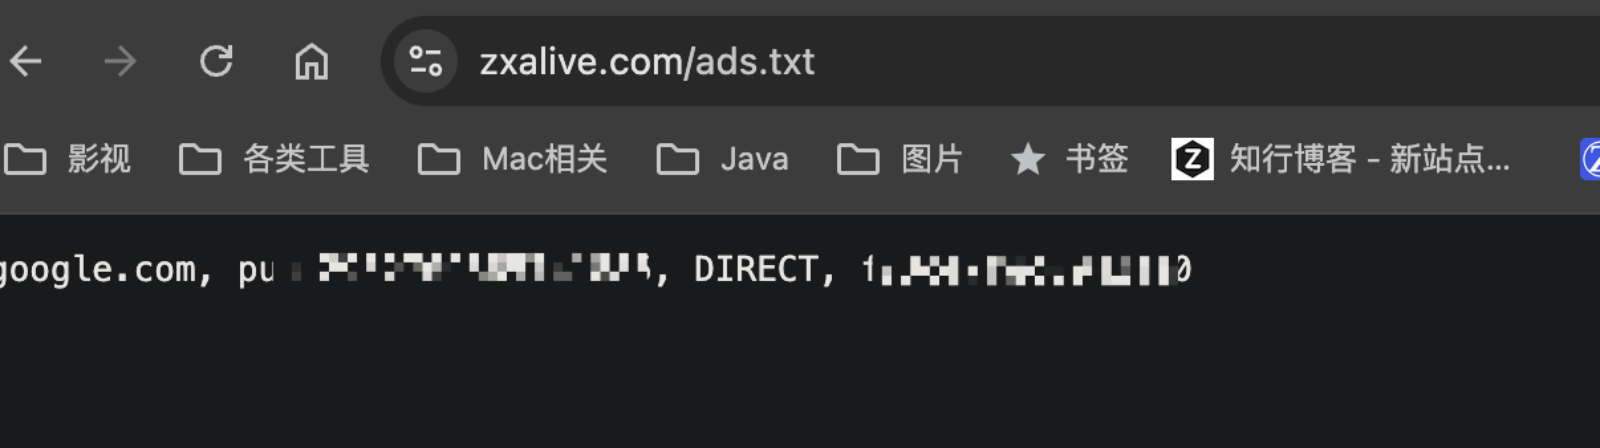
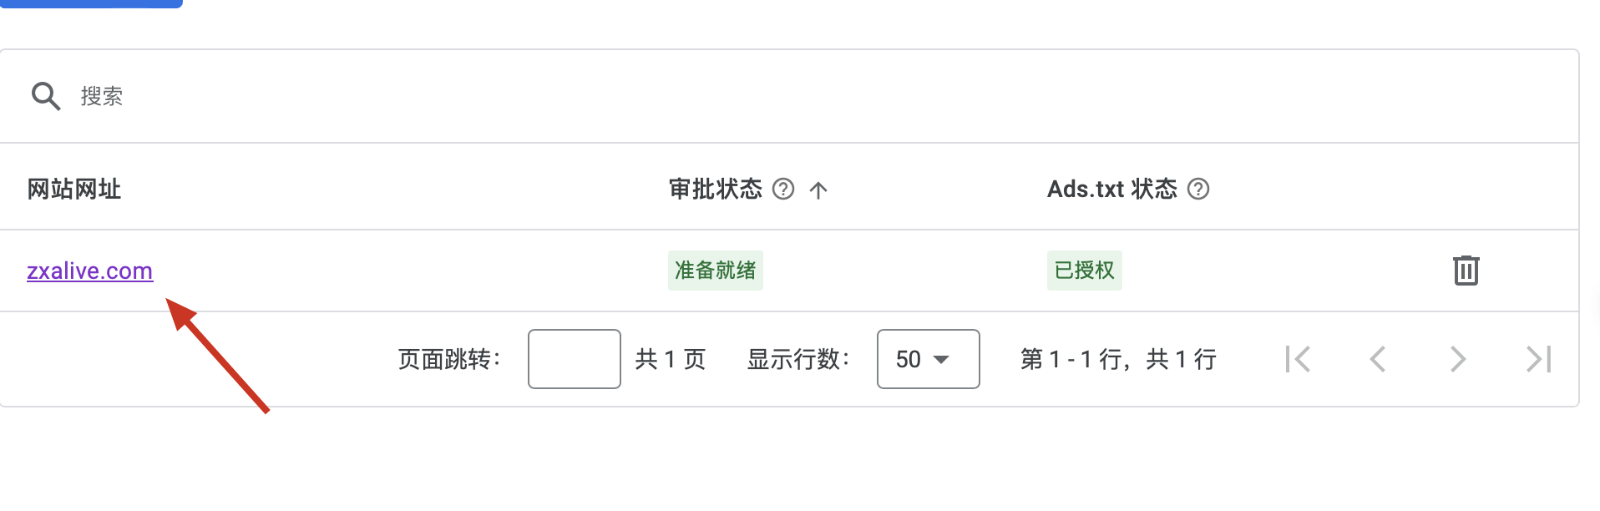
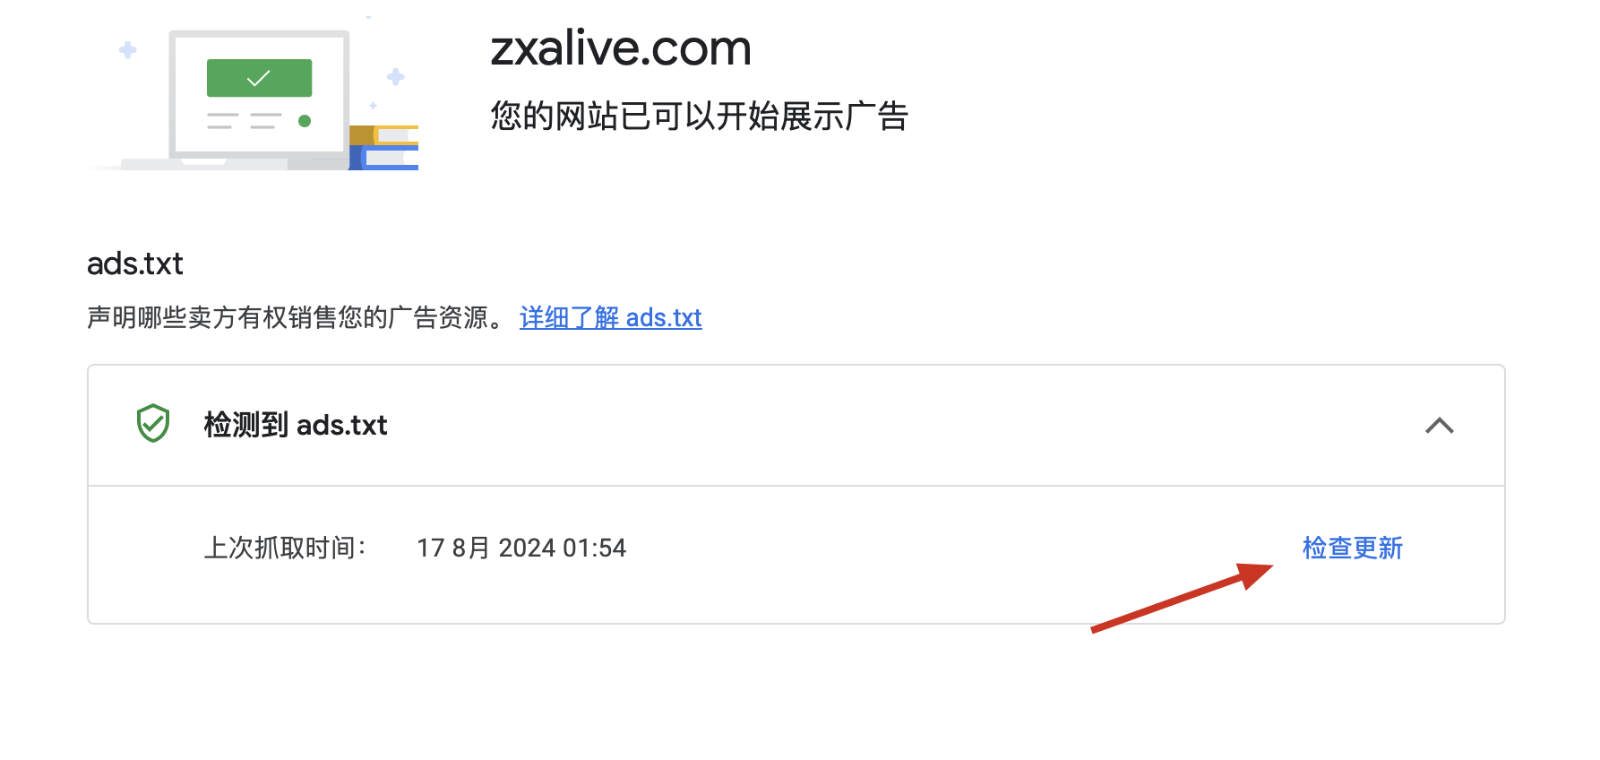
部署ads.txt文件(必须)
创建目录
1
|
mkdir /root/halo/halo2/static
|
将文件放入目录
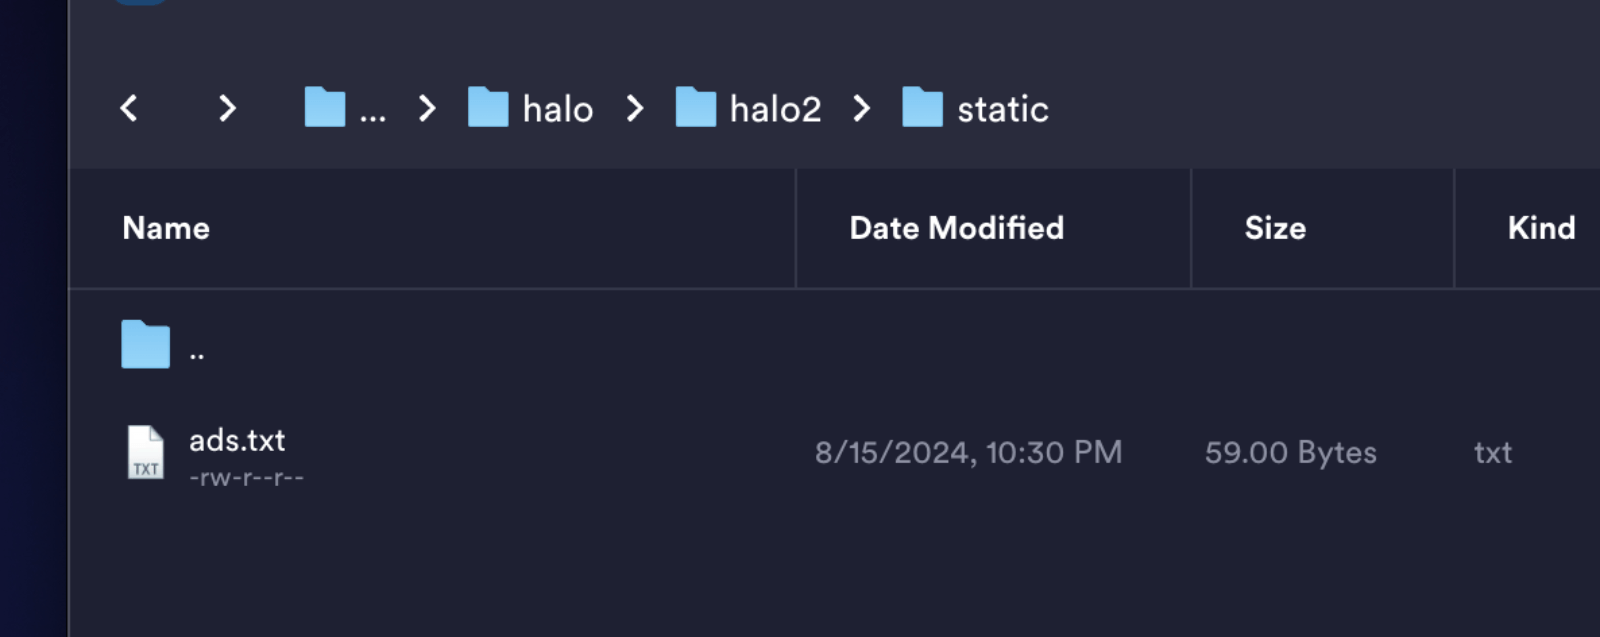
检查
google更新ads检测
Google AdSense 集成 Google Analytics
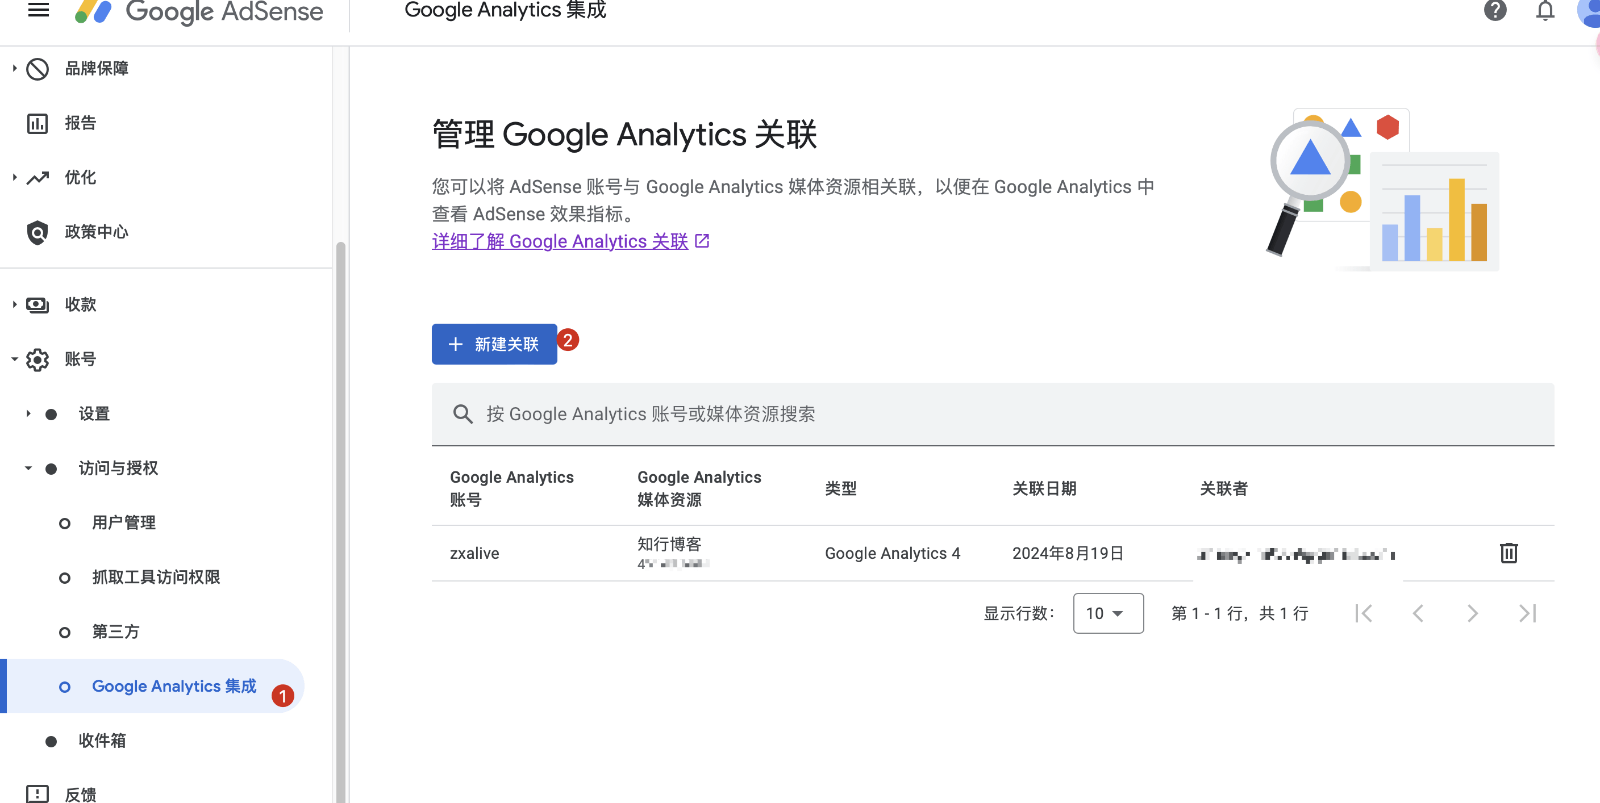
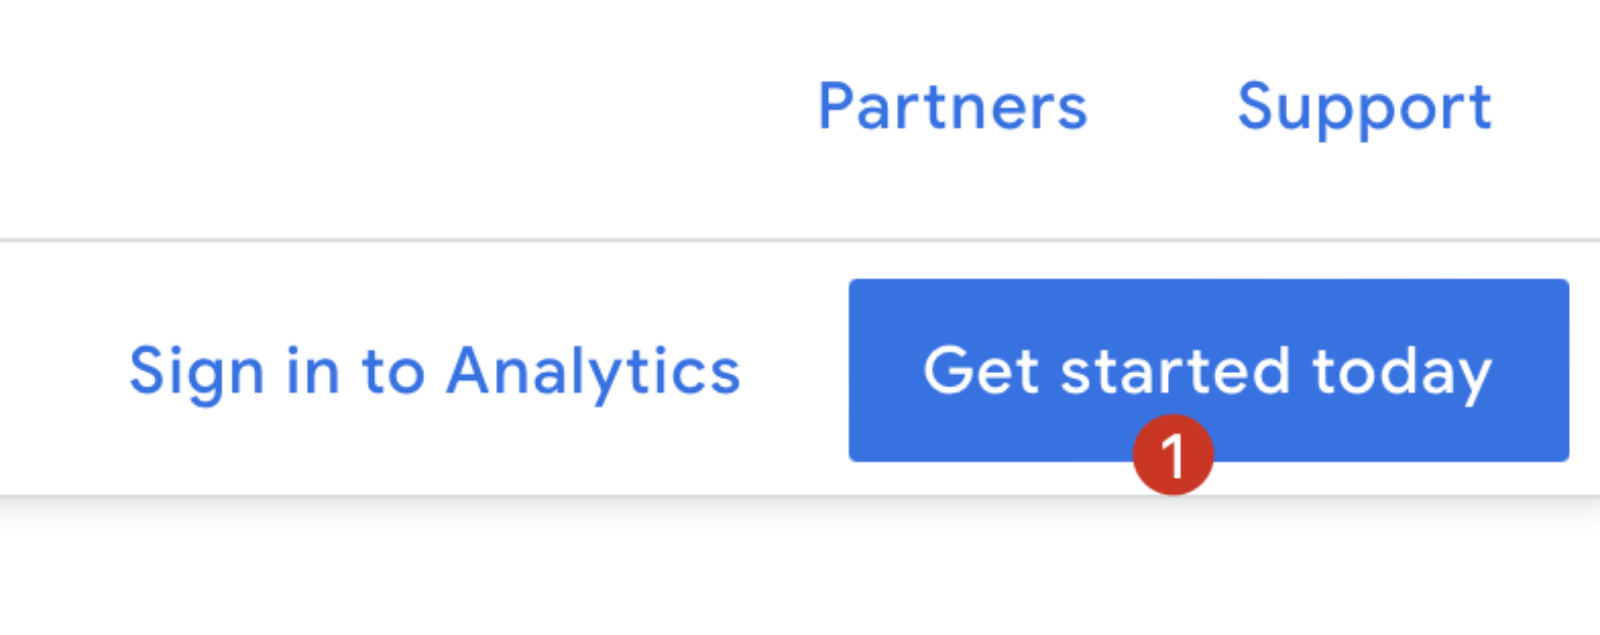
没有analytics账号?去注册:https://marketingplatform.google.com/about/analytics/
右上角点击1处,一步一步注册就好
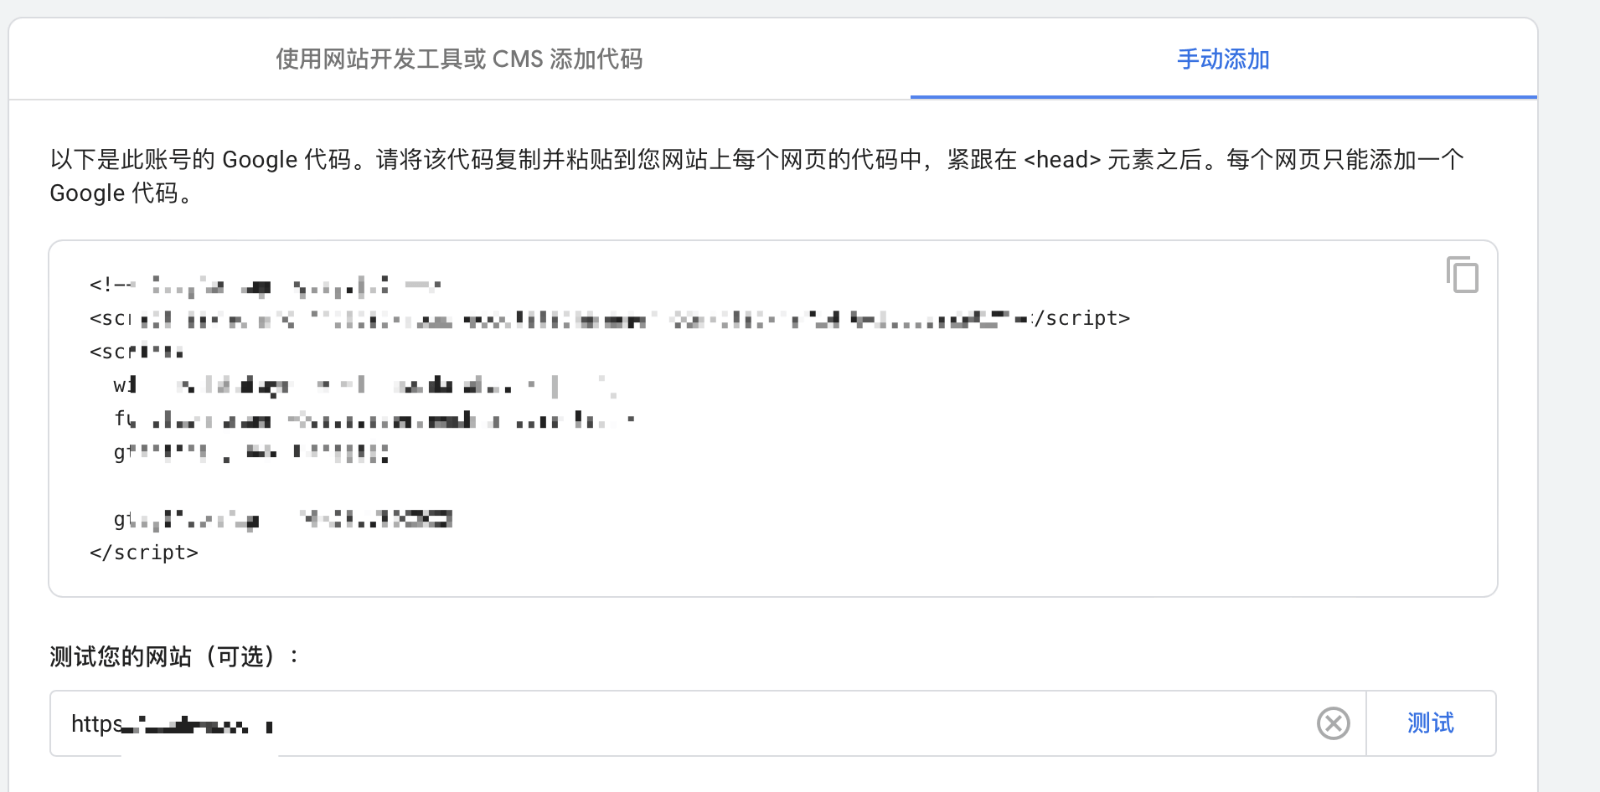
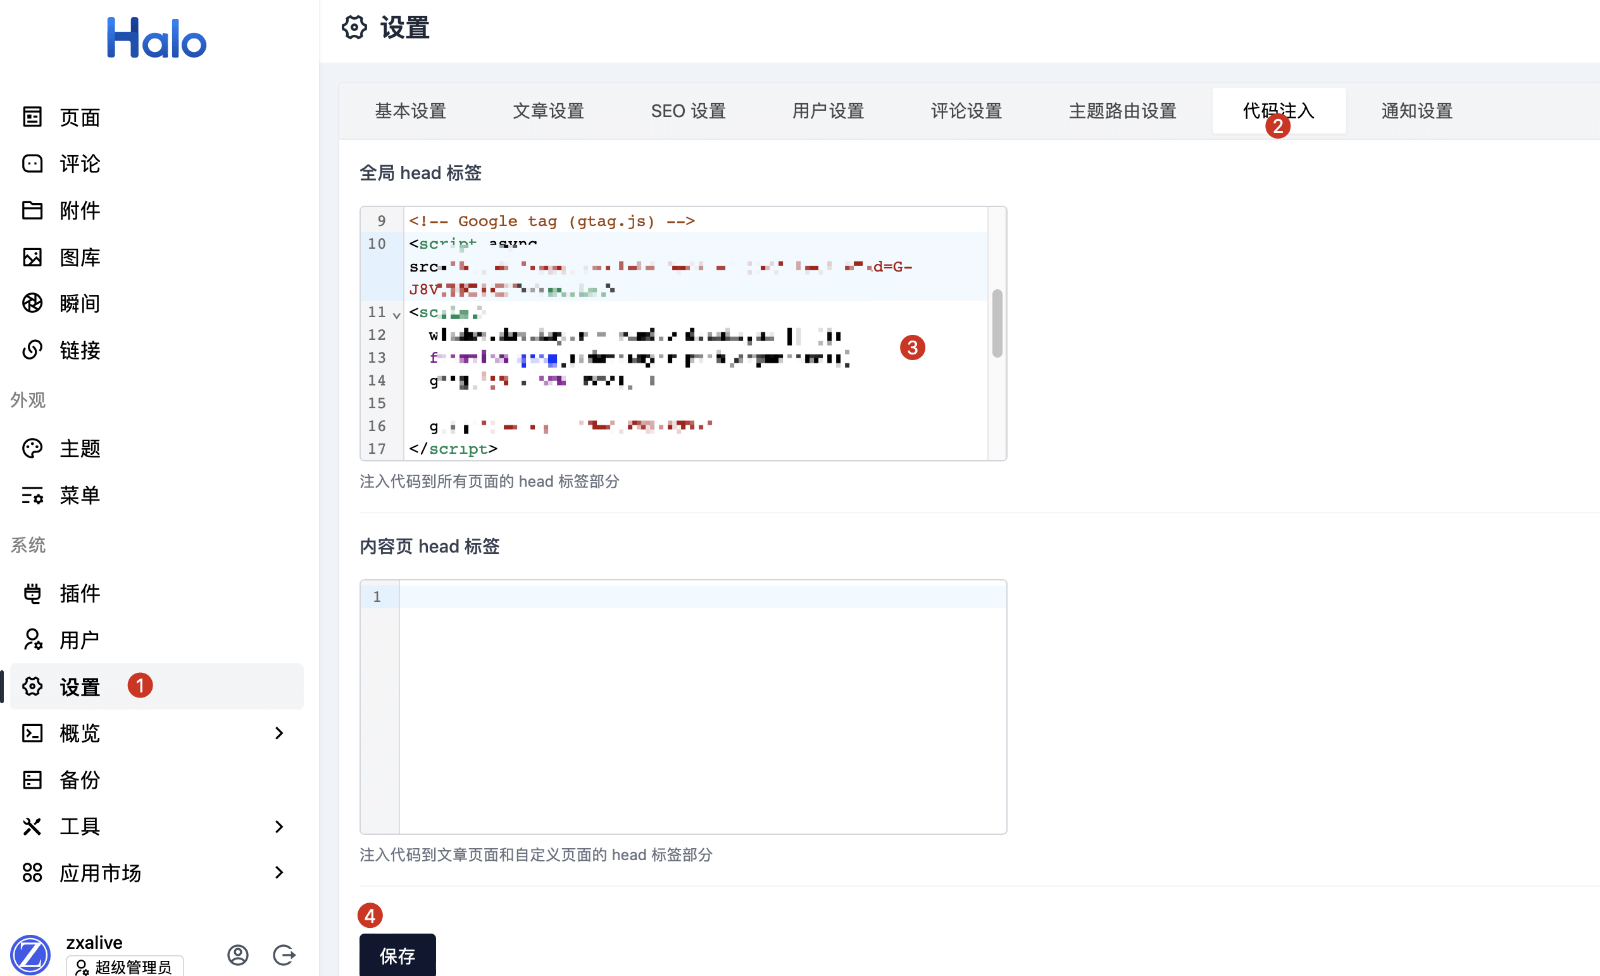
将js代码注入到自己的网站需要分析的页面中,取决于你用的cms管理框架,我这里用的halo,见下图二。一般cms都有全局js代码注入功能。
注入halo:
halo-theme-earth不同配色下使用不同logo
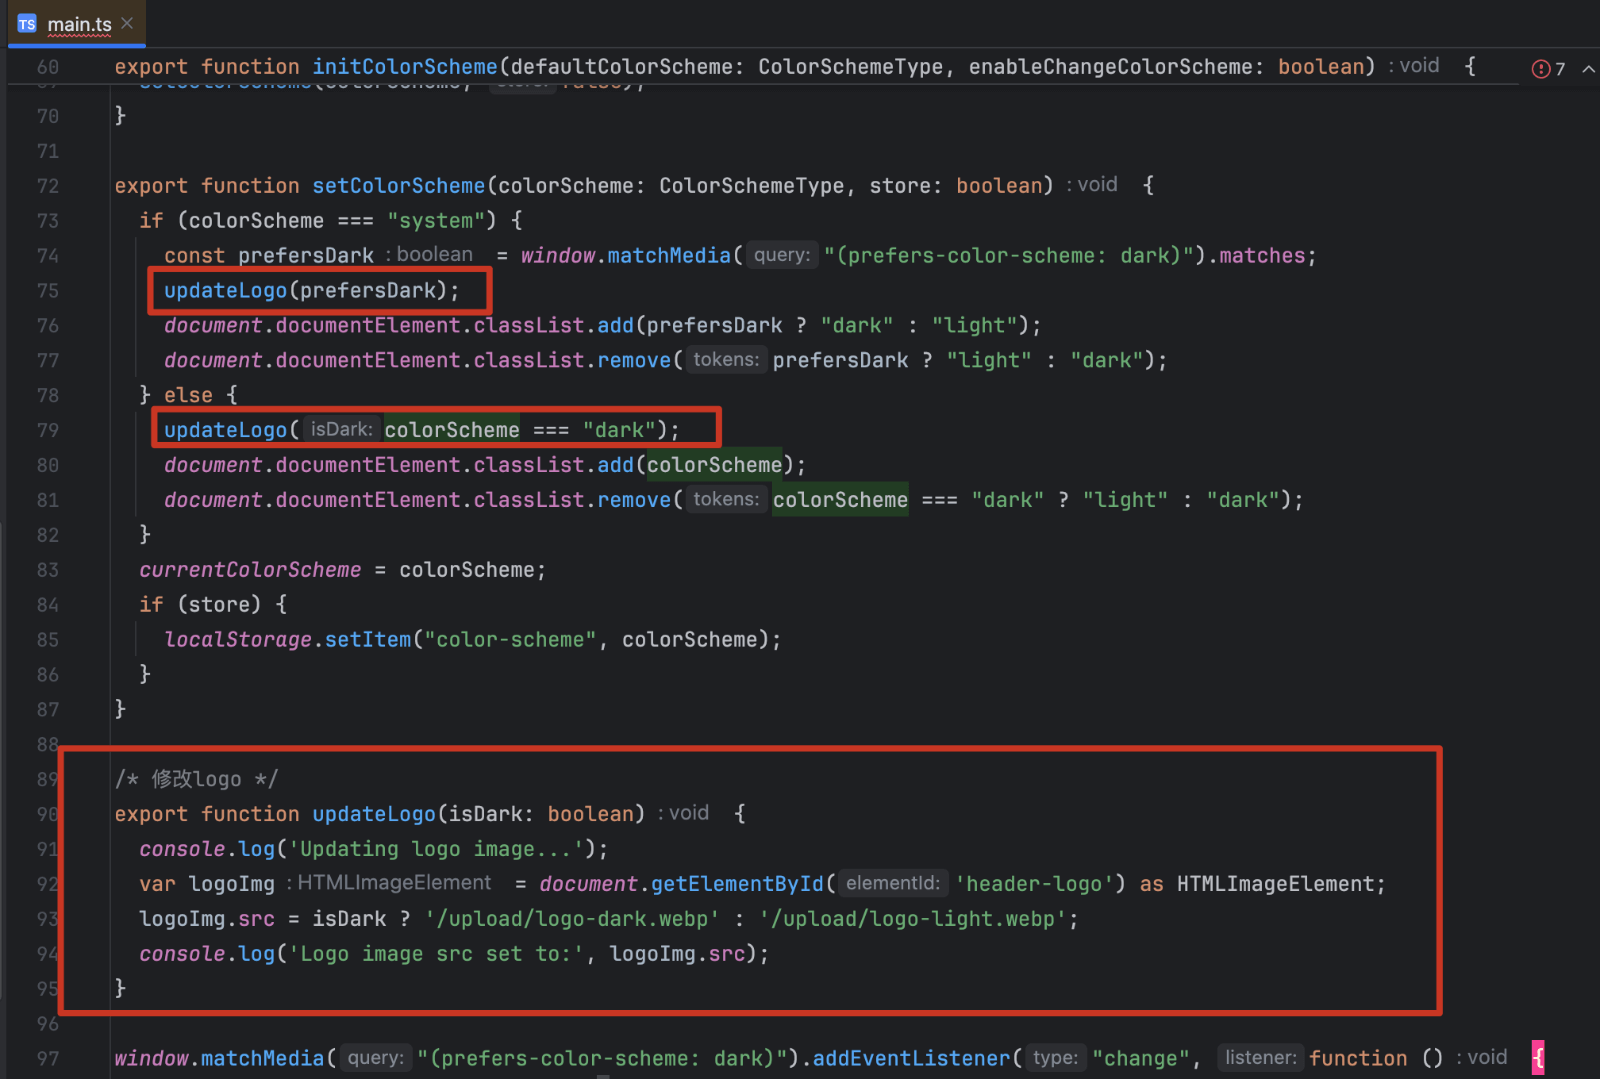
第一步:改main.ts
/theme-earth/src/main.ts
加3处代码,如图所示,代码在图的下面。
 1
 2
 3
 4
 5
 6
 7
 8
 9
10
11
12
13
|
updateLogo(prefersDark);

updateLogo(colorScheme === "dark");

/* 修改logo */
export function updateLogo(isDark: boolean) {
  console.log('Updating logo image...');
  var logoImg = document.getElementById('header-logo') as HTMLImageElement;
  /* 在halo后台附件上传好要用的logo图片。
        黑色模式下:用logo-dark.webp图片 白色模式下:用logo-light.webp图片*/
  logoImg.src = isDark ? '/upload/logo-dark.webp' : '/upload/logo-light.webp';
  console.log('Logo image src set to:', logoImg.src);
}
|
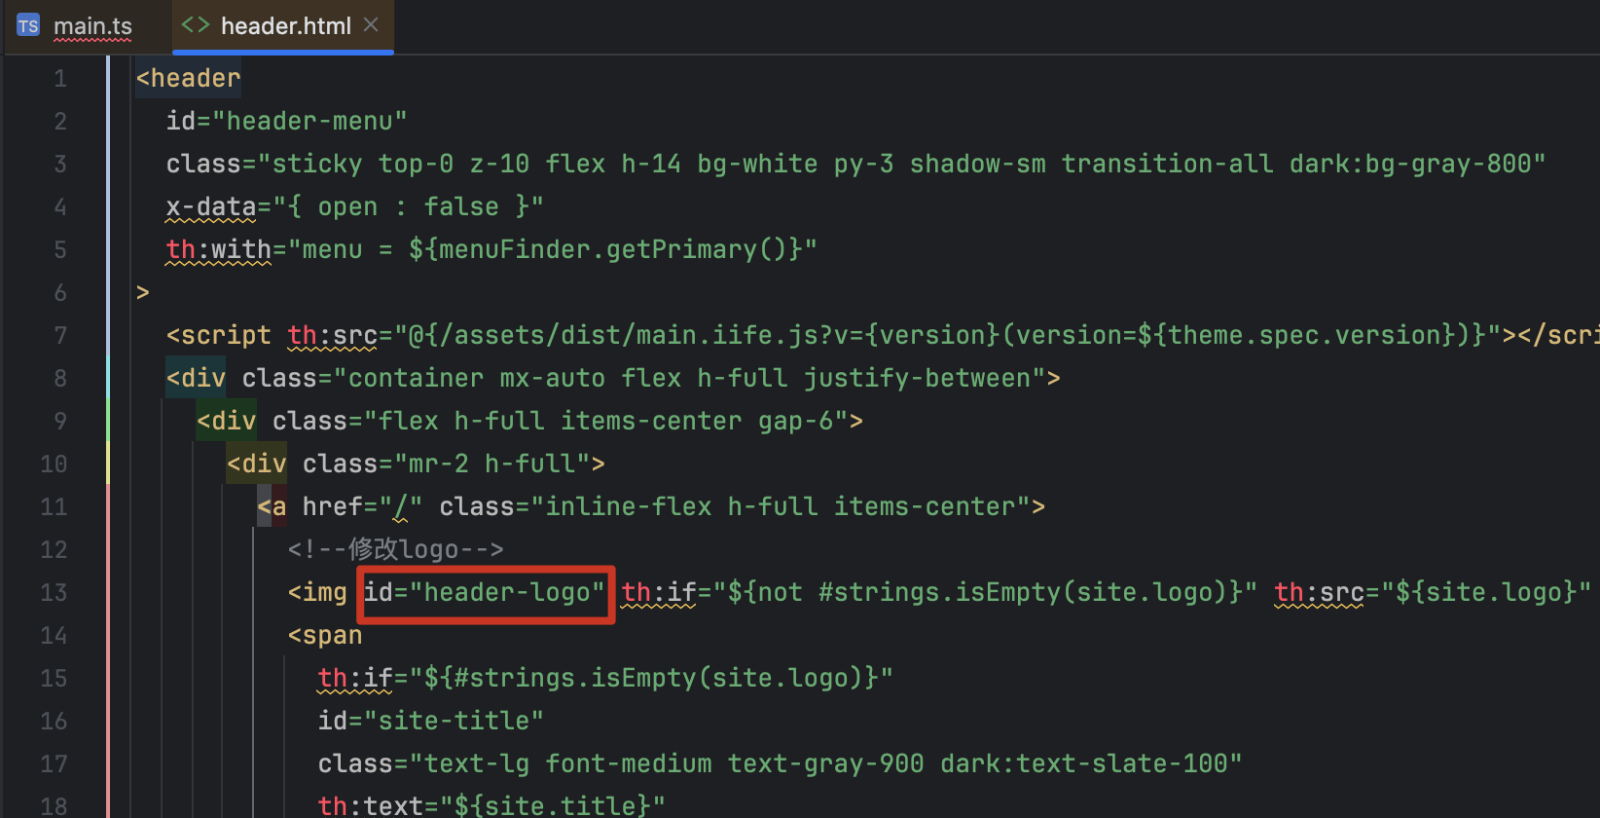
第二步:修改header.html
/theme-earth/templates/modules/header.html
img标签里面加上id=“header-logo” 即可
第三步:刷新主题缓存
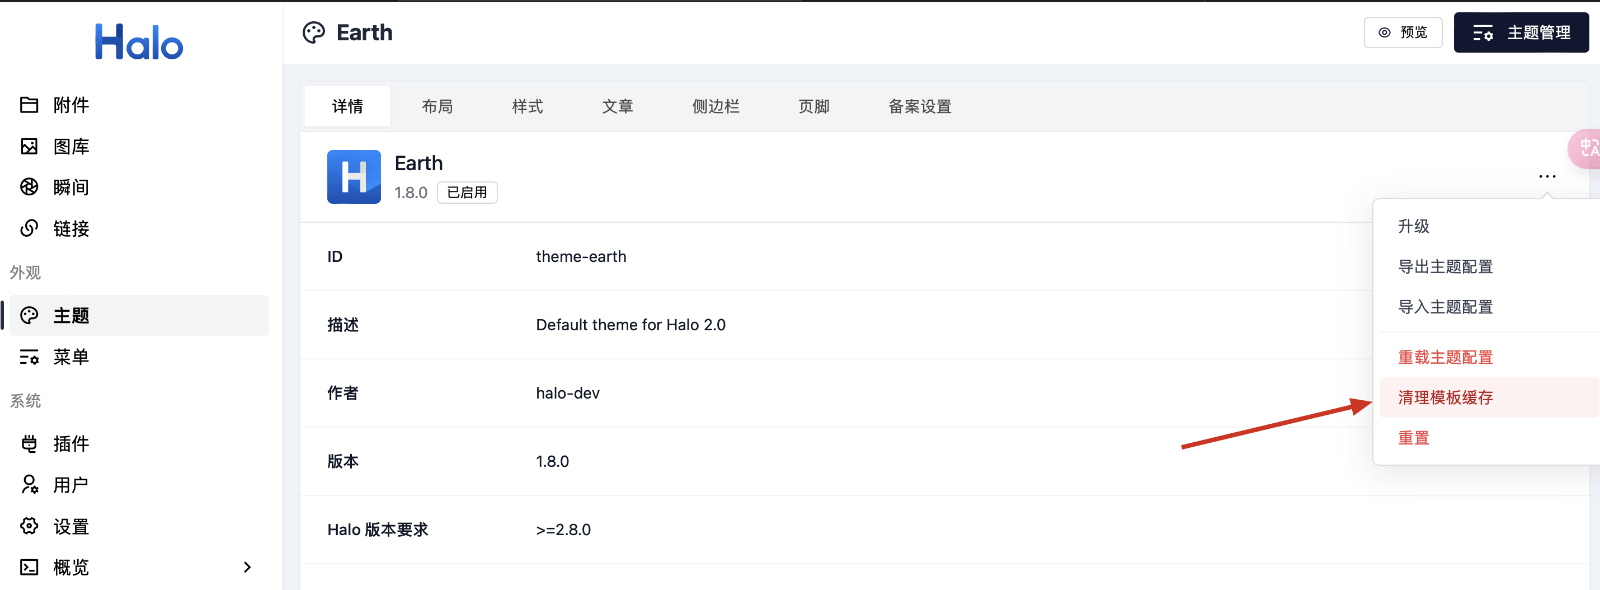
第四步:如果你的halo装了本地静态缓存插件,需要刷新缓存
Halo-Joe3主题-优化-删除Powered by-删除Theme by
在服务器上找到主题文件夹,用SFTP工具下载到本地
全局搜索关键词,或者按照目录结构找到footer.html文件
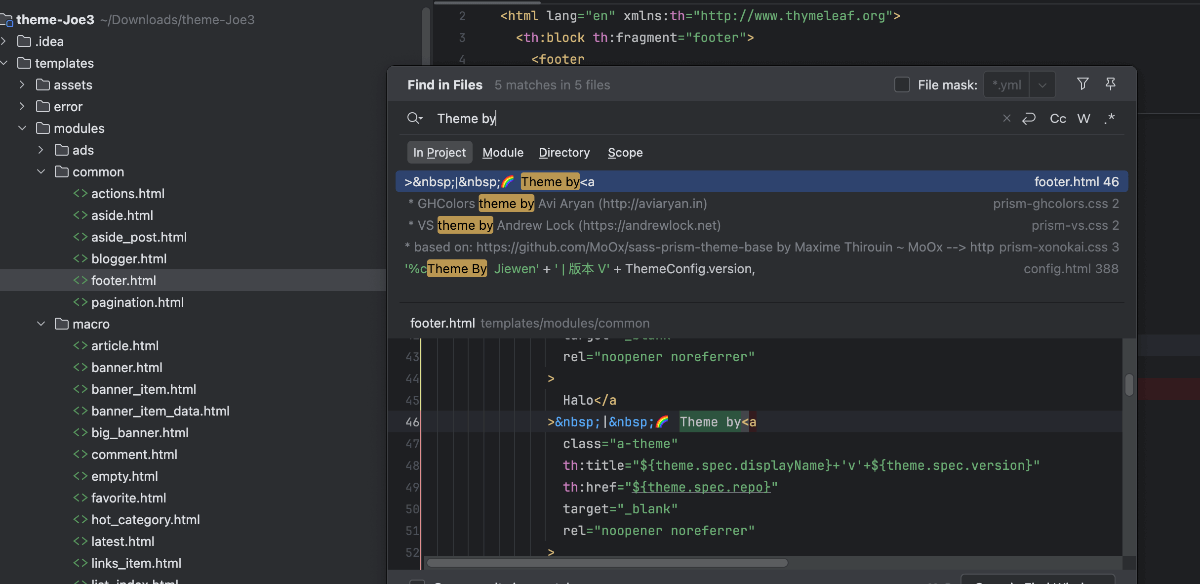
将选中的th标签删除
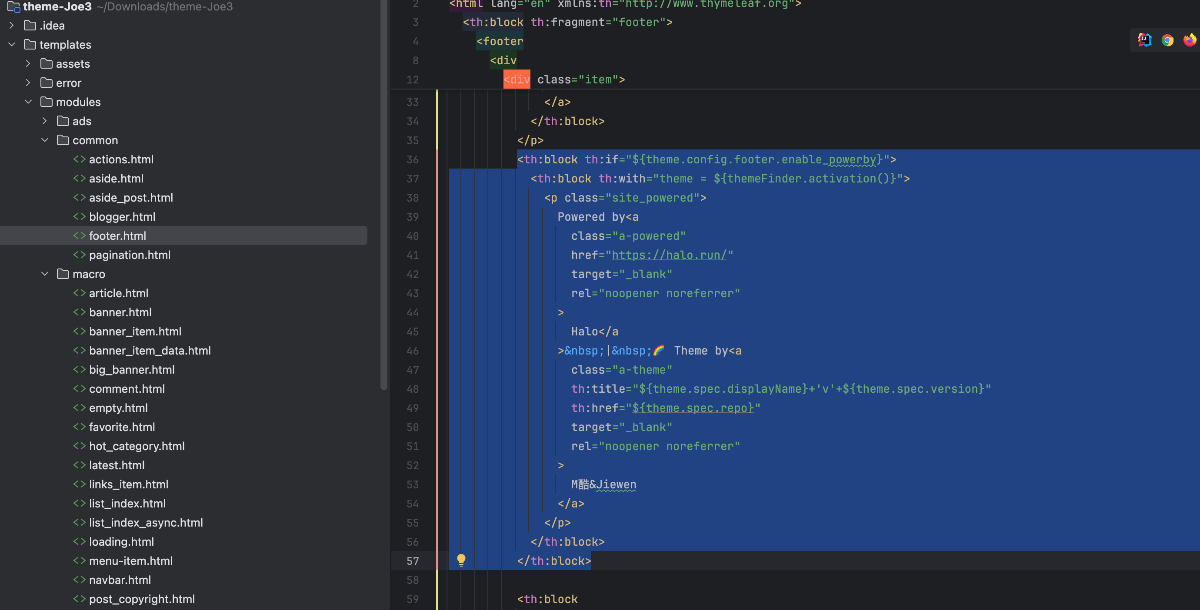
Halo-Joe3主题-优化-减少http请求
删除我选中的
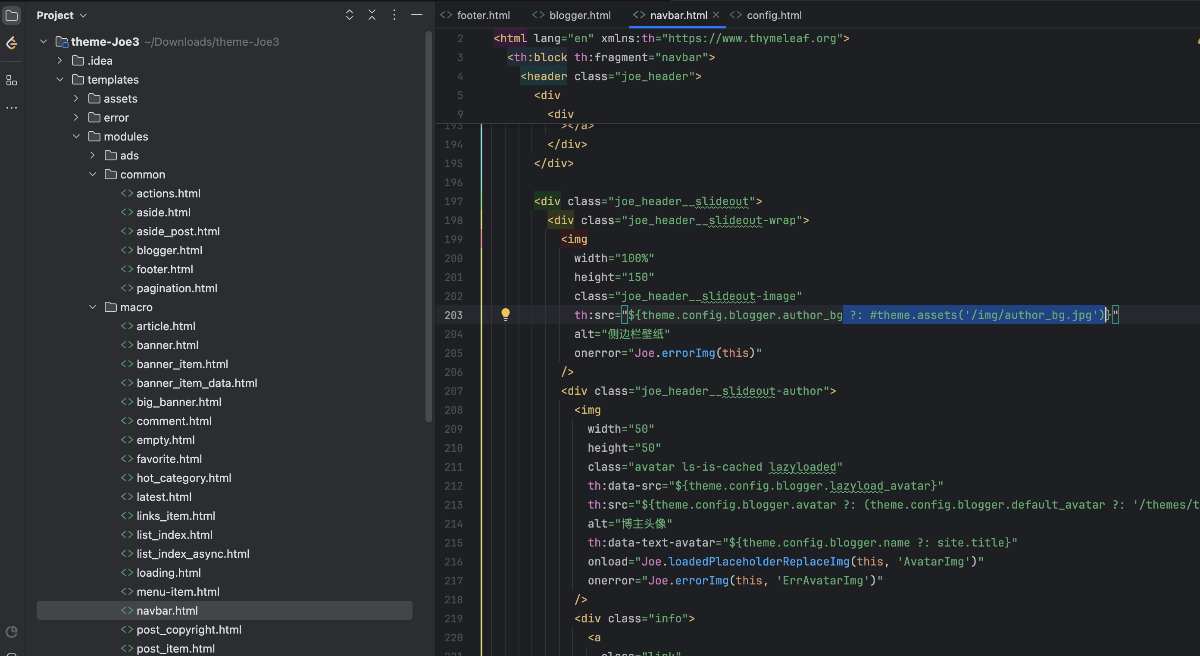
解决Halo-Joe3主题-暴露ip地址
点击这里之后地址栏显示ip访问
修改docker-compose.yaml文件,也就是下图最后一行
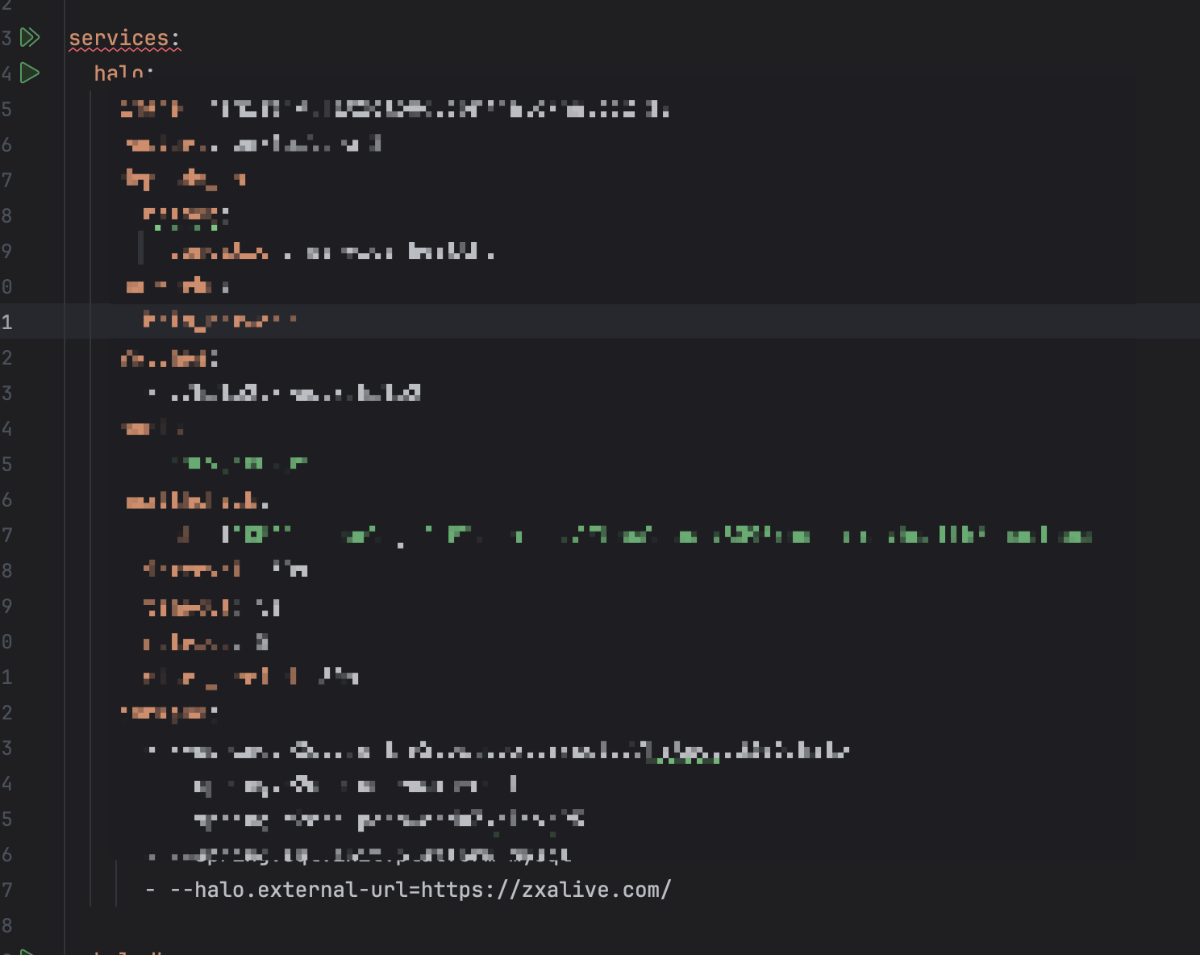
然后重新构建容器
反复查看容器状态,等到显示healthy就可以访问了

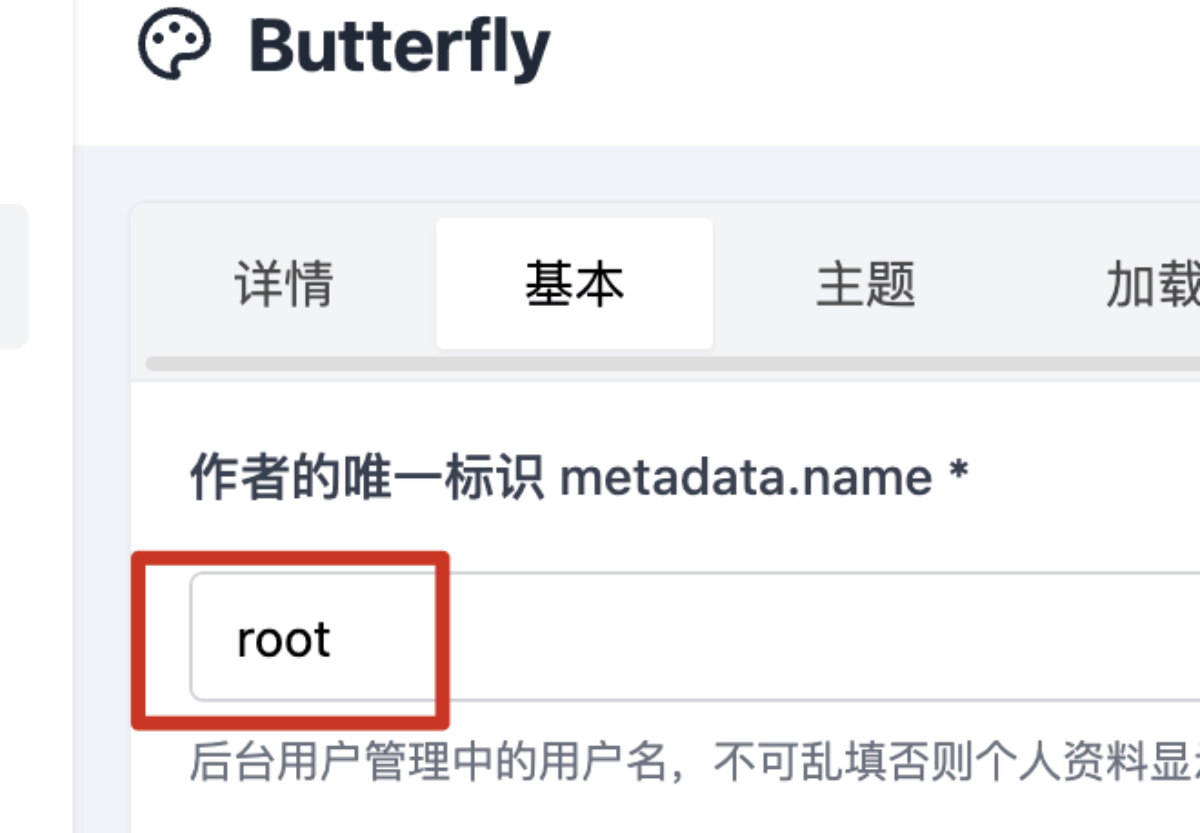
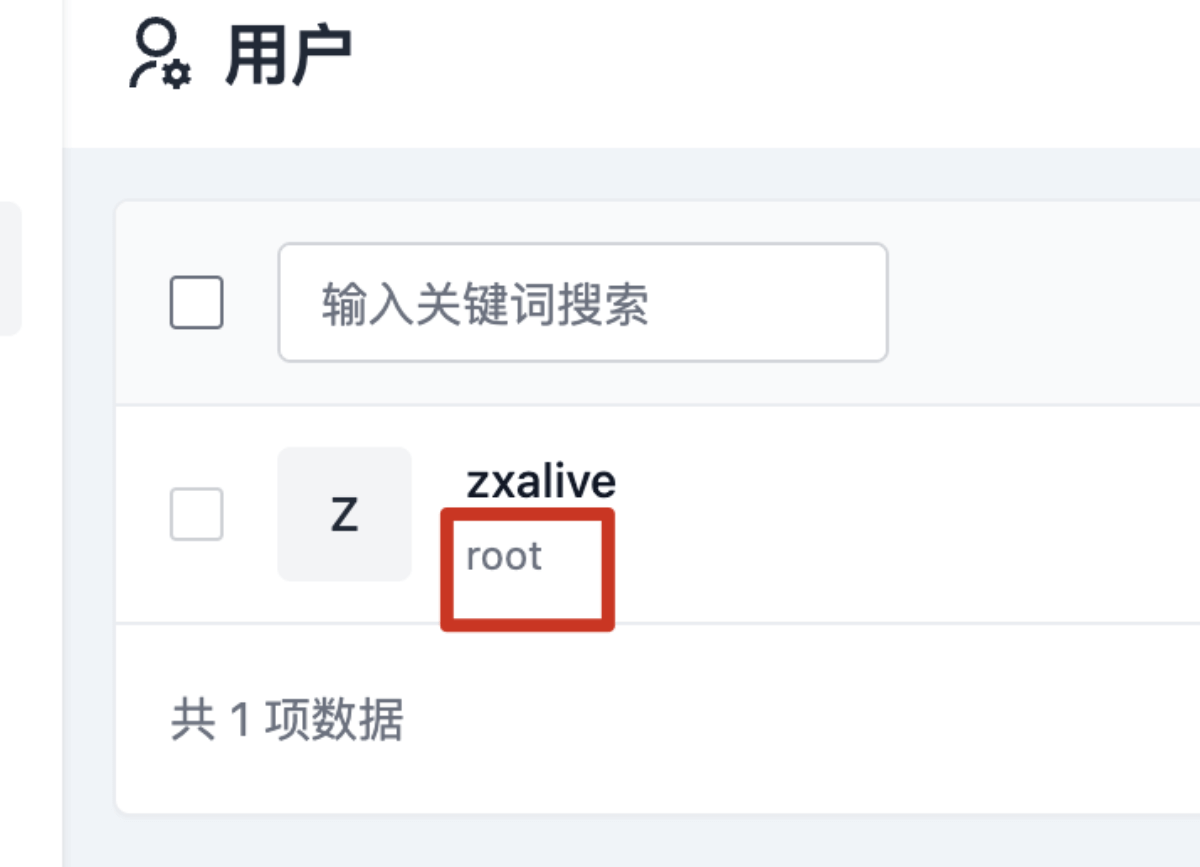
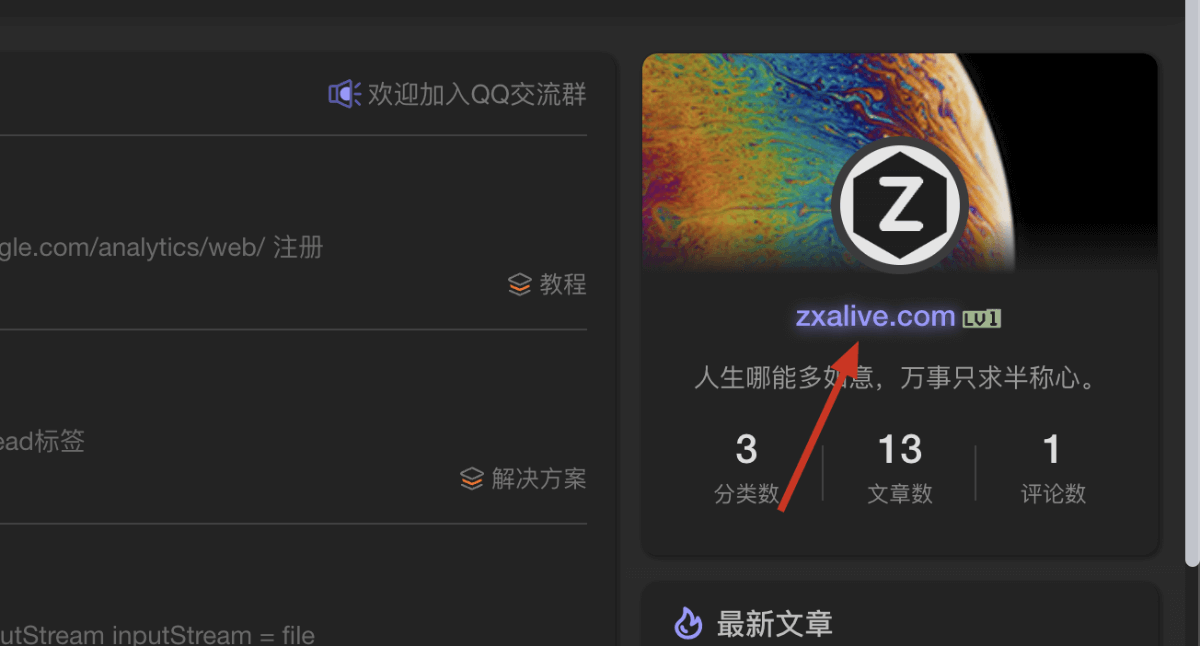
解决halo新建站点却出现 “已删除用户” 字样 且无法删除
这两个保持一致即可